
Instant Switch
Installation
Instant Switch uses a CR2032 coin cell battery.
If installing into a gang box, be sure to use the Ground Wire Assembly.
All iDevices products work with both iOS and Android mobile devices.
What's included:
- iDevices Instant Switch with CR2032 battery (pre-Installed)
- iDevices custom faceplate
- (2) Command™ Strips from 3M
- Ground Wire Assembly
- (2) 22mm phillips screws for gang box installations
- (2) 6mm standard screws for installing standard faceplates, (not included)
There are 3 methods in which you may install your Instant Switch:
- By itself on the wall, using the provided Command™ Strip from 3M and iDevices custom faceplate or a standard rocker faceplate of your choice.
- Next to an existing gang box, using the provided Command™ Strip from 3M and a multiple switch faceplate of your choice (not included).
- Installed directly into a gang box using a standard rocker style faceplate (not included).
Install on a wall:
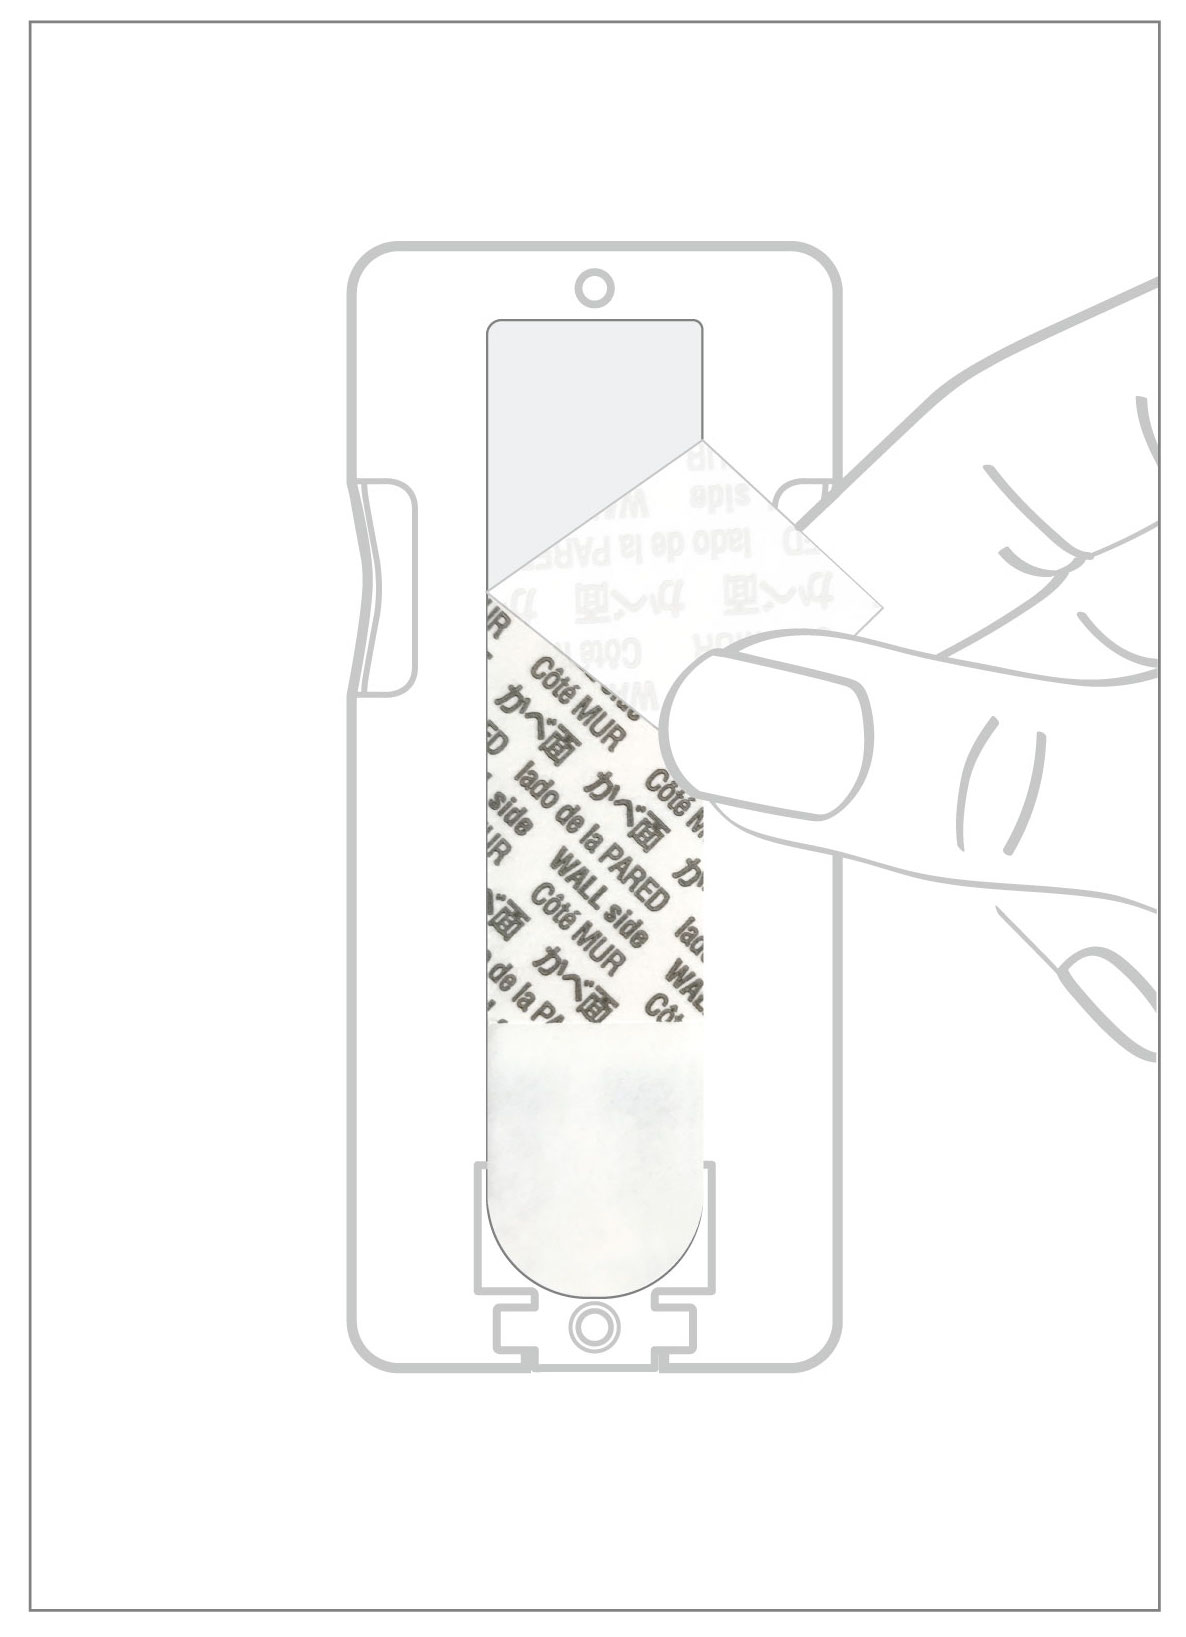
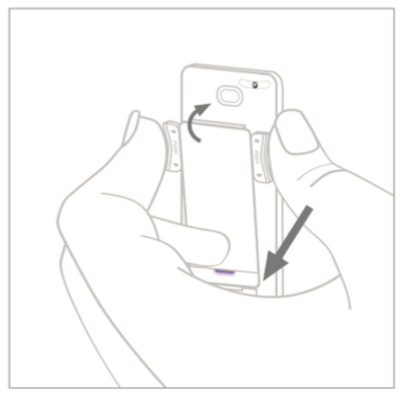
- To mount your Instant Switch directly onto a wall, first thoroughly clean the wall's surface with isopropyl alcohol to remove any dirt or dust.
- Remove the plastic backing to the Command™ Strip from 3M and align the strip with the recessed area on the back of the Instant Switch.
- Peel off the other side of the plastic backing and ensure that the product is level before pressing firmly to the wall. Hold for 30 seconds.
- Install the magnetic iDevices faceplate or a rocker style faceplate of your choice. If the faceplate you choose requires screws, use the shorter, 6mm screws provided to anchor the faceplate to the Instant Switch.
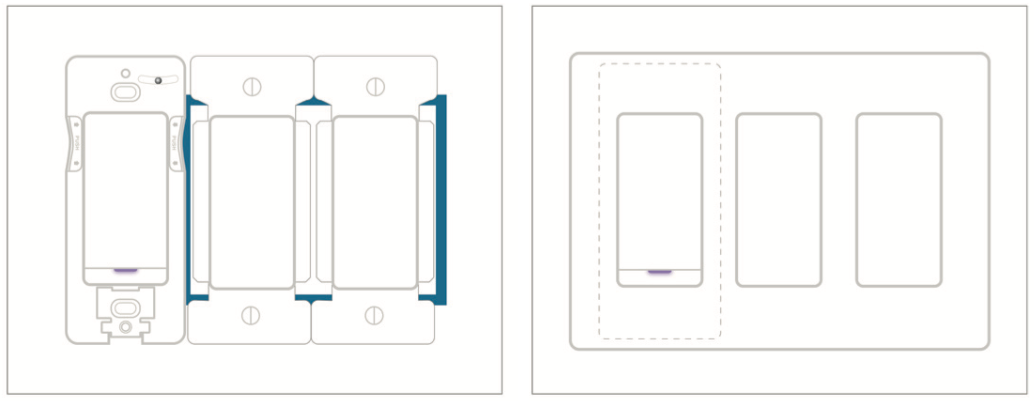
Install next to a gang box:
- Install the Command™ Strip from 3M onto the back of the Instant Switch.
- Mount the faceplate onto the Instant Switch using the provided 6mm screws.
- Peel off the plastic backing of the Command™ Strip from 3M.
- Carefully line up your faceplate with the existing wall switches and press to the wall for 30 seconds.
- Install the remaining faceplate screws into the adjacent wall switch(es).
Install into gang box:
When installing into a gang box, you will need the following tools:
- Philips screwdriver
- Flathead screwdriver
1. Turn OFF the power to the circuit you are working on at your home's breaker or fuse panel.
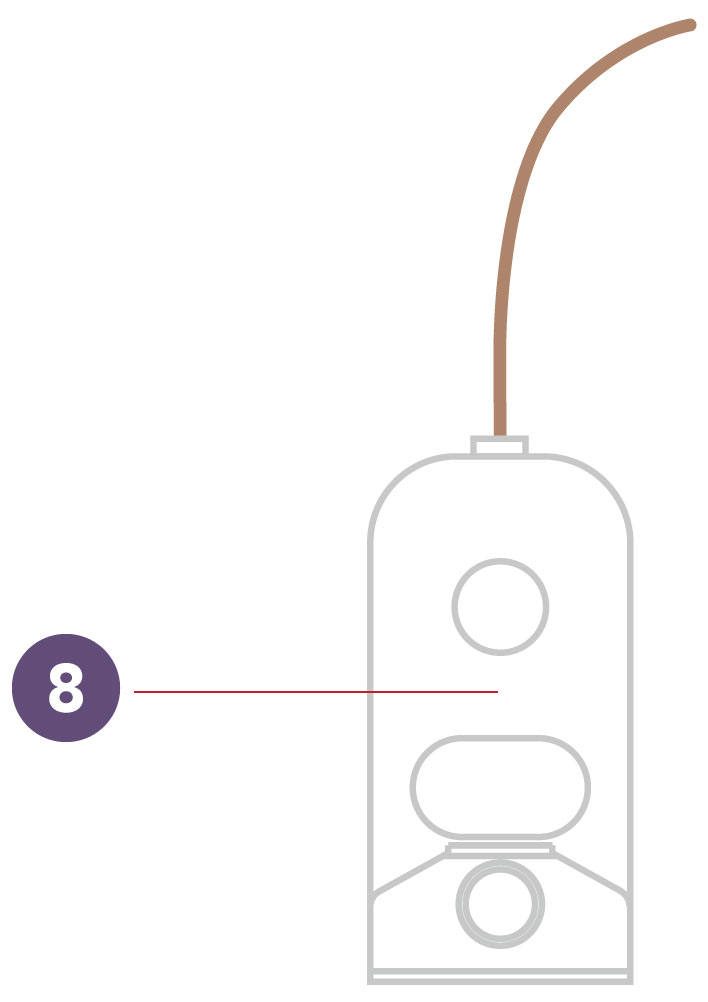
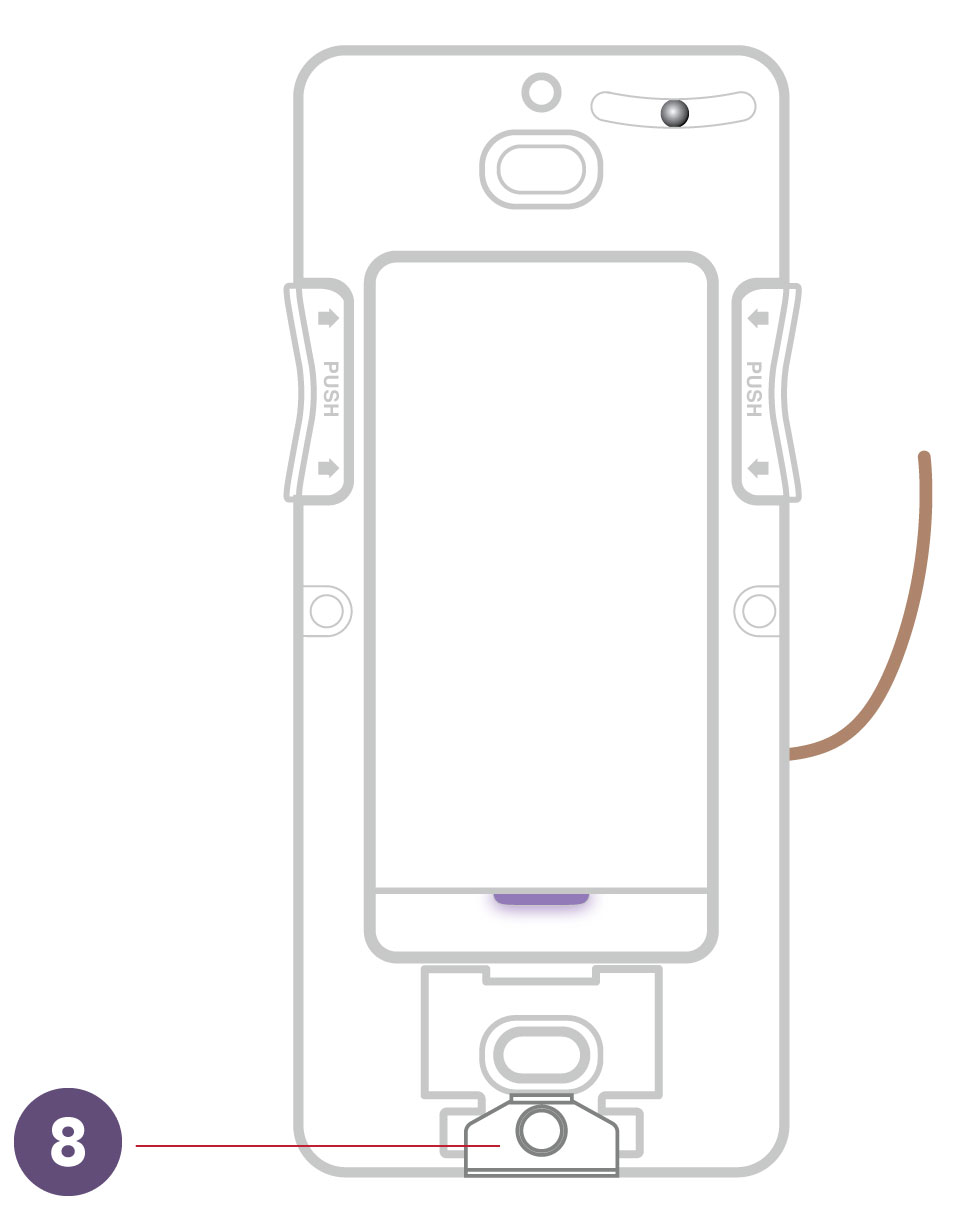
2. Install the ground wire assembly onto the access door of the Instant Switch.
3. Connect the ground wire on the Instant Switch to the ground wire in the gang box, which is usually bare copper or green.
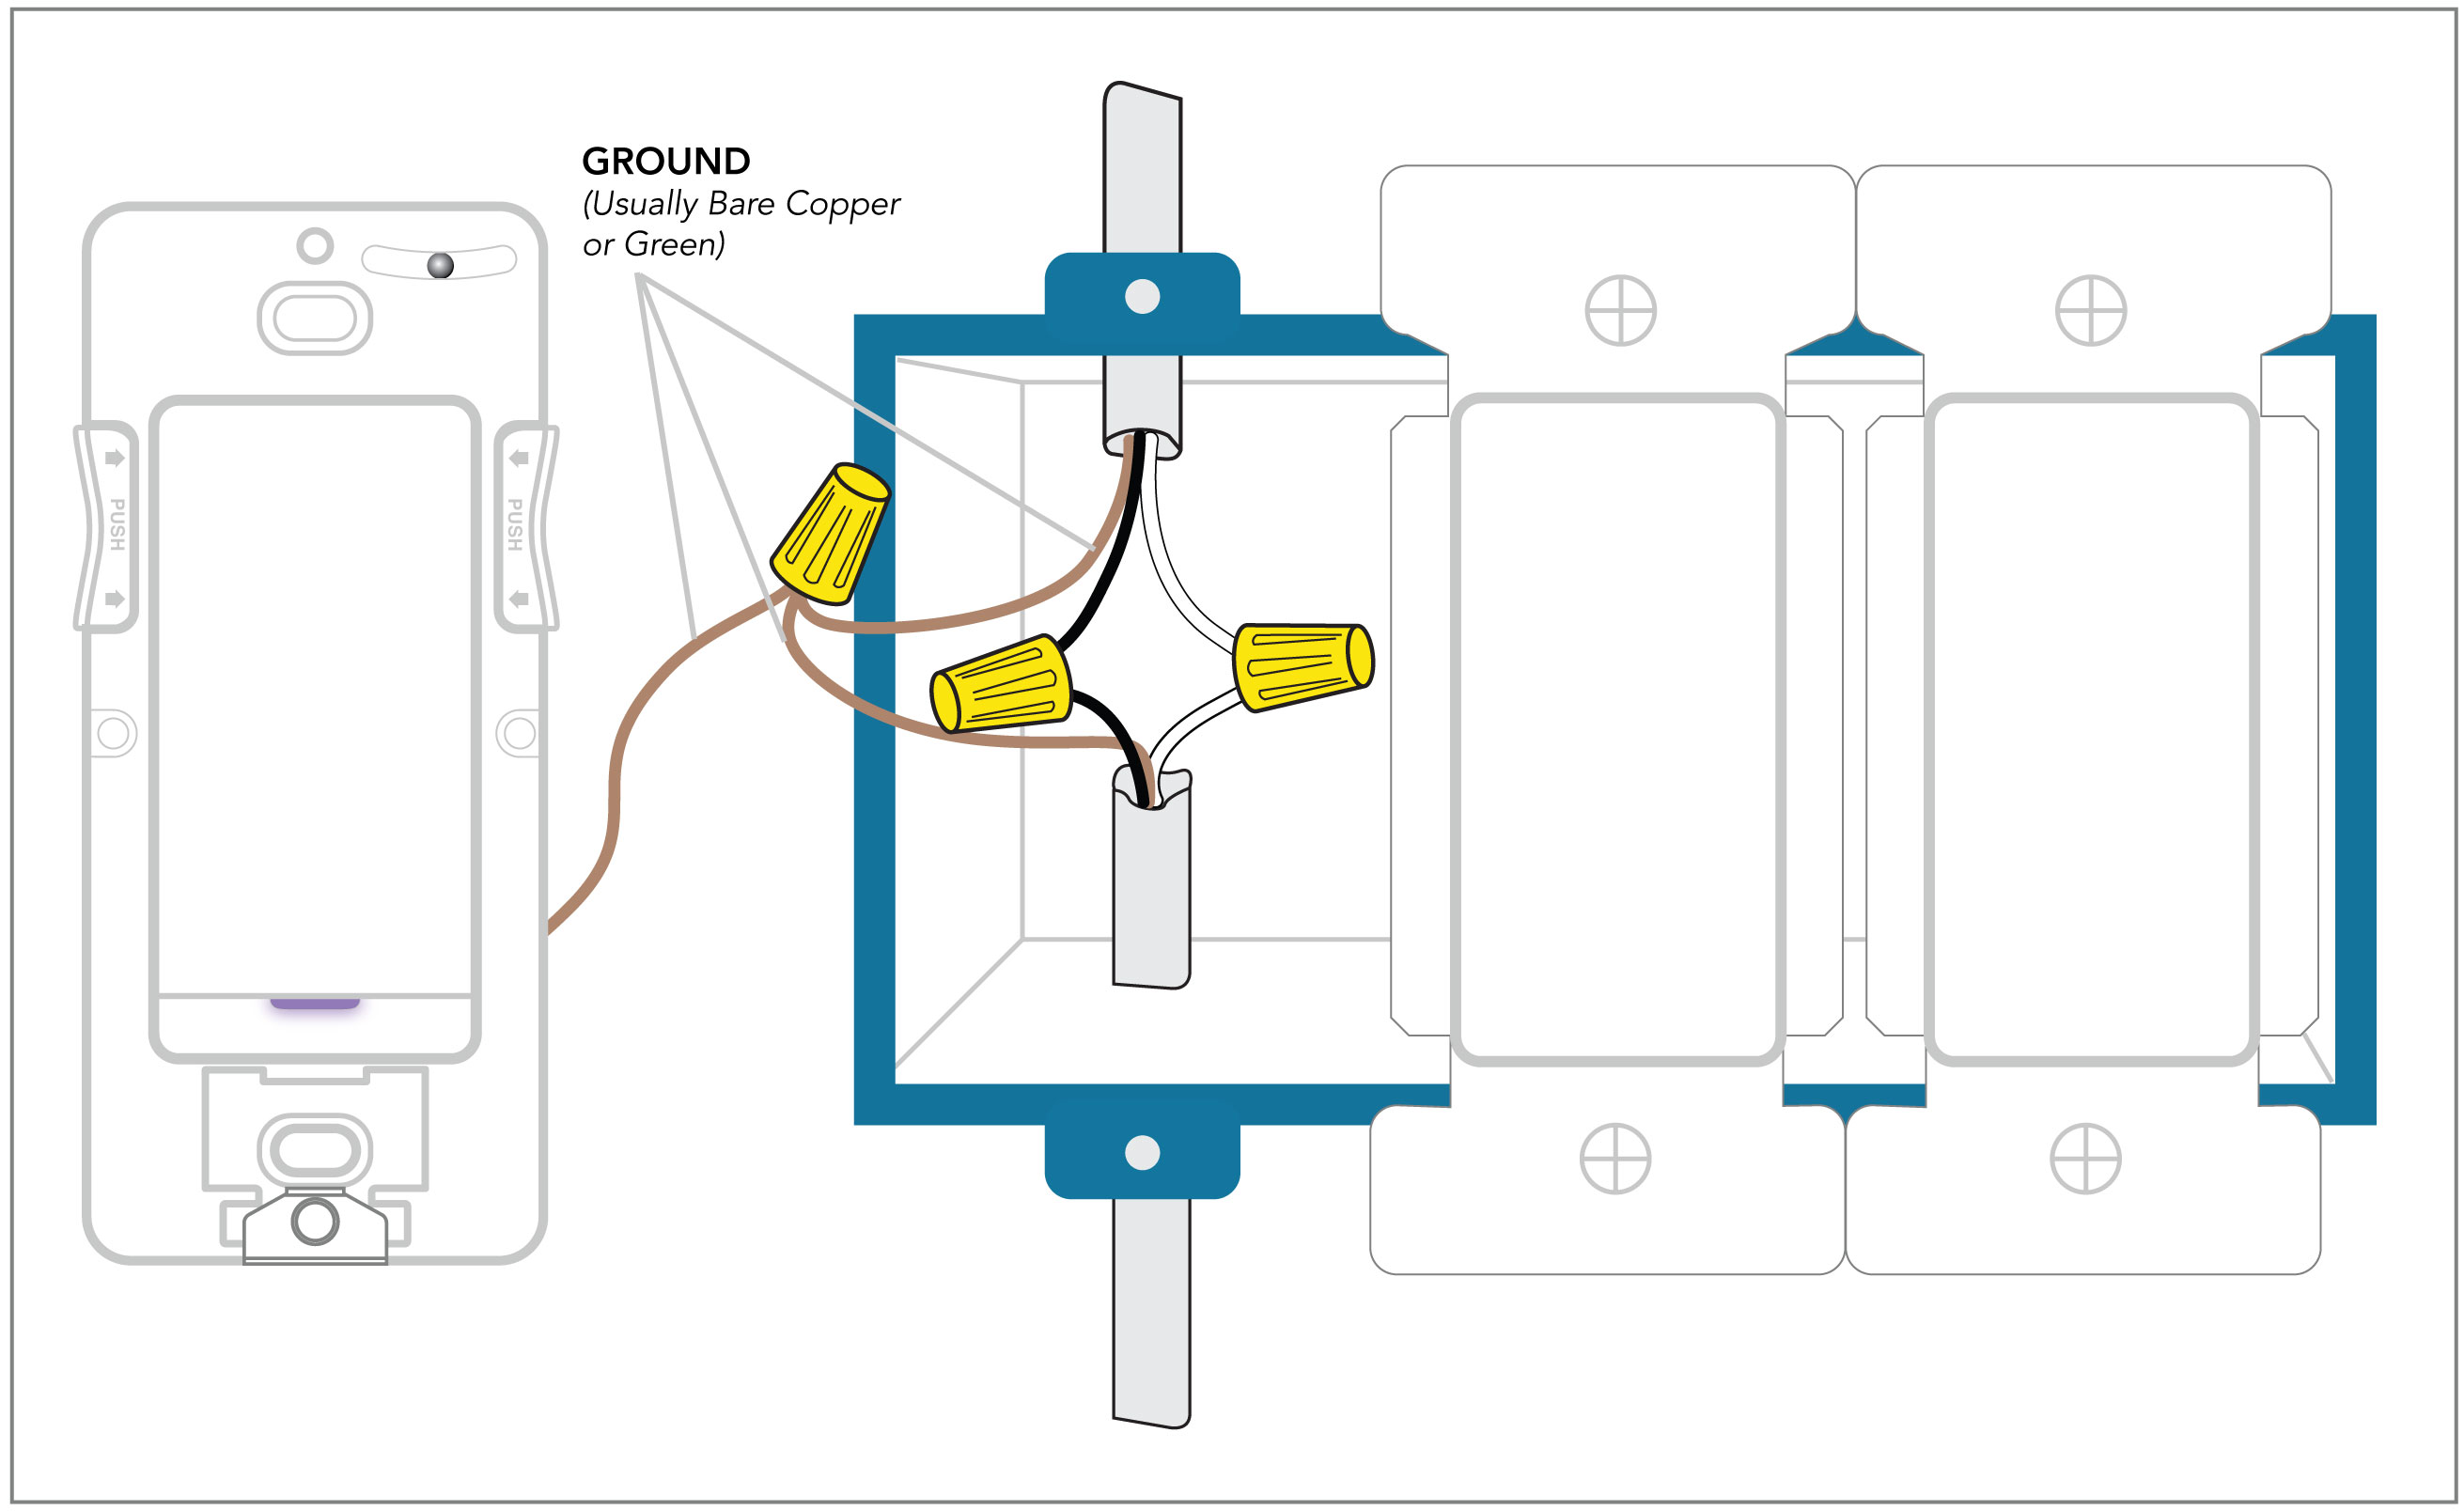
4. If you choose this method of installation, do not use the Command™ Strip from 3M on the back of the product. Instead, use the screws provided to mount it onto the gang box.

5. Install a rocker switch faceplate (not included).
6. Turn the power back ON at your circuit breaker.
iDevices Instant Switch is a wireless Bluetooth controller that connects to one compatible iDevices product. Instant Switch can be connected to iDevices Switch, Socket, Outdoor Switch, Wall Switch, Dimmer Switch, or Wall Outlet.
Before connecting the Instant Switch, be sure your iDevices product has been set up in the iDevices Connected app, is able to be controlled, and running the most up-to-date firmware. For instructions on updating firmware, visit: How to Download New Firmware.
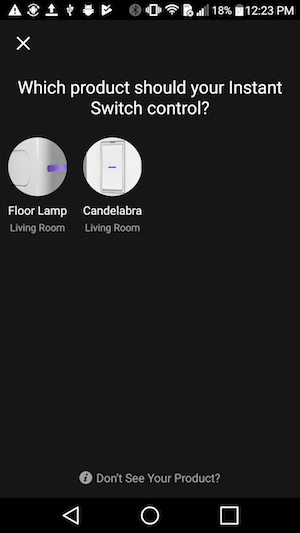
Follow the steps below to connect your Instant Switch to an iDevices product:
1. Remove the battery tab. Pull the plastic tab out from the back of the product and discard it. After pulling the tab, there will be a quick white flash on the Instant Switch LED. Instant Switch will then blink blue for the next 30 minutes to indicate it is ready for pairing and can be seen by the app for setup.
Note: If your Instant Switch does not go to blinking blue, please try replacing the Instant Switch battery.
2. Next, launch the iDevices Connected app. The app will guide you through the setup and placement of the Instant Switch in your home.
3. Tap the menu button (☰) in the upper left-hand corner.
4. Tap "Add Product."
5. Tap "Instant Switch."
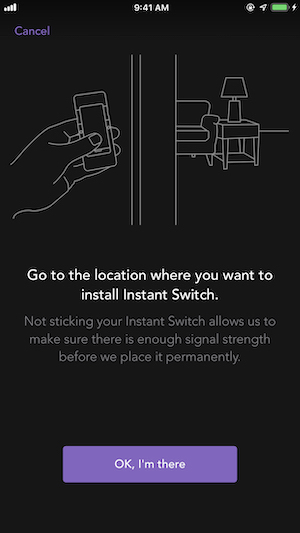
6. Bring the Instant Switch to the location you plan to install it. Once you've reached the location, tap “OK, I'm there."
7. Select the iDevices product that you want to connect your Instant Switch to.

8. The Instant Switch will begin pairing to your iDevices product. The pairing process may take up to 90 seconds if the iDevices product you're connecting with is farther away.
9. Now that Instant Switch is paired, you can install your Instant Switch. For information on installing Instant Switch, visit: Installing iDevices Instant Switch.
iDevices Instant Switch is a wireless Bluetooth controller that connects to one compatible iDevices product. Instant Switch can be connected to iDevices Switch, Socket, Outdoor Switch, Wall Switch, Dimmer Switch, or Wall Outlet.
Before connecting the Instant Switch, be sure your iDevices product has been set up in the iDevices Connected app, is able to be controlled, and running the most up-to-date firmware. For instructions on updating firmware, visit: How to Download New Firmware.
Follow the steps below to connect your Instant Switch to an iDevices product:
1. Remove the battery tab. Pull the plastic tab out from the back of the product and discard. After pulling the tab, there will be a quick white flash on the Instant Switch LED. Instant Switch will then blink blue for the next 30 minutes to indicate it is advertising and can be seen by the app for setup.
Note: If your Instant Switch does not go to blinking blue, please try replacing the Instant Switch battery.

2. Next, launch the iDevices Connected app. The app will guide you through the setup and placement of the Instant Switch in your home.
3. Tap on the menu (☰) in the upper left-hand corner.
4. Tap “Add Product."
5. Tap "Instant Switch."
6. Select the Instant Switch that appears.
7. The app will identify the Instant Switch; confirm the LED on the Instant Switch is flashing purple, then tap "Yes."
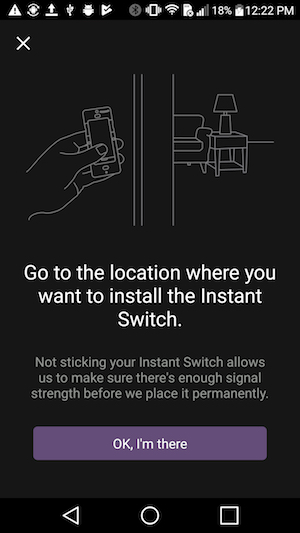
8. Bring the Instant Switch to the location you plan to install it. Once you've reached the location, tap “OK, I'm there."
9. Select the iDevices product that you want to pair with.
10. The Instant Switch will begin pairing to your iDevices product. The pairing process may take up to 90 seconds if the iDevices product you're connecting with is farther away.
11. Now that Instant Switch is paired, you can install your Instant Switch. For information on installing Instant Switch, visit: Installing iDevices Instant Switch.
Using Your Instant Switch
After initial setup the LED will remain off unless it needs to show a status issue.
The dimming feature requires using a dimmable bulb.
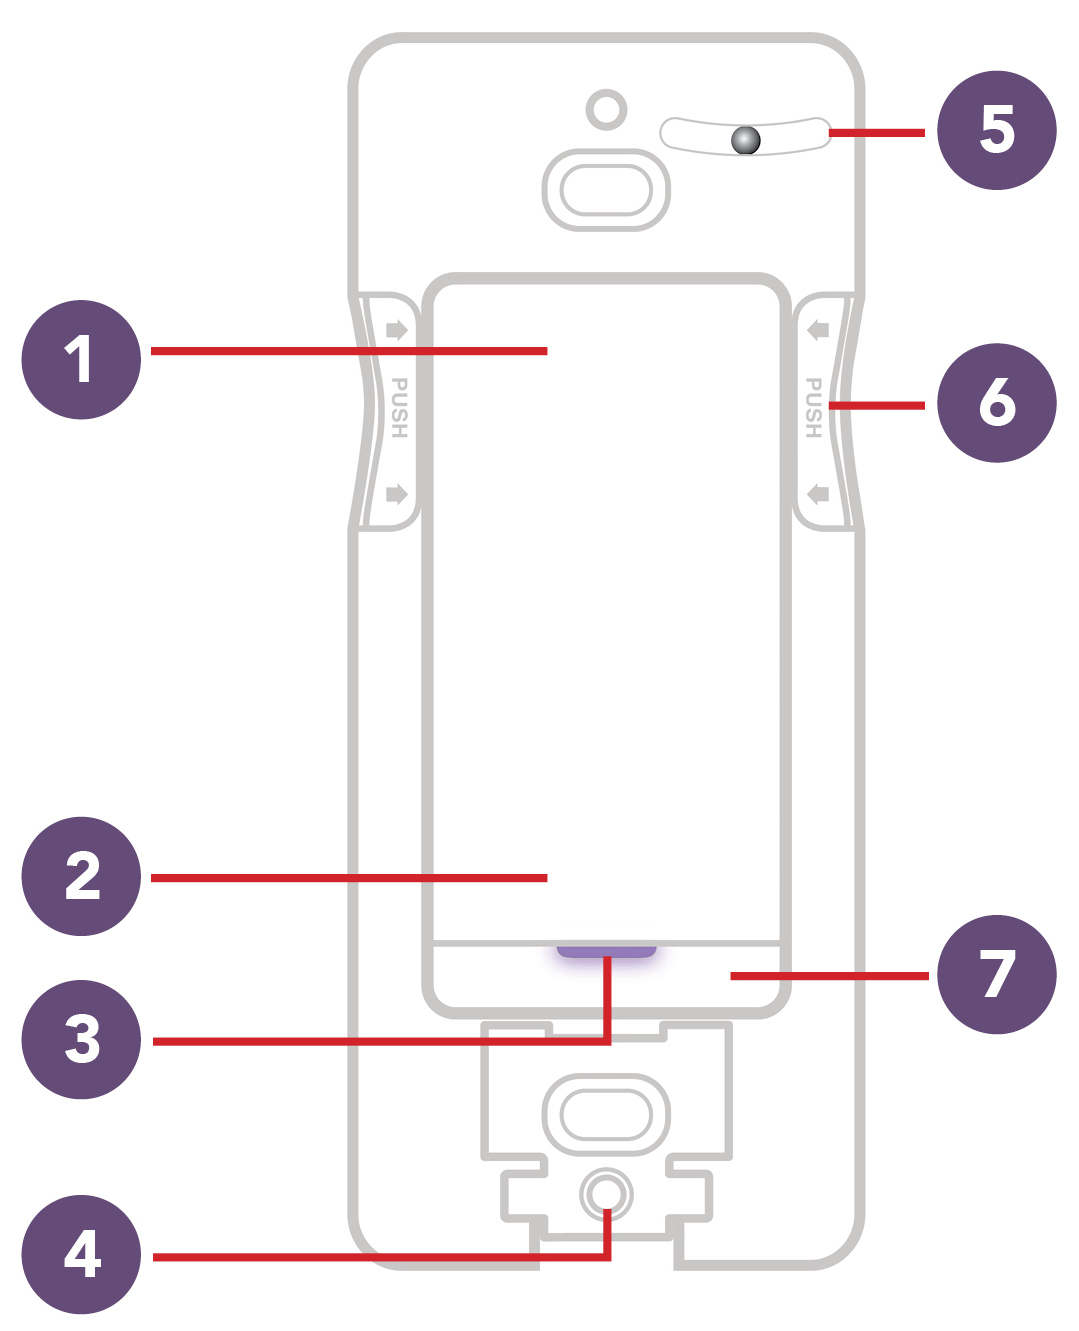
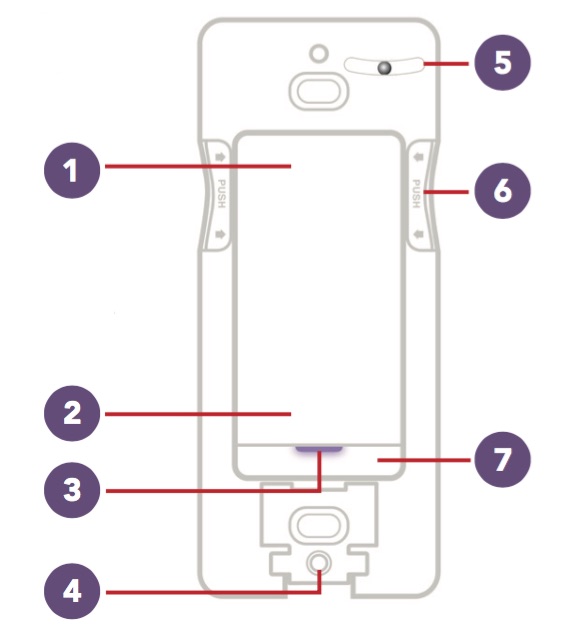
1- Turn On/Increase Brightness
- Single tap to turn on. Press and hold to increase brightness level. Double tap to quickly increase light to maximum brightness.
- Note: Dimmable feature only available when paired to a dimmable iDevices products.
2- Turn Off/Decrease Brightness
- Single tap to turn off. Press and hold to decrease brightness level. Double tap to quickly decrease light to minimum brightness level.
- Note: Dimmable feature only available when paired to a dimmable iDevices products.
3- Status LED
- Provides setup status.
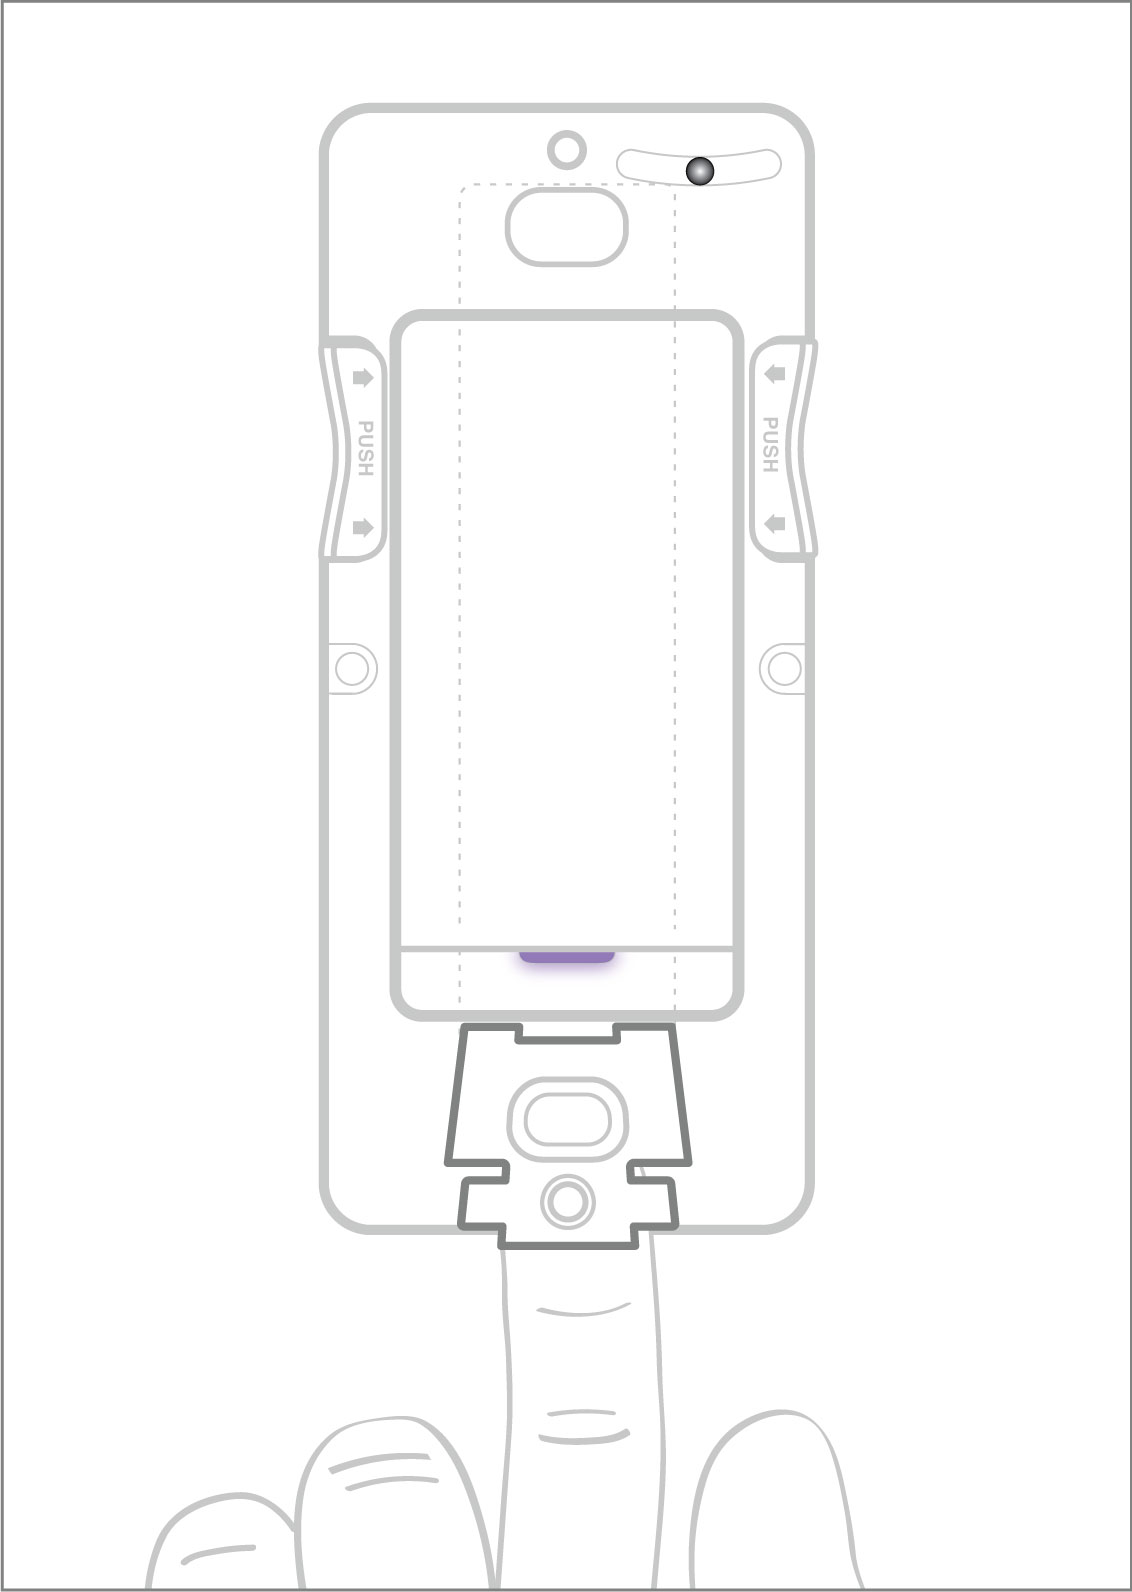
4- Command™ Strip from 3M Access Door
- Remove to access 3M Command™ Strip when removing Instant Switch from wall.
5- Level
- Built-in level ensures precise installation.
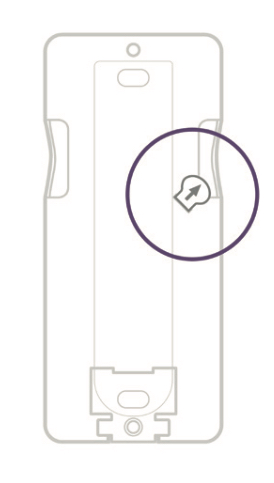
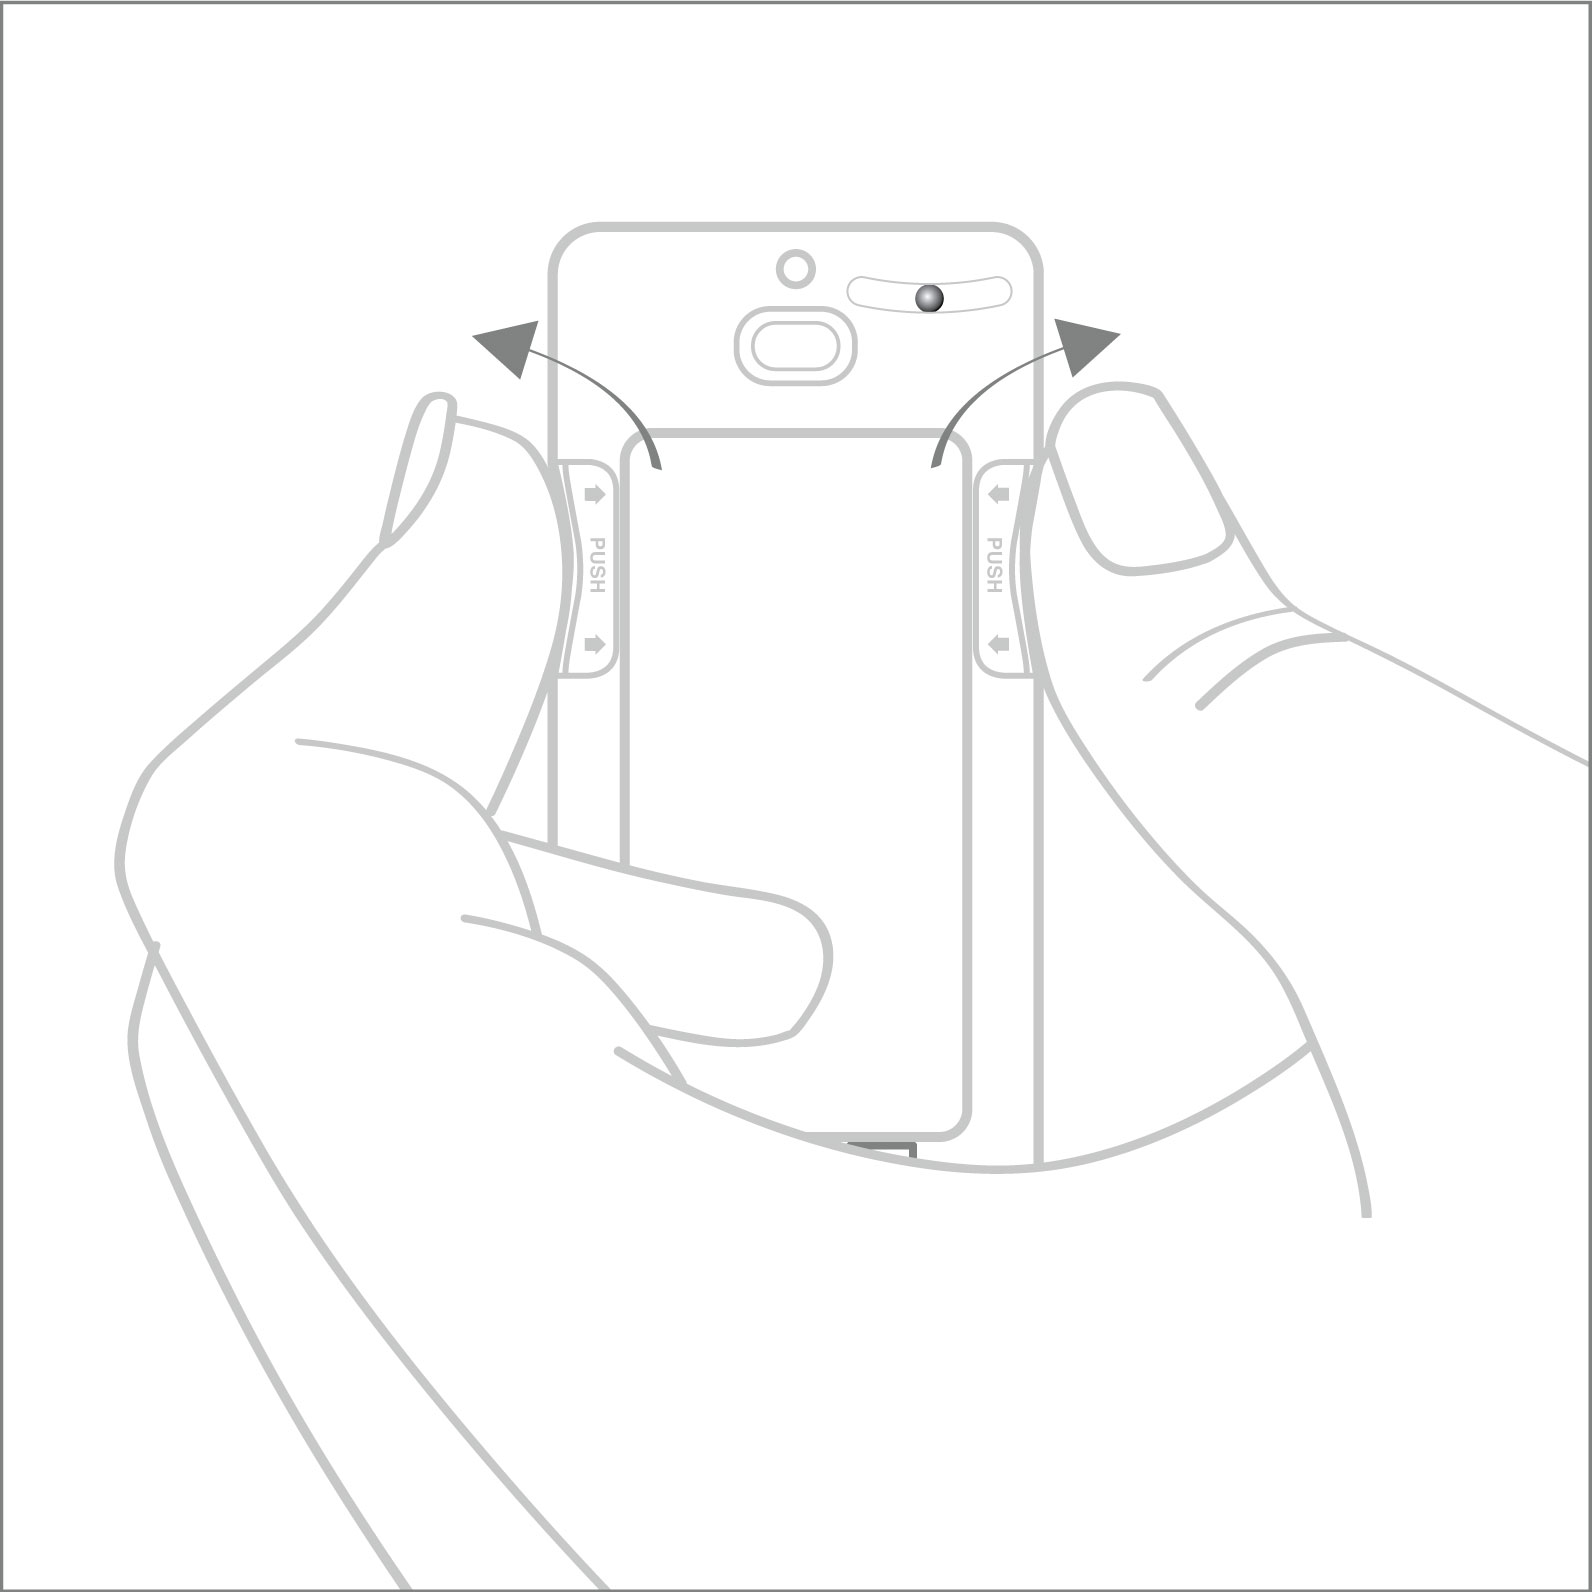
6- Instant Switch Unit Removal
- Press sides to remove Instant Switch from mounting plate to access battery.
7- Pairing Reset
- Press and hold for 10 seconds, until LED blinks red. Note: Resetting the device will remove all pairings associated with this product.
7 + 1- Device Reset:
- Press and hold 7+1 simultaneously for 10 seconds, then release to cycle power to the device.
8- Ground Wire Assembly
- Connect to Instant Switch when installing into a gang box.
The iDevices Instant Switch uses a standard CR2032 battery ONLY. On average, a new battery will last up to 2 years with the Instant Switch.
If you experience issues with your Instant Switch, it's recommended to first replace the battery.
Even when not in use, batteries slowly lose their charge. This is called self-discharge. This may leave initial battery levels too low, causing issues with both pairing and maintaining a Bluetooth connection.
Follow the steps below to replace your Instant Switch battery:
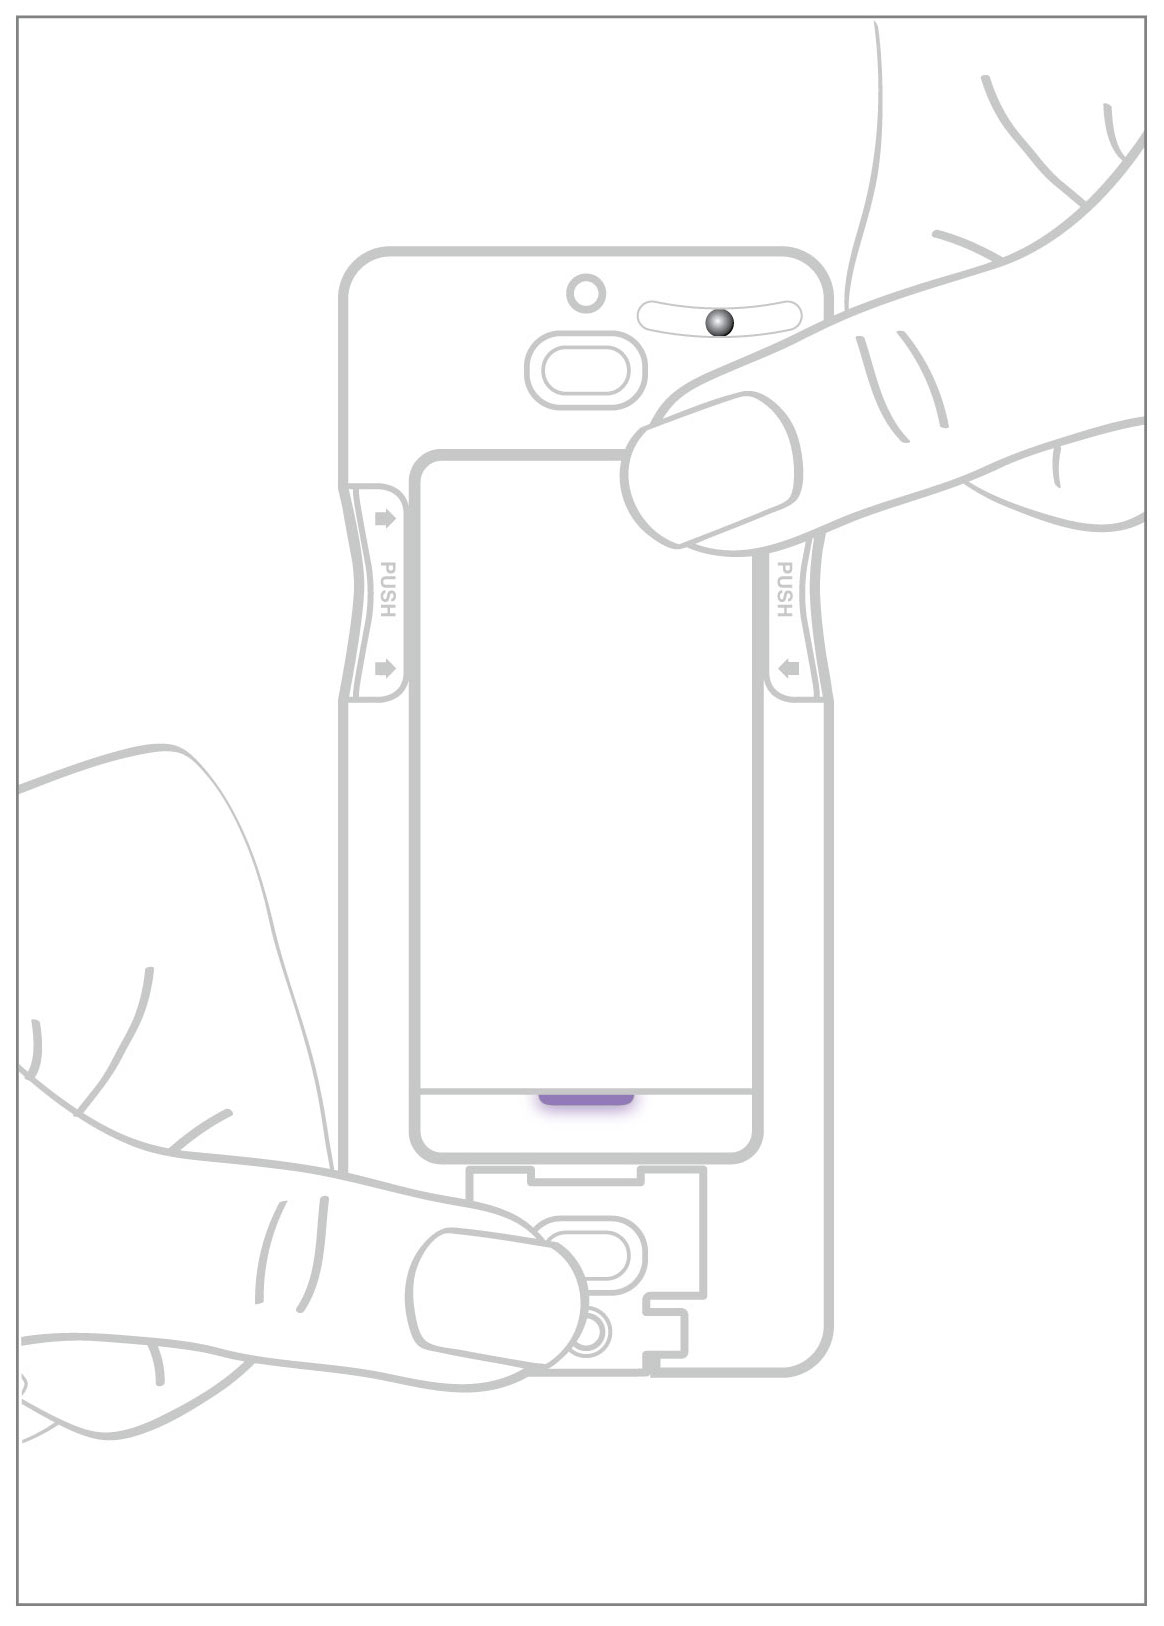
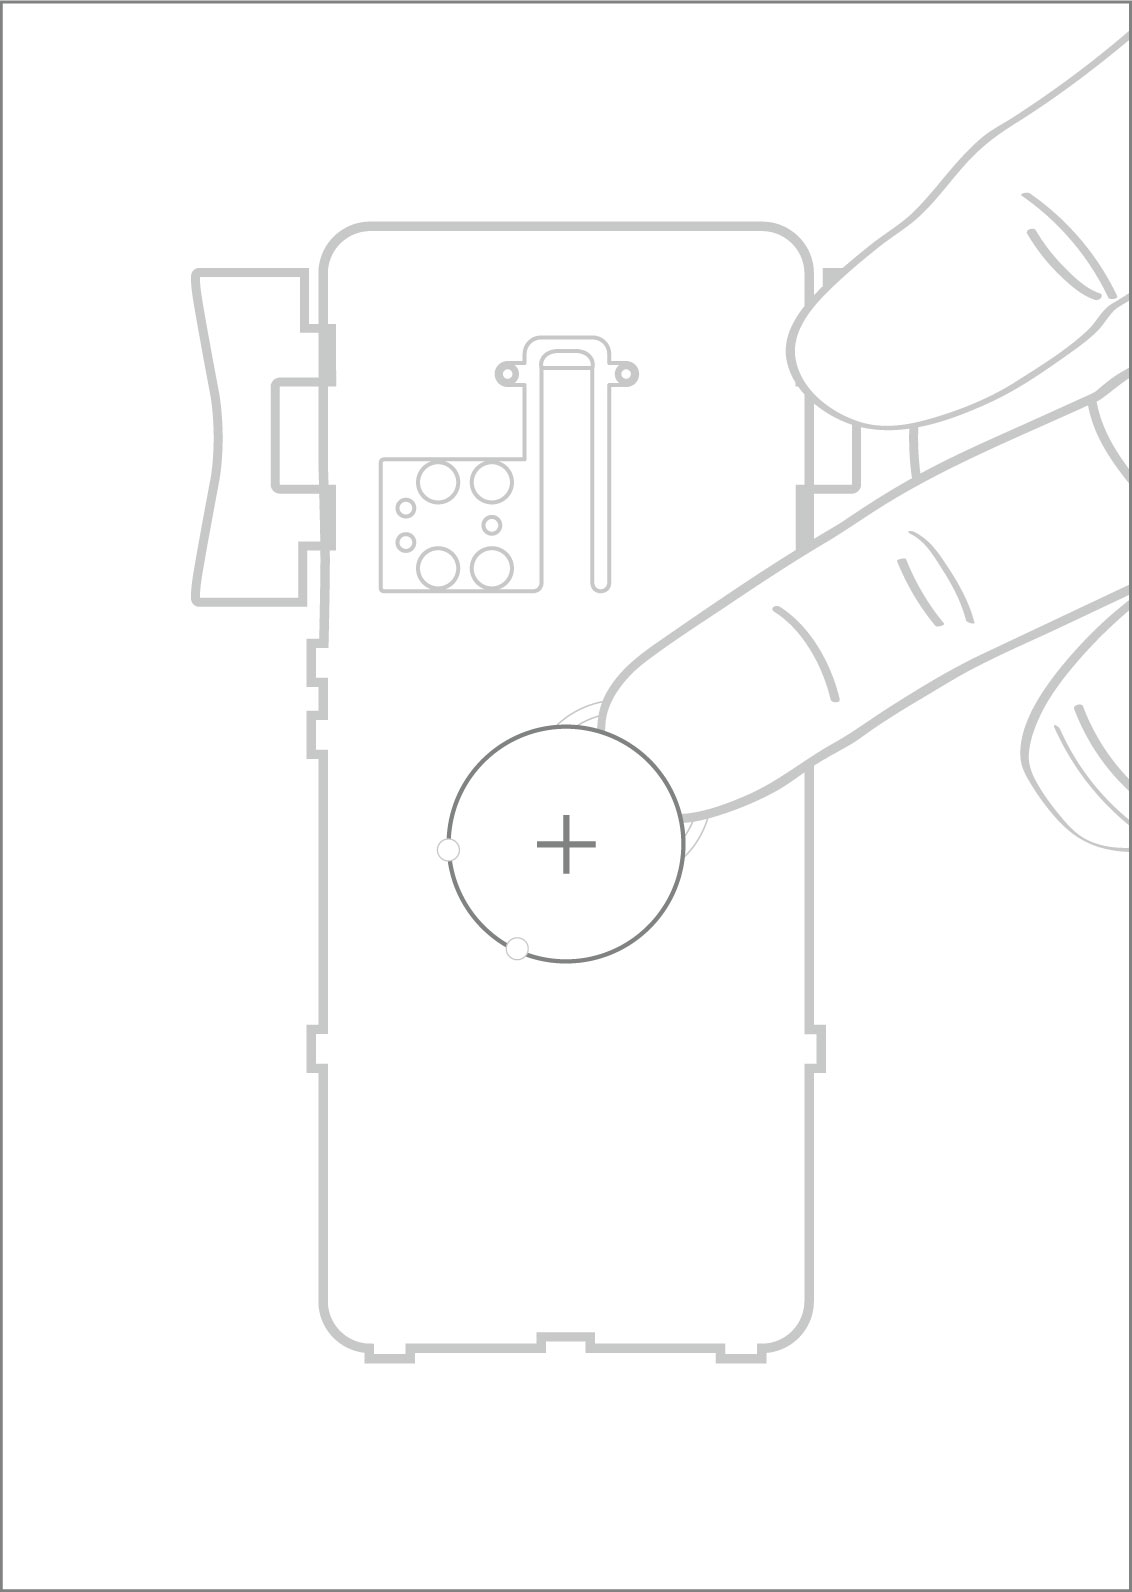
- Access the battery by pressing in the module assembly where noted and tilting the top toward you to remove from the mounting plate.
- After the module assembly has been removed, the battery will be visible on the back.
- Remove the battery by inserting your finger into the notch and pulling it toward you.
- When replacing the battery, be sure to install with the positive side (+) facing out, so it is visible.
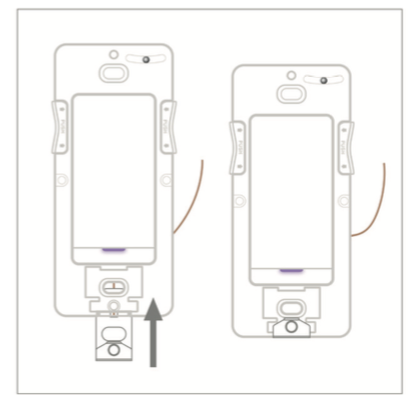
Replacing the module assembly:
- Line up the tabs on the bottom of the module assembly with the arrows on the bottom of the mounting plate.
- Tilt the top of the module assembly up and press it firmly until it clicks into place.
Instant Switch can only directly pair via Bluetooth with one iDevices product such as Switch, Socket, Outdoor Switch, Wall Switch, Dimmer Switch, or Wall Outlet.
For Wall Outlet, 1 Instant Switch can be paired to each outlet. For Wall Switch and Dimmer Switch, 2 Instant Switches can be paired in single-pole configurations and 1 Instant Switch can be paired in 3-way configurations.
Although you cannot pair Instant Switch to multiple products, there are a of couple options for adding advanced controls for multiple products:
Option 1: If you're using an iOS device and have an Apple Home Hub set up, the HomeKit platform allows you to create a trigger or automation to turn on multiple products. This way when you use Instant Switch to turn on the connected product, it will then trigger other products to turn on or off automatically. For more information, visit: Creating Triggers on iOS.
Option 2: You can also connect with the free service IFTTT. This would allow you to set up an Applet so that when the paired iDevices product is turned on or off, it can trigger another device to turn on or off. For more information, visit: Connecting iDevices Products to IFTTT.
- In the iDevices Connected app, find the product your Instant Switch is connected to.
- Tap on the product name.
- On the product details screen, tap on the product name located in the upper left-hand corner.
- Tap “Additional Controls.”
- Tap the paired Instant Switch.
- Tap “Delete.”
- The Instant Switch pairing will be deleted and then will begin flashing blue, indicating it's in pairing mode.
- Be sure Instant Switch is flashing blue, indicating it's in pairing mode.
- Tap on the menu (☰).
- Tap “Add Product” and select Instant Switch to start the pairing process with the new iDevices product.
Follow the steps below to remove your wall mounted Instant Switch:
- Remove the access door to expose the end of the Command™ Strip from 3M.
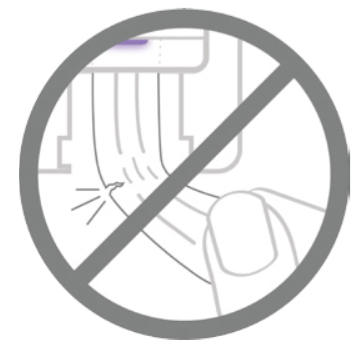
- Pull straight down on the end of the Command™ Strip from 3M while holding Instant Switch firmly against the wall.
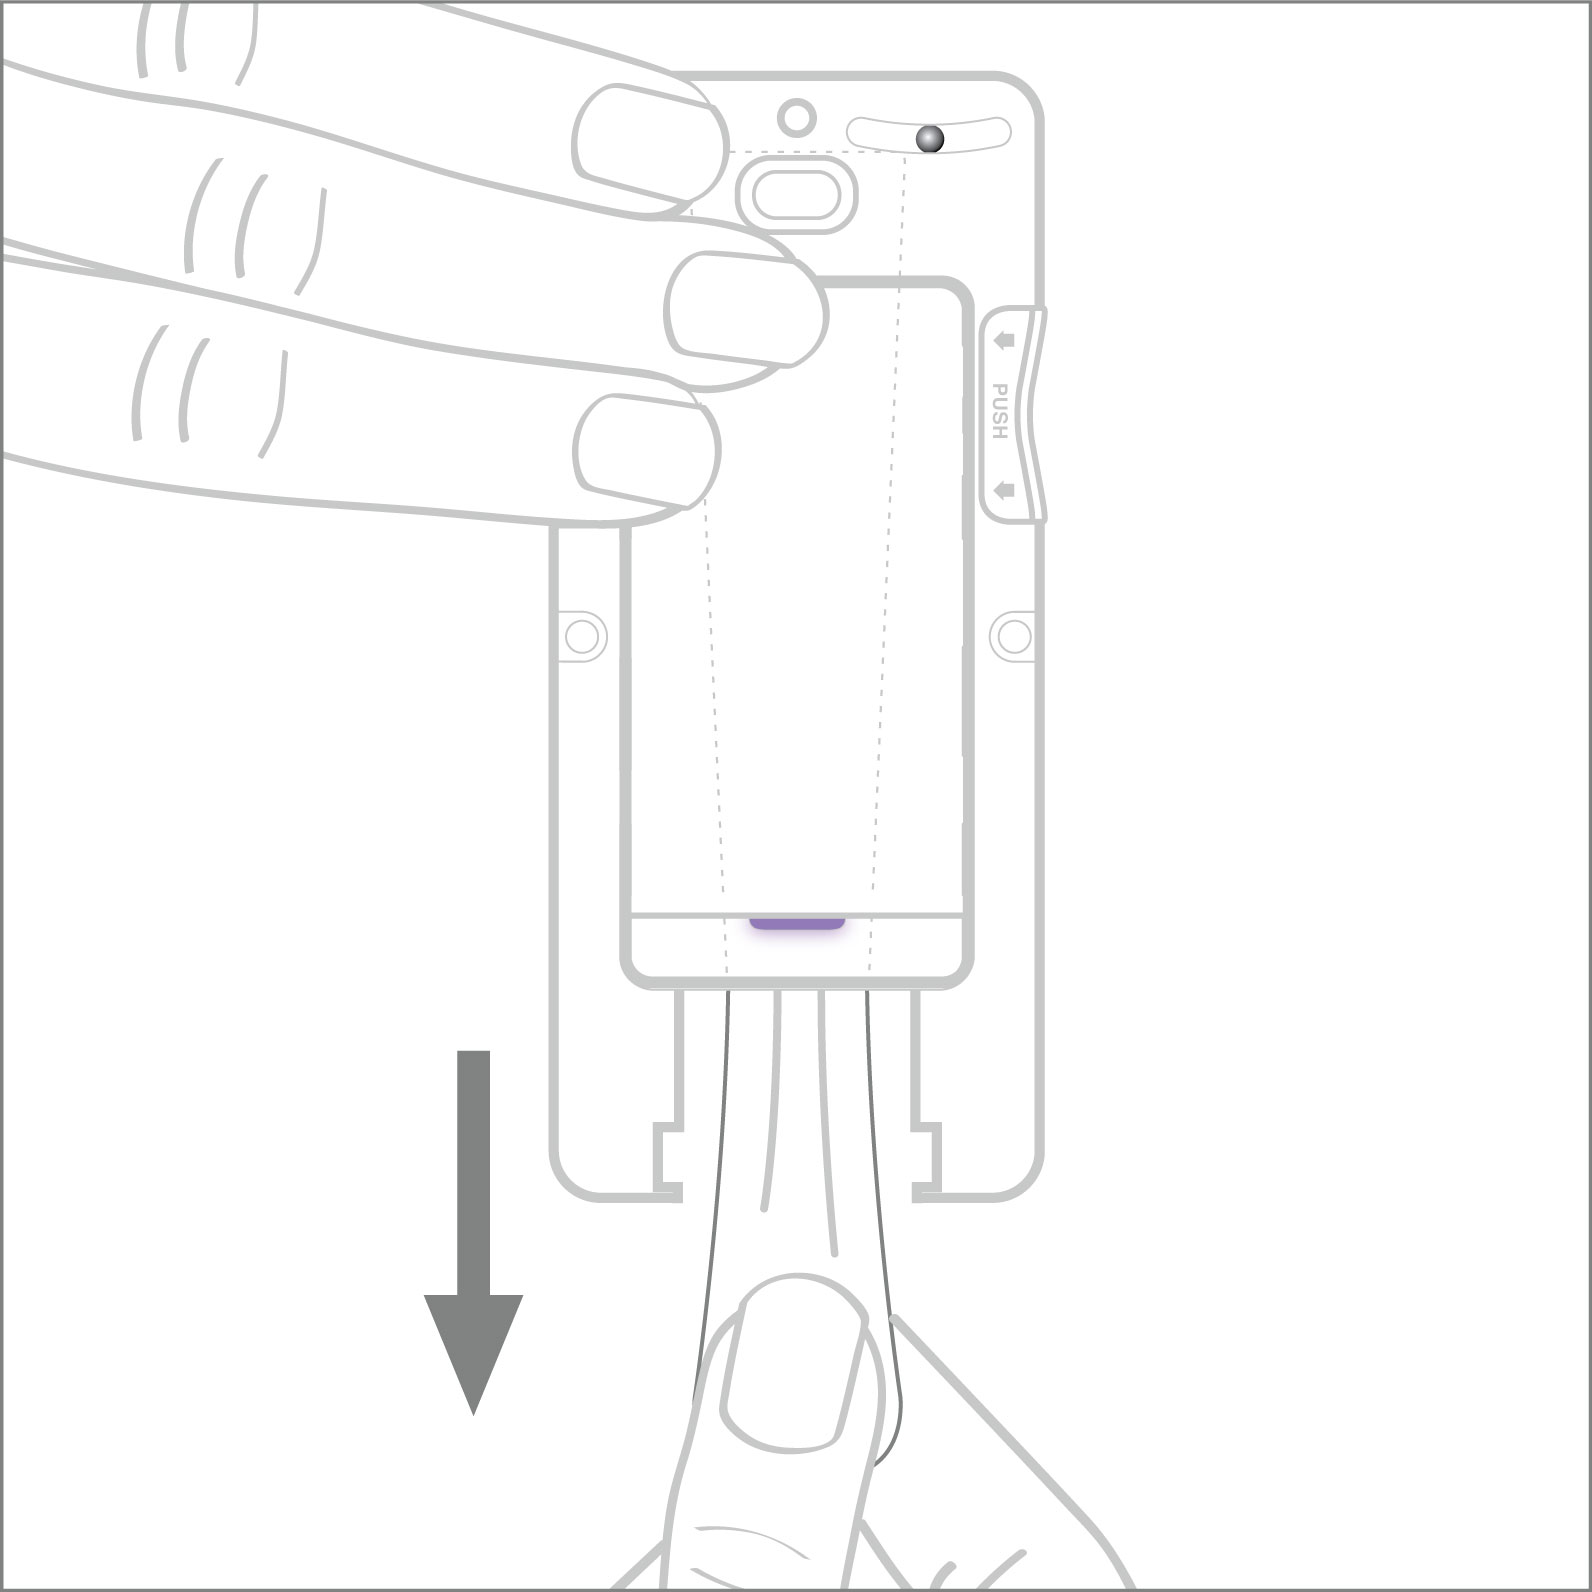
Note: Be sure to pull straight down, as pulling at an angle risks breaking the Command™ Strip from 3M.
To ensure safe usage of your iDevices Instant Switch and to prevent damages not covered under the 2-Year Limited Warranty provided with your iDevices Instant Switch, please follow the below guidelines.
- Instant Switch is certified for use in the US and Canada only.
- Instant Switch must be installed in a manner that conforms to all applicable national, state, and local building codes.
- Instant Switch is intended for dry, indoor use only.
- When installing with Command™ Strip from 3M, do not install above a bed, onto wallpaper, or outdoors.
- Ambient operating conditions: 32° F to 104° F (0° C to 40° C), 0-90% humidity, non-condensing.
- Instant Switch uses 1 CR2032 coin cell battery ONLY. Do not use a rechargeable battery. Using an improper battery may damage the iDevices Instant Switch. Please dispose of this battery at a recycling facility. Contact your local waste disposal provider to and a recycle center location nearest you.
Problem Solving
Instant Switch requires an iDevices product running firmware 1.9.4 or later.
A LED light showing yellow when tapped indicates a low battery.
If you're experiencing an issue with your iDevices product, a quick reboot can resolve many issues. After rebooting the device using the steps below, it will take several moments to restart, then reconnect to the Wi-Fi network. Rebooting the product will not affect your schedules or customizations applied to the product.
Switch and Outdoor Switch:
- Unplug the device, then plug it back in.
Socket:
- Unscrew the entire Socket from the fixture, then screw it back in.
Wall Switch and Dimmer Switch:
- Press the bottom right-hand button below the rocker once.
Wall Outlet:
- Press the small circle button next to the LED once.
Thermostat:
- Pull the Thermostat off the mounting plate, then place it back on.
Instinct:
- Gently pull the bottom right-hand button below the rocker out 1/4". Then, press the button back in.
Instant Switch:
- Remove the battery, then place it back in.
Reboot Instant Switch:
To cycle power to the device in the event that the Instant Switch becomes unresponsive, press and hold 7 and 1 simultaneously for 10 seconds, then release.
Reset Instant Switch:
To reset the pairing and allow pairing to a new device, press and hold 7 for 10 seconds, until LED blinks red. After resetting, be sure to remove the Instant Switch pairing for the originally paired iDevices product using the steps here: Unpairing Instant Switch
There are several instances in which the product you're trying to pair to the Instant Switch will not show as being available for pairing, such as:
- Instant Switch cannot pair with Instinct or the iDevices Thermostat.
- iDevices products that need to be updated to newer firmware. To learn how to update your firmware, visit: Downloading New Firmware
- Products made by other companies are not compatible with Instant Switch.
- The product will not show for pairing if its pairing limit has been reached. Only 1 iDevices product can pair with 1 Instant Switch. For Wall Switch and Dimmer Switch, secondary switches are included in this pairing. For single-pole configurations (one switch controlling one set of lights), 2 Instant Switches can be added. For 3-way configurations (two switches controlling one set of lights), 1 Instant Switch can be added.
- The product will not show for pairing if it is listed as “Product Unavailable” in the iDevices Connected app. If the product is unavailable you'll see the circle arrows on the upper right-hand corner of its icon. Click the product below for more information on getting reconnected:
Note: Wall Outlet allows for two Instant Switch pairings, one for each outlet. If the battery in Instant Switch is low, it will not allow the pairing process to start, if this is the case the app will display a pop-up notifying you the battery is low.
If you receive an error that states, ”Get closer to the product you're trying to pair with,” the iDevices product you're trying to pair to does not have a strong enough Bluetooth signal to complete the pairing to your Instant Switch.
If this occurs, move the Instant Switch closer to the product you're trying to pair with and attempt to pair again. If the new location doesn't resolve the pairing issue, there may be objects in-between the Instant Switch and iDevices product you're trying to pair it with, causing decreased Bluetooth signal strength. Walls, doors, and refrigerators are a few examples of items in the home that can weaken the Bluetooth signal.
To test if this is the cause, attempt to pair the Instant Switch directly next to the iDevices product you're trying to pair with. Once it pairs, move the Instant Switch to the desired location and see if you're still able to control the product. If you are unable to control the product from the Instant Switch it means the location is too far or the signal strength is being decreased significantly by items between the products.
Below is a list of the additional error codes that we have seen when setting up an iDevices Instant Switch:
| 0x8011 |
This indicates that the device you're attempting to pair the Instant Switch to needs to be rebooted. To learn how to reboot your product visit: Rebooting Products. Then, attempt to pair the Instant Switch again. |
|
0x3 |
Reboot the iDevices product you're attempting to pair with. To learn how to reboot your product visit: Rebooting Products. Then, toggle WiFi on your mobile device OFF, then back ON again. Verify you are connected to the same network as your iDevices product. Then, attempt to pair the Instant Switch again. |
If you continue having pairing issues, contact the iDevices Customer Experience Team at support@idevicesinc.com for additional assistance.
The LED night light is used to indicate the product's status during product setup or to report something that requires attention.
Blue Flashing

Indicates during initial setup:
Instant Switch is waiting for the mobile device to complete pairing to the companion iDevices product.
Resolution:
Open the iDevices app and start the setup process:
Instant Switch Setup on Android
Solid Blue
Indicates:
Pairing has been completed.
Resolution:
Continue to wait for the iDevices Connected app to complete the pairing process.
Green Flashing
Indicates during initial setup:
When the iDevices Connected app has completed the setup, the LED flashes green 5 times.
Indicates during software update:
When the software update has completed, the LED flashes green 5 times.
Resolution:
No action needed in either instance.
Solid Yellow
Indicates:
If the battery is low, the LED turns yellow for 2 seconds when the rocker button is pressed.
Resolution:
Replace battery:
Replacing the Instant Switch Battery
Red Flashing

Indicates:
When the battery needs to be replaced, the LED flashes red 5 times when the rocker button is pressed.
Resolution:
Replace battery:
Replacing the Instant Switch Battery
Solid Red
Indicates:
When the Instant Switch has lost the link with its paired iDevices product, the LED will turn solid red for 5 seconds when the rocker button is pressed.
Resolution:
Power cycle the Instant Switch by holding the top of the Instant Switch rocker and the pairing button simultaneously for 10 seconds.
Purple Flashing

Indicates firmware being updated:
A firmware update is being installed onto the product.
Resolution:
Keep the app in the open until the firmware update is complete.
Compatibility
iOS:
- HomeKit™ Requires an iPhone, iPad, or iPod touch with iOS 10 or later
- iCloud® account using iCloud Keychain®
- Requires an Android™ 4.3+ device with Bluetooth® technology
- Google Account to sync home data and device names across devices
- Free iDevices Connected App
- 3 VDC, 5.4mA
- Replacement Battery: CR2032 ONLY
The iDevices Instant Switch requires a compatible iDevices product to function. Be sure a product is assigned to your home before setting up your Instant Switch, and running firmware 1.9.4 or later. To learn more about updating your product's firmware, Click Here
Instant Switch is currently compatible with the following products:
- Switch
- Outdoor Switch
- Socket
- Wall Switch
- Dimmer Switch
- Wall Outlet
To learn more about the iDevices Connected app setup and compatibility, visit the iDevices Connected app support page here
Remote Access Requirements
Use Instinct remotely with the Amazon Alexa app.
All other produts work remotely through the iDevices Connected App.
Instinct
Use the Amazon Alexa app to access and control your Instinct remotely. For more information on controlling Instinct, visit Controlling Instinct in the Amazon Alexa app
Switch, Outdoor Switch, Socket, Thermostat, Wall Outlet, Wall Switch and Dimmer Switch
Using the iDevices Connected app, users can securely access and control iDevices products from anywhere through our own encrypted IoT infrastructure. The iDevices Connected app automatically allows you to control your iDevices products when you're away from your home Wi-Fi network.
For HomeKit™ features such as Siri® voice control, an Apple TV® (3rd generation or later) is required for use outside of your home. Ensure Apple TV® is signed in with the same iCloud® account on your iOS device, and that Keychain® is turned on.
For users with an iOS device running iOS 10 or later, that would like to remotely control HomeKit compatible accessories with the Apple Home app, an Apple Home Hub is required. Devices that can be setup as an Apple Home Hub are: Apple TV 4K, Apple TV 4th generation with tvOS 10 or later, HomePod, or iPad with iOS 10 or later. The device you set up as a home hub must remain in your home, connected to your home Wi-Fi network, plugged into power and powered on.
For more information on using an Apple Home Hub: Click Here
Need Further Assistance? We're Here To Help.
Our Customer Experience Team is available Mon - Fri 9am - 5:30pm EST