
The iDevices Connected App
Setting Up Your Product
iDevices products require a home Wi-Fi® network.
Be sure that Home Data is turned on in your Settings, if using HomeKit.
Add new products by tapping on the menu button and Add Products.
For best performance, be sure to run the most current version of the Connected app.
Before pairing the iDevices product to your Wi-Fi® network, ensure that your Wi-Fi network is running on a 2.4 GHz b/g/n Wi-Fi band. It should also be using either None, WPA or WPA2 network security with AES encryption. If you have multiple wireless networks such as a guest network, a 2.4 GHz network, and a 5 GHz network, please connect your phone or tablet to the 2.4 GHz network for initial set-up. HomeKit™ accessories can't be set up on guest networks. To learn more about adjusting these security settings, click here
Download the latest version of the iDevices Connected app here:

When opening the iDevices Connected app for the first time, several prompts will appear on screen. Allowing these prompts to ensure a proper connection to Apple's HomeKit Protocol, which is required for setting up a new product. If you are unsure if you allowed all prompts, please go to Settings > iDevices and make sure everything is turned ON.
Setting up your product:
In this example setup, we'll be using an iDevices Switch. The setup process is similar for each iDevices product.
1. Tap on the menu button (☰) then, tap "Add Product."
2. Tap the product you will be setting up.
3. Confirm the product is ready to be set up. Tap “Yes, I am Ready.” The iDevices Connected app may walk you through additional steps to determine if the product is ready for setup.
4. Scan the 8-digit HomeKit setup code for the product.
5. Select the product from the list of available accessories.
6. Tap “Allow” to connect the accessory to your Wi-Fi network.
Note: Your iOS device will automatically send the password information to the product; you will not be asked to type the password. Please be patient, as this process may take a moment.
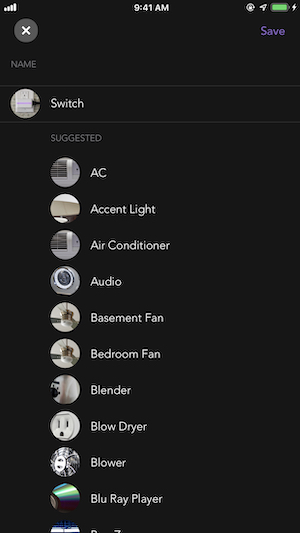
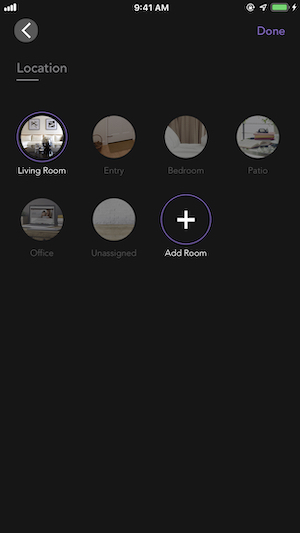
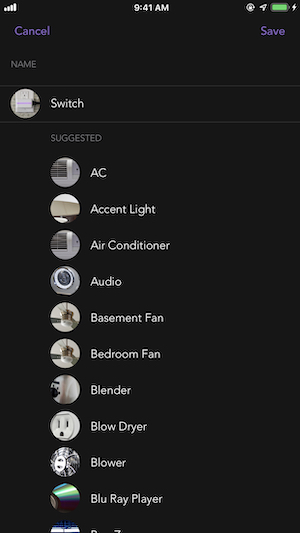
7. Tap “Switch” to create a customized name for the product in the app: Naming Products and Rooms Choose the room the product is located in (e.g. Bedroom, Kitchen, Living Room, etc.). If your product does not have an LED night light, the setup will continue directly to the next step. Customize the night light name to control with Siri. You will also be able to customize the night light color and brightness from the iDevices Connected app.
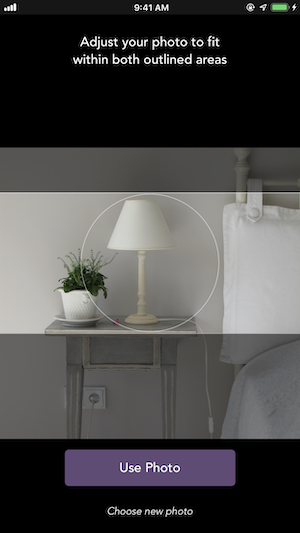
8. Choose a photo for the product; you can use the default photo or set a custom photo.
9. Next, the iDevices Connected app will walk you through any additional customizations or settings required for your specific product.
Note: If you're on iOS 14, after adding and customizing your product, the app may show a “Loading…” screen. Tap the X in the upper left-hand corner to close the window and ensure the product you added is available for control from the home dashboard.
Before pairing the iDevices Product to your Wi-Fi® network, ensure that your Wi-Fi network is running on a 2.4 GHz b/g/n Wi-Fi band and using WPA or WPA2-Personal Security. Note that 5 GHz networks are NOT compatible. Also, download the latest iDevices Connected app here:

- Power on your Android™ Device (phone/tablet).
- Please ensure Bluetooth® is enabled. Bluetooth is used to pair your Android device and iDevices product.
- Please ensure Wi-Fi is enabled. After pairing is complete all communication between your Android device and iDevices product is done via Wi-Fi.
- Make note of your Wi-Fi network name and password for later in the setup process.
Click on the link below to view the setup process for the product:
iDevices smart home products are compatible with both iOS and Android devices, and can be accessed from both platforms simultaneously. The pairing process varies slightly with each product. Select the iDevices product you would like to sync to both an iOS and Android device for more detailed information.
The following article applies to Android devices only.
This is a list of the most common error codes that we have seen when setting up and using iDevices products
|
20701 |
App and iDevices product communication error. Retry setup. If the issue persists, try resetting the iDevices product and attempting setup again. |
|
20704 |
Wi-Fi connection error. Verify the Wi-Fi password is correct and that the mobile device has a strong signal. |
|
20705 |
There was an issue reading the IP address. Check the Wi-Fi connection, verify the mobile device is on a 2.4GHz network. |
|
20706 |
The iDevices product connected to the Wi-Fi network and obtained an IP address, but the app could not connect. Check the Wi-Fi connection, verify the mobile device is on a 2.4GHz network. |
|
20708 |
App has timed out during the Wi-Fi connection process. Restart your router and mobile device. Then, attempt the setup process again. |
|
20800 |
A connection has been lost during or post pairing. Close the app, then retry pairing. In some cases, a full reset may be needed on the iDevices product. |
|
20804 |
The connection has been lost during pairing. Retry the pairing process. |
| 20808 |
Pairing is unavailable. Reset the product and try pairing again. If this doesn't work, try restarting the app. |
| 20809 |
An error has occurred during setup. Wait a few seconds, then quit the app and try again. |
| 20811 |
An error has occurred during setup. In the mobile device settings, turn Bluetooth off then on again, then try to set the iDevices product back up again. |
| 20813 |
Bluetooth could not make a connection to the iDevices product. In the mobile device settings, turn Bluetooth off then on again, then try to set the iDevices product back up again. |
| 20816 |
The iDevices product and app are having trouble during Bluetooth pairing. Restart the app and try again. |
| 20818 |
The iDevices product has received too many pairing requests within a short amount of time. Wait for an hour or reset the iDevices product before attempting to pair it again. |
| 20822 |
This timeout error occurs when the app has waited over 75 seconds to connect with the iDevices product. After the error, try again. |
|
20823 |
The iDevices product has joined the network but cannot get a valid IP address for the mobile device to connect to. Try to set up again, as the IP handoff may just be taking a little longer. If this issue persists, it may be a router setting, so please contact the Customer Experience Team. |
Automation
For advanced control, group products together by creating Zones or Service Groups.
Set schedules for your products or create Triggers for more automatic control of your home, based on your location.
A great way to automate your home is by scheduling individual products within the iDevices Connected app. When products are scheduled individually, the schedule is embedded directly onto the product allowing it to run even when the Wi-Fi® network is down.
To schedule iDevices products:
- From the home dashboard, tap "Schedules."
- Tap the + in the upper right-hand corner or if this is your first schedule tap "Create a Schedule."
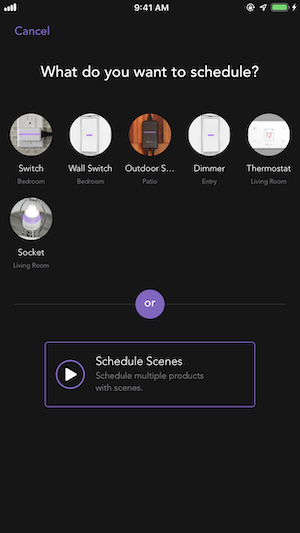
- Select the product you would like to schedule. If you have an Apple Home Hub you will see an additional option to schedule scenes. To learn how to schedule scenes Click Here
- Choose what the accessory should do in this schedule (turn on, turn off, brightness, temperature setpoint, etc.). For products with a night light, you can also turn the night light on or off within the same schedule. Then, tap "Next"
- Select the day (or days) and time this schedule should take place.
- Review the schedule details, then tap done.
Note: When you first create a schedule, all of your iDevices products must be reachable. If you attempt to create the schedule and receive the error, "Schedule format is no longer supported. Please update firmware then try again." Please update the firmware on the product, then create the schedule again. To learn how to update firmware: Click Here
A great way to automate your home is by scheduling individual products within the iDevices Connected app. When products are scheduled individually, the schedule is embedded directly onto the product allowing it to run even when the Wi-Fi® network is down.
To schedule iDevices products:
- From your home dashboard, tap the calendar icon at the top
- Tap the + sign at the bottom right-hand corner
- Select the product you would like to schedule
- Choose the action for the product by selecting on or off; you can also adjust the night light as well as the brightness for dimmable products
- Set the time and days you want the schedule to activate
- Tap “Next”
- Tap “Done” to save
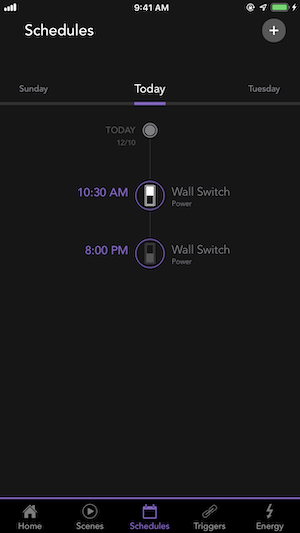
From the schedules timeline, you can see the current day and what times your products will turn on and off. Scrolling down will bring you through the schedules for upcoming days. From this view, you can also tap on an event to adjust its schedule (power state, time, and days).
Note: When using an iDevices product with both an iOS and Android device, schedules set up on the Android device will be overwritten by any iOS device that attempts to create a schedule.
After creating schedules, they can be adjusted at any time! You can adjust the state of the product, time of the scheduled event, days the event occurs and the product night light.
Note: Schedules will update based on the current time zone the iOS device is located in.
Follow the steps below to edit or delete a schedule:
1. From the home dashboard, tap "Schedules."
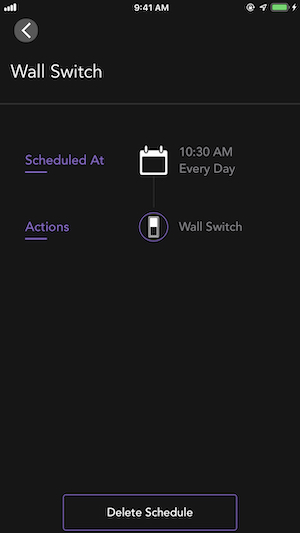
2. Tap the scheduled event in the timeline you would like to edit or delete.
3. Adjust or delete the schedule:
- To adjust the day(s) and time, tap "Scheduled At"
- To adjust the product actions, tap "Actions"
- To delete the scheduled event, tap "Delete Schedule"
4. After making adjustments, tap the back arrow in the top left-hand corner to save any changes and return to the schedules timeline.
After creating schedules, they can be adjusted at any time! You can adjust the state of the product, time of the scheduled event, days the event occurs, and the product night light.
Note: When using an iDevices product with both an iOS and Android device, schedules set up on the Android device will be overwritten by any iOS device running iOS 10 that attempts to create a schedule.
Follow the steps below to edit or delete a schedule:
- From your home dashboard, tap the calendar icon at the top.
- Tap the scheduled event in the timeline you would like to edit or delete.
- To edit the schedule, tap on the item you would like to adjust.
- To delete the schedule, tap “Delete Schedule” at the bottom of the screen.
- After making adjustments, tap “Back” on the top left-hand corner to save any changes made and return to the schedules timeline.
A Scene is a group of multiple products, performing specific actions (turning on, turning off, etc.). They can be a combination of iDevices products and other HomeKit™ compatible devices. Scenes are not currently available on Android™.
You can ask Siri® to activate the Scene, or you can assign a Schedule to the Scene if you have an Apple Home Hub. The Scene will be activated when the phone is on the same Wi-Fi® network as the product, or if you have a Home Hub setup, the Scene can be activated remotely. An Apple Home Hub can be an Apple TV 4K, Apple TV 4th Generation or iPad® running iOS 10 and later. For more information on using a Home Hub, Click Here
To create a Scene:
- From the home dashboard, tap "Scenes."
- Tap the + in the upper right-hand corner or if this is your first Scene tap "Create a Scene."
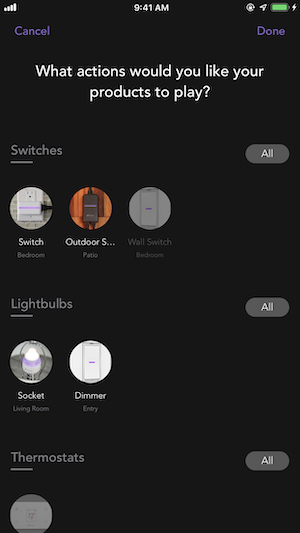
- Select each product and choose what the accessory should do in this scene.
- Tap "Next" in the upper right-hand corner once all the products in the scene are highlighted.
- Tap "Enter Scene Name,” and enter a name using the keyboard or choose a name from the list of suggestions.
- Tap "Next" in the upper right-hand corner.
- Review the Scene details, then tap "Done" in the upper right-hand corner.
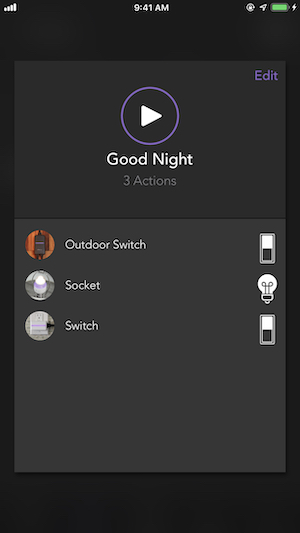
You can now have Siri® activate your scene by saying “Siri® set my [Scene Name] scene.” Alternatively, you can tap the Play Button (►) in the scenes menu to activate a scene at any time.
A Scene is a group of multiple products, performing specific actions (turning on, turning off, etc.). They can be a combination of iDevices products and other HomeKit™ compatible products. Scenes are not currently available on Android™.
You can ask Siri® to activate the Scene, or you can assign a Schedule to the Scene if you have an Apple Home Hub. The Scene will be activated when the phone is on the same Wi-Fi® network as the product, or if you have a Home Hub setup, the Scene can be activated remotely. An Apple Home Hub can be an Apple TV 4K, Apple TV 4th Generation or iPad® running iOS 10 and later. For more information on using a Home Hub, Click Here
Follow the steps below to edit or delete a scene:
1. From the home dashboard, tap "Scenes."
2. On iOS 11 and Later, press firmly on the scene you would like to edit. On iOS 10, hold your finger on the scene for several moments. The scene details will appear, tap “Edit” on the top right-hand corner
3. To edit the scene, tap “Actions,” select each product and choose what the accessory should do in this scene. To save your adjustments, tap “Done” in the upper right corner.
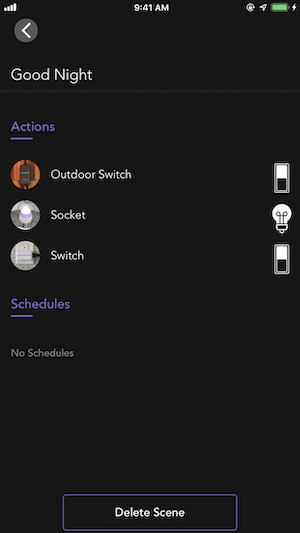
4. To delete the scene, tap “Delete Scene” at the bottom of the screen.
Automate your home by creating schedules for your scenes.
With an Apple Home Hub, you also have the option to schedule scenes that have been created at a time of day or sunrise/sunset. Apple devices that can be setup as a Home Hub are: Apple TV 4K, Apple TV 4th Generation, HomePod™, or iPad® running iOS 10 and newer. For more information on using a Home Hub visit: https://support.apple.com/en-us/HT207057
1. From the home dashboard, tap "Schedules."
2. Tap the + in the upper right-hand corner or if this is your first schedule tap "Create a Schedule."
3. Tap "Schedule Scenes"
4. Select the Scene you want to schedule or tap "Add Scene" to create a new Scene.
5. Choose when the Scene should occur. Time of day (e.g. Monday-Sunday at 3:00 p.m.) or Sunrise/Sunset (e.g. Monday-Friday at Sunrise).
6. If you'd like to customize the schedule, choose the option(s) below then tap “Next” or choose “Skip” to continue without customizing:
- End Time: Automatically ends the Scene after a period of time
- People: I'm Home, I'm Not Home, Anyone Is Home, No One Is Home
7. Review the Schedule and tap "Done" to save.
Triggers activate Scenes based on the state change (turning on, turning off, etc.) of a product, your location, the presence of people in your home, or when a HomeKit™ compatible sensor detects a change.
If you're running iOS 11.2 or later, an Apple Home Hub is required to create Triggers. A Home Hub can be an Apple TV 4K, Apple TV 4th Generation, HomePod™, or iPad® running iOS 10 or later.
Some users may have existing triggers created before the Home Hub requirement was introduced. For users running iOS 11.2 and later who don't have a Home Hub, existing Triggers can only be deleted, and no longer edited or created.
For users running iOS 11.1 and older, only product and location Triggers can be created. A Home Hub is required for remote activation of Triggers. Without a Home Hub, the iOS device must be connected to the same Wi-Fi® network for the Trigger to activate. More information on using a Home Hub can be found on the Apple support site. Click Here
Note: The administrator of the iCloud® account is the only person that can create Triggers, unless additional users have been given “Allow Editing” capabilities in the Apple Home app. All other shared users cannot create Triggers.
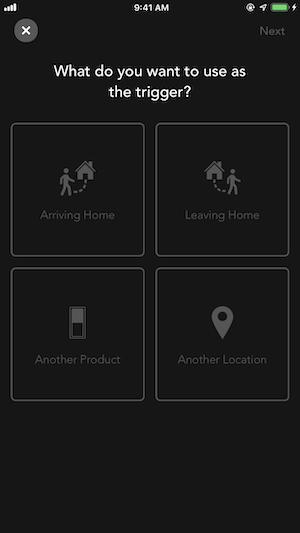
Trigger Types:
Product Trigger: Allows a status change (turning ON, turning OFF, etc.) in a product to activate a Scene. An example of a product Trigger would be: turning off your “Bedroom Lamp” will trigger your “Goodnight” scene, or when “Main Thermostat” ambient temperature is above 65°, it will trigger your “I Am Home” scene.
Location Trigger: Use the location of your iOS device to determine when you arrive or leave set locations and activate a Scene when that action occurs. An example of a location Trigger would be: When leaving work, activate my “Coming Home” scene. Note: When your iOS device is not connected to your home Wi-Fi network, a Home Hub is required to activate the Trigger.
Home Trigger: Allows your Home Hub, to determine when you or other users in your home arrive or leave. An example of a Home Trigger would be: When the last user leaves home, activate my “Going To Work” scene.
Sensor Trigger: Uses a HomeKit compatible sensor to activate a Scene. An example of a sensor Trigger would be: when my motion sensor detects motion, activate my “I'm Home” scene.
Creating A Trigger:
1. From the home dashboard, tap "Triggers."
2. Tap the "+" in the upper right-hand corner or if this is your first Trigger, tap "Create a Trigger."
3. Select the Trigger type and continue to the steps below for creating each Trigger.
Product Trigger:
- Select “Another Product.”
- Choose the product that will be used to activate the Scene.
- Choose the state of the product — ON, OFF, Ambient Temperature reading, etc. — then tap “Next.”
- Choose the Scene to be activated and tap “Next." If you need to make a new Scene, select “Create New” at the bottom.
- If you'd like to customize* the Trigger, choose the option(s) below then tap “Next” or choose “Skip” to continue without customizing.
- Activate Times: Day time, Night Time or Custom Range.
- End Time: Automatically ends the Scene after a period of time (Thermostat settings will remain unchanged).
- People: I'm Home, I'm Not Home, Anyone Is Home, No One Is Home.
- Tap “Next” to review the Trigger, then tap “Done.”
Location Trigger:
- Select “Another Location.”
- Choose when the Trigger activates — “When Arriving” or “When Leaving” — then tap “Next.”
- The map will default to your current location, but you can use the search field to find and set a different location. Pinching in or out on the map allows you to customize the distance from the set location that the phone will use to trigger the Scene. Tap “Next”.
- Choose the Scene to be activated. If you need to make a new Scene, select “Create New” at the bottom.
- If you'd like to customize* the Trigger, choose the option(s) below then tap “Next” or choose “Skip” to continue without customizing.
- Activate Times: Day time, Night Time or Custom Range.
- End Time: Automatically ends the Scene after a period of time (Thermostat settings will remain unchanged).
- People: I'm Home, I'm Not Home, Anyone Is Home, No One Is Home.
- Tap “Next” to review the Trigger, then tap “Done.”
Home Trigger*:
- Select “Arriving Home” or “Leaving Home.”
- Choose when the Trigger activates.
- Choose the Scene to be activated. If you need to make a new Scene, select “Create New” at the bottom.
- If you'd like to customize* the Trigger, choose the option(s) below then tap “Next” or choose “Skip” to continue without customizing.
- Activate Times: Day time, Night Time or Custom Range.
- End Time: Automatically ends the Scene after a period of time (Thermostat settings will remain unchanged).
- Tap “Next” to review the Trigger, then tap “Done.”
Sensor Trigger*:
- Select “A Sensor.”
- Choose when the Trigger activates, tap “Next”
- Set the activation threshold, tap “Next”.
- Choose the Scene to be activated. If you need to make a new Scene, select “Create New” at the bottom.
- If you'd like to customize* the Trigger, choose the option(s) below, then tap “Next” or choose “Skip” to continue without customizing.
- Activate Times: Day time, Night Time or Custom Range.
- End Time: Automatically ends the Scene after a period of time (Thermostat settings will remain unchanged).
- People: I'm Home, I'm Not Home, Anyone Is Home, No One Is Home.
- Tap “Next” to review the Trigger, then tap “Done.”
*For these Triggers and customizations, a Home Hub running the latest OS is required. A Home Hub can be: Apple TV 4K, Apple TV 4th Generation running tvOS 11, HomePod™, or iPad® running iOS 11 and later.
Within Apple's HomeKit™ platform you can create different types of groups for your products–Zones or Service Groups. Both types of groups are controlled solely through voice commands.
Zones are a collection of Rooms that you may want to control simultaneously using Siri® (e.g. Upstairs = Master Bedroom and Kids' Bedrooms).
Service Groups allow you to group together multiple services in order to be controlled by Siri (e.g. A service group called “Recessed Lights” would allow you to turn off/on all of the recessed lights in your home, without controlling all other lighting products, just by saying, “Siri, turn on my Recessed Lights.”)
To create a Group:
- From the home dashboard, tap the home name in the upper left-hand corner
- Tap "Zones" or "Services Groups"
- Selecting Zones will allow you to select the rooms to group into a new Zone and then create a name for that Zone.
- Selecting Service Groups will allow you to select the products you'd like to group into a new service group and then name that service group.
Once the Zone or Service Group is created you can ask Siri to control them by saying things like “Turn on Upstairs” or “Turn on my Recessed Lights.”
On Android™ devices you can create groups, allowing you to control products together. Some examples of groups would be lights, master bedroom, upstairs, etc.
To create a group:
- Tap on the Groups icon.
- Tap on the + in the bottom right-hand corner.
- Tap on the products you would like to group.
- Tap “Next” in the upper right-hand corner.
- Enter a custom group name or select a name from the list of suggested names.
- Tap “Next.”
- Your group is created, tap “Done” in the upper right-hand corner.
You can toggle the products ON or OFF as a group, adjust the brightness for any dimmable iDevices products and adjust the night lights.
If you'd like to learn how to create schedules for your iDevices products on your Android device: Creating Schedules on Android
Daylight Savings Time (DST) can cause schedules associated with iDevices products to change by an hour. In order to adjust these times, please follow the steps below:
Make sure you are on the latest version of the iDevices Connected app and that you're connected to your home Wi-Fi® network.
Adjust Schedule on iOS:
- Tap on Schedules at the bottom of the dashboard
- Select the Schedule you would like to change
- Tap the time and adjust it to the appropriate time
- Tap "Done" and to save the change
Adjust Schedule on Android:
- Open the iDevices Connected app
- Tap Schedules
- Select the Schedule you would like to change
- Tap on the current time and adjust to the appropriate time
- Tap on "back" to save the change
Customizing
Creating multiple homes on iOS allows you to organize and control products at different locations.
Reorder rooms and products to quickly access the devices you use most.
Rename a product when changing the connected accessory, a reset is not needed.
To ensure the best possible user experience and product performance, we suggest some of these best practices for naming your products and rooms as you build your smart home.
Use unique and specific names:
Unique names allow you to easily scan your home dashboard, helping you to quickly identify and control your products.
A few good examples of unique product names are:
Desk Lamp
Pendant Light
Recessed Lights
A few good examples of unique room names are:
Master Bedroom
Guest Bedroom
Upstairs Bedroom
Avoid names that are too similar:
Names that are too similar such as “Bedroom” and “Bedroom Light” may prevent platforms and voice assistants from quickly identifying and controlling products properly.
Avoid using letters or numbers:
Avoid using letters and numbers in product or rooms names. Platforms and voice assistants can't easily interpret these types of characters and may not be able to perform the command.
A few bad examples are:
Lamp 1
Lamp 2
Light A
Light B
Avoid special characters:
When naming products, it's best to avoid adding special characters such as hyphens and apostrophes. Some examples are “Kid's Room,” and “Room-1.” Similar to capitals and numbers, platforms and voice assistants can't easily interpret special characters.
Once you've completed the setup of your home and products, you can continue to customize the app by adjusting product names, images, or locations as needed.
Customize your Home:
1. From the home dashboard, tap the current home name in the upper left-hand corner
To adjust the home image:
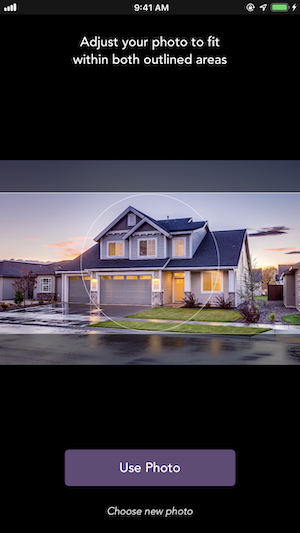
1. Tap on the current image
2. Tap “Photo Library” to choose an existing photo or choose “Take Photo” to take a new, custom photo
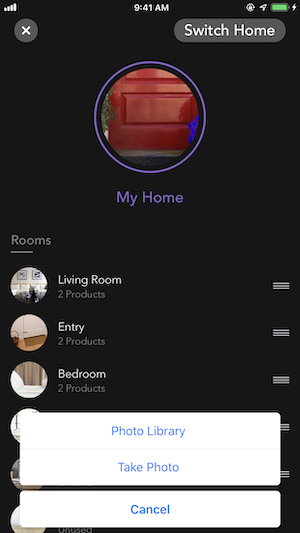
3. Once the photo is selected, crop your photo in the frame and tap "Use Photo"
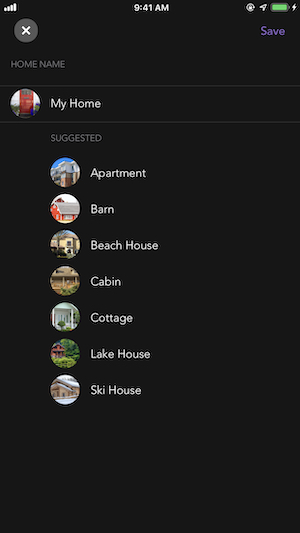
To adjust the home name:
1. Tap the current home name shown in purple below the photo
2. You can pick a suggested name or type a custom name at the top, then tap "Save"
Customize your Product:
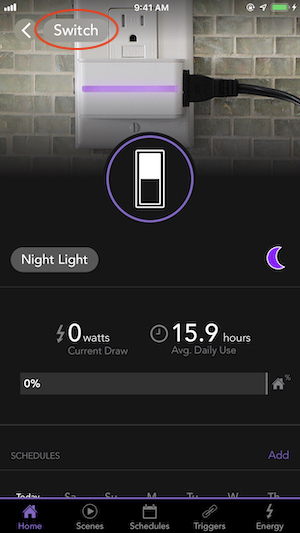
1. From the home dashboard, tap the product you want to edit
2. Tap the product name in the upper left-hand corner
To adjust the product image:
1. Tap on the current image
2. Tap “Photo Library” to choose an existing photo or choose “Take Photo” to take a new, custom photo
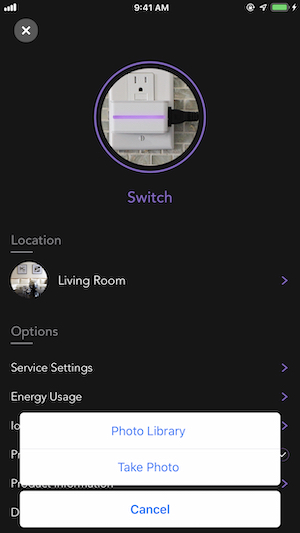
3. Once the photo is selected, crop your photo in the frame and tap "Use Photo"
To adjust the product name:
1. Tap on the current name shown in purple below the photo
2. You can pick a suggested name or type a custom name at the top, then tap "Save"
To adjust the product location:
1. Tap the current room listed below "Location"
2. Select a new room or tap "+ Add Room" to create a new room, then tap "Done"
Once you've completed the setup of your home and products, you can continue to customize the app by adjusting product names, images, or locations as needed.
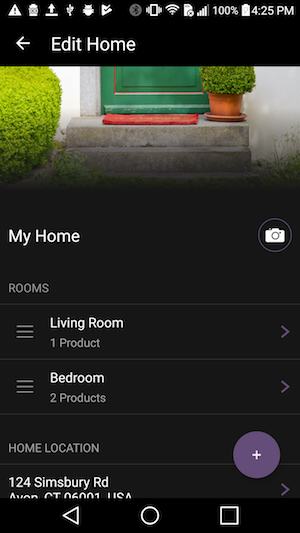
Customize your Home
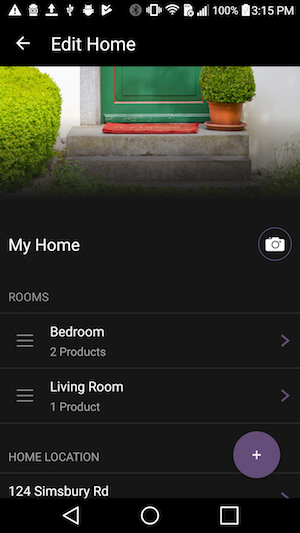
1. Tap the 3 dots in the upper right-hand corner
2. Tap "Edit Home"
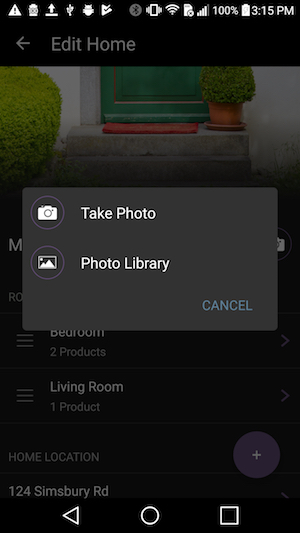
To adjust the home image:
1. Tap on the camera icon
2. Tap “Photo Library” to choose an existing photo or choose “Take Photo” to take a new, custom photo
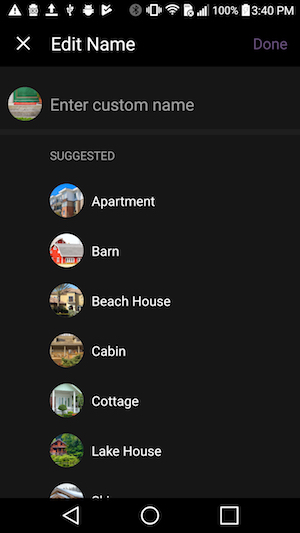
To adjust the home name:
1. Tap the current name
2. You can pick a suggested name or type a custom name at the top, then tap "Done"
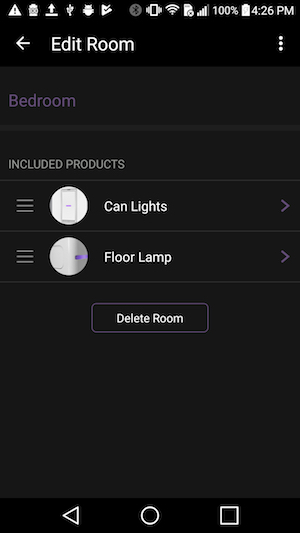
Customize your Product
1. Tap the current name of the product and tap the three dots in the upper right-hand corner
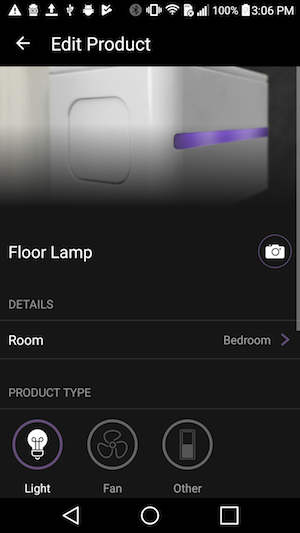
2. Tap Edit Product

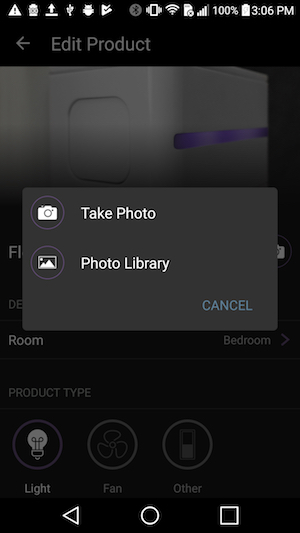
To adjust the product image:
1. To adjust the product image, tap on the camera icon
2. Tap “Photo Library” to choose an existing photo or choose “Take Photo” to take a new, custom photo
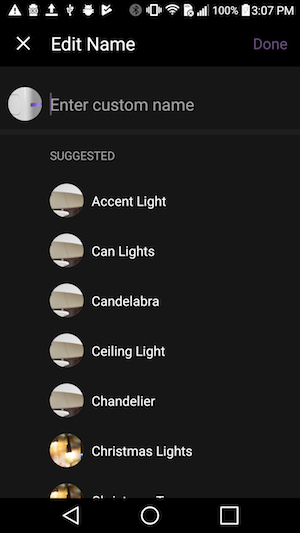
To adjust the product name:
1. Tap on the current name
2. You can pick a suggested name or type a custom name at the top, then tap "Done"
To adjust the product location:
1. Tap the current room
2. You can pick an existing room, or tap "Create New Room" to make a new one, then tap "Done"

You can change the name of your product at any time! Follow the steps below to change the name of your product on iOS devices:
1. From the home dashboard, tap on the product you would like to edit.
2. Tap the name of the product in the upper left-hand corner.
3. Tap on the name of the product. This will bring up various preset naming options to choose from, or you can tap on the name at the top to type in a custom name.
4. Once you have selected or typed in the new name, tap “Save” on the top right-hand corner of the screen.
If the name of the product includes the words “Light” or “Fan,” it will change the Associated Service automatically. This allows Siri® to recognize the device as a light or fan. When you say, “Siri, turn on the lights/fans in my home,” Siri will recognize that device and turn on the connected accessory.
You can change the name of your product at any time! Follow the steps below to change the name of your product on Android devices:
1. Tap on the product you would like to edit.
2. Tap the 3 dots on the top right-hand corner.
3. Tap “Edit Product.”
4. Tap on the current name of the product to type in a custom name or tap the “X” to the right to bring up the list of suggested names
5. Once you have selected or typed in the new name, tap “Done” on the top right-hand corner of the screen.

Customize the order of your rooms, placing the most frequently used rooms at the top. For example, you can change the order in which your rooms are displayed from top to bottom in the dashboard. Additionally, your most frequently used products can be placed at the top of each room, making them easily accessible.
To reorder rooms:
1. From the home dashboard, tap the current home name in the upper left-hand corner
2. Tap and hold on the ☰ icon to the right of the room
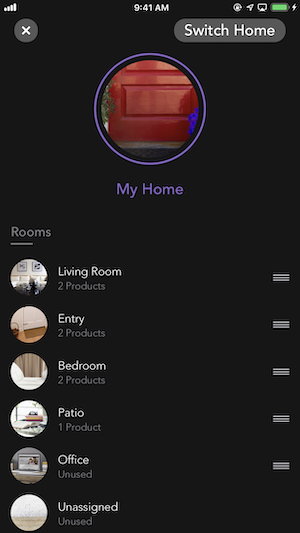
3. Drag up and down to set the room order
To reorder products:
1. From the home dashboard, tap on the room name listed above the products in purple
2. Tap the room name in the upper left-hand corner
3. Tap and hold on the ☰ icon to the right of the product
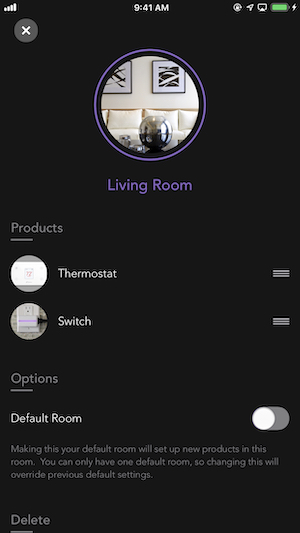
4. Drag up and down to set the product order
Customize the order of your rooms, placing the most frequently used rooms at the top. Additionally, your most frequently used products can be placed at the top of each room making them easily accessible.
To reorder rooms:
1. Tap the three dots in the upper right-hand of the iDevices Connected app
2. Tap "Edit Home"
3. Tap and hold on the ☰ icon to the left of the room, then drag up and down to set the room order

4. Set the desired room order, then tap the back button in the top left-hand corner to save the changes
To reorder products:
1. Tap the three dots in the upper right-hand of the iDevices Connected app
2. Tap "Edit Home"
3. Tap on the name of the room to view the products assigned to that room

4.Tap and hold on the ☰ icon to the left of the product, then drag up and down to set the product order
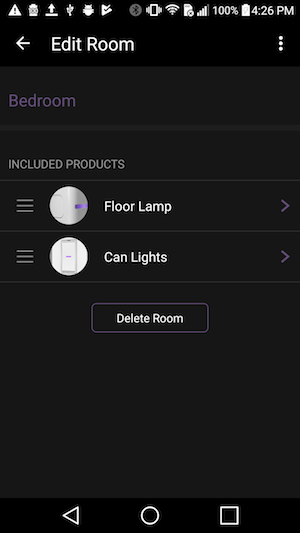
5. Set the desired product order, then tap the back button in the top left-hand corner to save the changes
Customize your home and organize your products by creating additional rooms.
To create new rooms:
1. From the home dashboard, tap the current home name in the upper left-hand corner.
2. Tap “Create New Room.”
3. Choose a name from the list of suggestions or type a custom name at the top.
4. Tap “Next” in the top right-hand corner.
5. Select any products you would like to move to the new room the tap “Next."
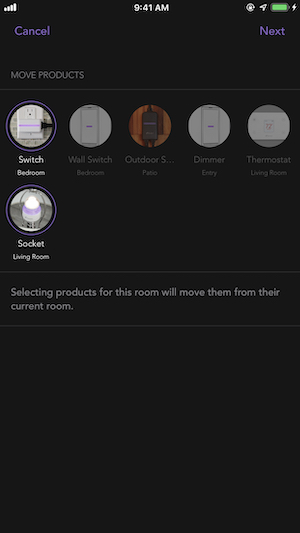
6. Review the changes and tap “Save” to complete the setup of your new room.
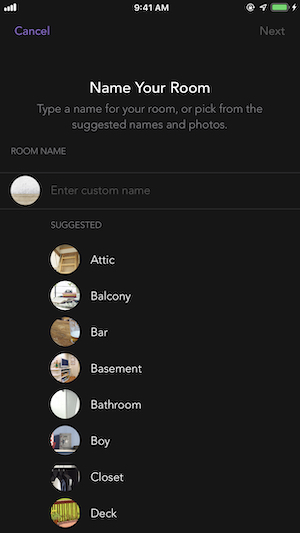
Customize your home and organize your products by creating additional rooms.
- From the home dashboard, tap the three dots in the upper right-hand corner.
- Tap “Edit Home.”
- Tap the + in the bottom right-hand corner.
- Choose a name from the list of suggestions or type a custom name at the top.
- Tap “Next” in the top right-hand corner to add your new room.
To move a product to the new room:
- Tap the current name of the product.
- Tap the three dots in the upper right-hand corner.
- Tap "Edit Product."
- Tap the current room.
- Tap the new room name.
- Tap "Done."
Creating a new Home on iOS allows you to further organize products that may be connected at another location, such as your vacation home or office. When you're using the latest version of the iDevices Connected app, it will automatically switch homes based on your current location. Using the steps below, you can also switch your home to control it any time you are away.
To create a new home:
1. From the home dashboard, tap the current home name in the upper left-hand corner
2. Tap the "Switch Home" in the upper right-hand corner
3. Tap “+ Create New”
4. Name your new home or select a suggested name from the list
5. Customize a photo of your new home or use the default photo
6. Confirm the location of the new home or type in a custom address, then tap "Add"
7. Tap “Done" and your home is now set up!
Apple's HomeKit platform allows users to create and manage multiple homes. Multiple homes add flexibility and convenience when managing products across multiple locations or residences.
To create a new home:
- From the home dashboard, tap the current home name in the upper left-hand corner
- Tap "Switch Home" in the upper right-hand corner
- Tap “+ Create New”
- The iDevices Connected app will walk you through customizing your new home
To switch between multiple homes:
- From the home dashboard, tap the current home name in the upper left-hand corner
- Tap "Switch Home" in the upper right-hand corner
- Tap on the Home you would like to view
To delete an existing Home:
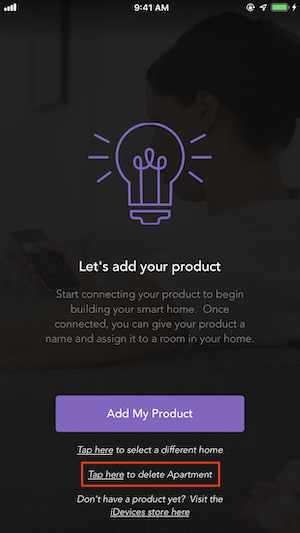
- If the home is empty:
- Tap the delete option at the bottom of the main dashboard
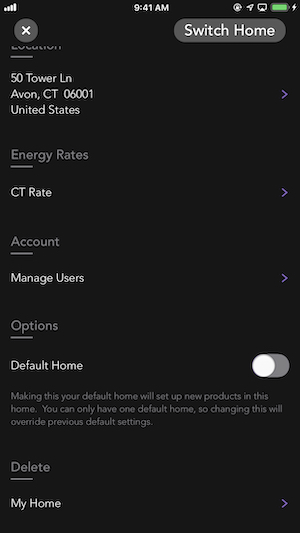
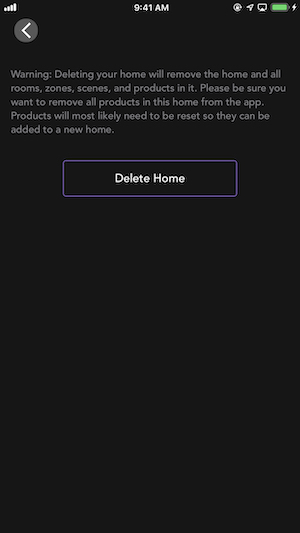
- If the home is not empty:
- From the home dashboard, tap the current home name in the upper left-hand corner
- Scroll down to the bottom and tap the current home name, then tap “Delete Home”
To switch homes based on your location:
The iDevices Connected app can automatically switch between homes as your iOS device enters the home location. To allow automatic home switching:
- Open your iOS Settings app
- Scroll down and tap iDevices
- Verify "Automatic Based On Location" is turned on
Set Default Home and Location:
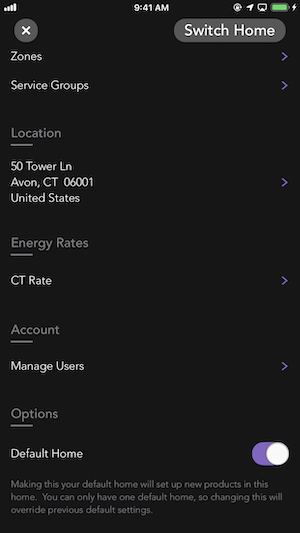
1. From the home dashboard, tap the current home name in the upper left-hand corner
2. Scroll down to view the current Location and "Default Home" settings:
- Location: Setting your Home location allows the iDevices Connected app to switch between multiple Homes automatically based on your location and provides average energy rates for your state.
- Default Home: Use the toggle to the right of “Default Home” to set the current home as the default; this means any new products will be added to this home. You can only have one default home.
Switch, Outdoor Switch, Wall Outlet and Wall Switch have the ability to change their Service Type. These allow Siri® to recognize the device as a light or fan. Other HomeKit products may have additional options, depending on the product.
For example, when you say, “Siri, turn on the lights in my home,” Siri will recognize all the products in the "Light" Service Group and turn on all the connected lights in the home.
If the name of the product includes the words “Light” or “Fan,” the app will change the Service Type automatically.
To change a product's Service Type after setup is complete, follow the steps below:
- Tap on the product in the iDevices Connected app
- Tap the product name in the upper left-hand corner
- Tap “Service Settings”
- Tap “Associated Service”
- Choose the appropriate Service Type; Lightbulb, Fan or None.
Shared Access
Control your products from all of your mobile devices.
Share control of your home and accessories for both iOS or Android
Set Schedules for your products or create Triggers for more automatic control of your home, based on your location.
On iOS devices, iDevices smart home products can utilize Apple's iCloud® service to sync information to different iOS devices signed in to the same iCloud account. This will allow you to control your HomeKit™ devices (including non-iDevices HomeKit products) from all of your iOS devices.
Note: When updating to the newest version of the iDevices Connected app, you must update the firmware on all of your iOS devices for syncing to continue to work properly.
Follow the steps below:
- On your administrator device (the iOS device you used initially to set up the product) go to Settings > iCloud, login to your iCloud account if you are not logged in
- In iCloud settings, make sure Home, Keychain® and iCloud Drive are turned ON
- Power off the administrator iOS device and then power it back on
- On your secondary device, go to Settings > iCloud, login to your iCloud account if you are not logged in
- On the secondary device, in iCloud settings, make sure Home, Keychain® and iCloud Drive are turned ON
- Power off the secondary iOS device and then power it back on
Please allow 24-48 hours for iCloud to sync HomeKit data to the other iOS device.
If your Home information doesn't show up in the iDevices Connected app on your secondary iOS device, try the following steps:
Note: In the following steps, we will assume that your Device A is the device which HAS your iDevices product set up and working and Device B is the device which does NOT show your iDevices product.
- Sign OUT of iCloud (Settings > iCloud > Sign Out) on Device A
- Sign OUT of iCloud on Device B
- Sign IN to iCloud on Device A and turn on iCloud Keychain and approve with security code
- Sign IN to iCloud on Device B and turn on iCloud Keychain and approve with security code
If you are having trouble with your iCloud Keychain, please take a look at Apple's Support article:
https://support.apple.com/en-us/HT203783
When adding users to control your HomeKit™ home and products, it is important that all users have their iOS devices upgraded to iOS 11.2.5 or later. All users must be signed into an iCloud® account to safely and securely allow multiple users the ability to control your home. Giving access to new users should be done within the home Wi-Fi® network, where the iDevices HomeKit products are already set up.
To invite a new user:
- Make sure iCloud Drive, Keychain, and Home are turned on for all users in iOS Settings > iCloud
- The administrator (person who initially set up the iDevices products and Home) needs to be connected to the Wi-Fi network or have an Apple Home Hub where all HomeKit products are reachable (all products have to be working). An Apple Home Hub can be an Apple TV 4K, Apple TV 4th Generation, HomePod™, or iPad® running iOS 10 and later.
- From the home dashboard, tap the current home name in the upper left-hand corner
- Scroll down and tap "Manage Users"
- Tap "Invite People"
- Enter the email address the recipient uses for their iCloud account, then tap "Send Invite"
- Once the invitation is sent, a pop-up notification will appear on the iOS device allowing them to accept or decline the invitation. If the pop-up notification is missed, open the Apple Home app and tap the home icon in the upper left-hand corner to locate the pending invitation.
Once approved, please allow 24-48 hours for iCloud to sync HomeKit data to the guest user's iOS device.
Note: In the iOS device of the invited user, ensure the iDevices Connected app is installed and the following settings are turned on:
- iOS Settings > iDevices > Home Data > On
- iOS Settings > iDevices > Synchronize Custom Home > On
If an Apple Home Hub is set up, the admin who initially set up the home can manage the level of control and access invited users have, as well as remove users at any time.
An Apple Home hub is not required for remote access via the iDevices Connected app.
To control accessories through the Apple Home app remotely, a Home Hub is required. Otherwise, an invited user can use the Apple Home app if they are in the home and on the Wi-Fi network.
To adjust access or remove a user:
- Open the Apple Home app and tap the house icon in the upper left-hand corner
- Tap the person that you want to edit permissions for or remove from the home
- Adjust the settings below:
Allow Remote Access: Turn on to allow users to control accessories from any location using the Apple Home app. Turn off to allow users to only control accessories while they're at the home.
Allow Editing: Turn on to allow users to add and remove accessories, scenes, and invite other users.
Remove Person: Removes this user from the home. They will no longer see or control any accessories.
The iDevices Connected app for Android uses a Google account to sync your home to multiple mobile devices. In order for your home to synchronize across devices, you must log into the same Google account in the iDevices Connected app on all of the devices.
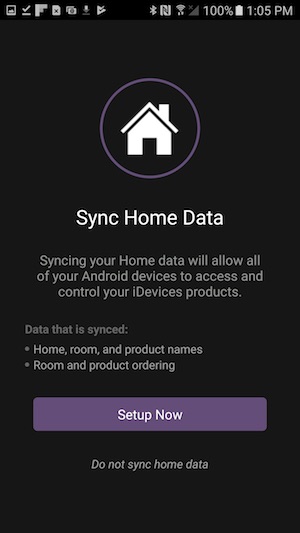
After downloading the iDevices Connected app, you'll walk through the following Home Data syncing steps during the initial app setup.
- Tap “Setup Now”
- Choose the Google account you'd like to use for syncing, or sign into a new account. Some users prefer to set up a new Google account to use for home sharing.
- When downloading the app on additional Android devices, sign in with the same account and the Home Data will sync automatically.
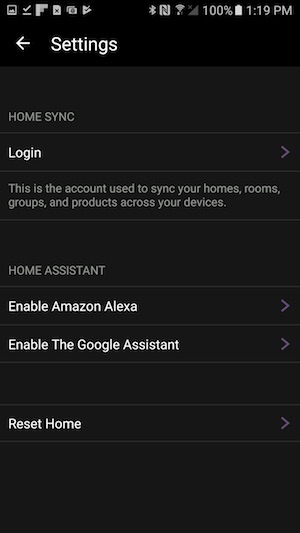
If you did not sign in during the initial setup, follow the steps below to setup the Home Data syncing:
- Tap on the (☰) in the upper left-hand corner
- Tap "Settings"
- Tap "Login"
- Tap "Setup Now"
- Choose the Google account you'd like to use for syncing, or sign into a new account. Some users prefer to set up a new Google account to use for home sharing.
- When downloading the app on additional Android devices, sign in with the same account and the Home Data will sync automatically
Energy Reporting
Get current energy consumption info on your products and rates specific to your local energy costs.
View your average hours used and have better insight into how your energy compares to homes nearby.
By using iDevices Switch, Outdoor Switch, and Wall Outlet, homeowners can save money on utility bills. The app shows current wattage draw, estimated cost, as well as average hours used, giving users the insight they need to make better energy-saving decisions daily. Your energy report can be viewed by Day, Week, Month, Year, or All-Time.
When you open the iDevices app for the first time, it will allow you to enable location services which will customize your Energy Report. If you haven't allowed location services initially, you can always enable it later by going to Settings > iDevices > Change "Location" to "While Using the App."
By default, when location services are enabled, the app will show your energy report using the average energy rate for your local state or province. If location services are not enabled, the national average will be shown.
Follow these steps to customize your specific energy rate and see a comparison of your rate against the average rate of your state or province:
- Tap the home name in the upper left-hand corner
- Scroll down to "Energy Rates,” then tap the national, state, or province rate listed below
- Enter your custom energy rate in the box, based on the energy rate of your electric bill
- Tap "Done" to save your changes
By using iDevices Switch, Outdoor Switch, and Wall Outlet, homeowners can save money on utility bills. The app shows current wattage draw, estimated cost, as well as average hours used, giving users the insight they need to make better energy-saving decisions daily. Your energy report can be viewed by Day, Week, Month, Year, or All-Time.
To view your home energy report:
- Select the energy tab
- To change the time range for the report, tap the 3 dots in the upper right-hand corner
- Tapping on a specific product will show you the energy report for that product
The app will show your energy report using the average energy rate for your local state or province. Follow these steps to customize your specific energy rate and see a comparison of your rate against the average rate of your state or province:
- From the iDevices Connected app home dashboard, tap on the 3 dots in the upper right-hand corner
- Tap “Edit Home”
- Tap “Energy Rates”
- Enter your custom energy rate in the box, based on of the energy rate your electric bill, then tap "Done"
Energy usage may be reset at any time, such as when a new accessory is connected to Switch, Outdoor Switch, or Wall Outlet.
iOS:
- From the home dashboard, tap the name of the product
- Tap the product name in the upper left-hand corner
- Tap "Energy Usage"
- Tap "Reset Energy Usage"
- Tap "Reset" to confirm and reset
Android:
- From the home dashboard, tap the name of the product
- Tap the 3 dots in the upper right-hand corner
- Tap "Edit Product"
- Tap "Energy Usage"
- Tap "Reset Energy Usage"
- Tap "OK" to confirm and reset
Firmware
If new firmware is available, tap the download icon on the Connected app home dashboard on one mobile device.
Keep app open while updating the firmware.
After downloading the latest iDevices Connected app, every time you launch the app, it will scan your local network for known iDevices products that need updated firmware. If you have a firmware update, you will see a notification icon in the upper right corner. If your firmware is up-to-date, you will not see the icon.
If your product is paired to both an iOS device and an Android device, you should only attempt to update the product from one of the devices.
To Start Firmware Updates:
1. Tap the notification icon in the iDevices Connected app:
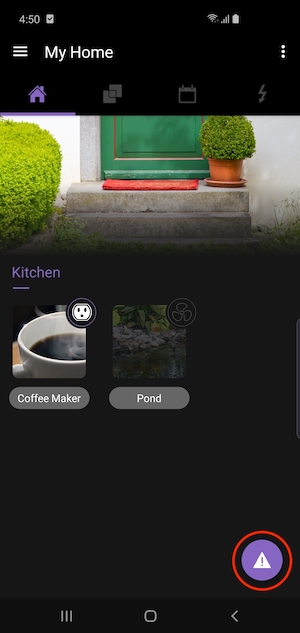
On iOS: Tap the notification icon in the top right-hand corner.
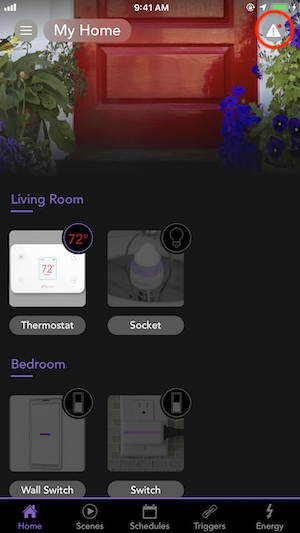
On Android: Tap the notification icon in the lower right-hand corner.
2. Tap the update icon to the right of the product to start the download and installation of the new firmware for all available products.
3. For both iOS and Android, the iDevices Connected app has to be running in the foreground throughout the entire update process. If the app is closed or sent to the background, the update process will pause. Depending on the iDevices product, a typical firmware update will last 5-7 minutes.
Note: During the download and installation process, it's normal for the product LED to flash and the connected accessory to turn on and off.
iOS 3.0 and 3.0.1 | 2/22/2017
Welcome to the next evolution of the iDevices Connected app. Based on your feedback we've enhanced the app with several new features, while further simplifying many of the functions you use every day.
App includes new software downloads for all iDevices products to enhance your experience.
- Improved voice response for services like Siri® and Alexa
- Improved responsiveness of iDevices remote access
- Bug fixes to fix stability of iDevices products on some Wi-Fi® networks
- Faster display of iDevices products within the Apple® Home app
Dynamic Automation
- Location Triggers - Activate scenes automatically when arriving or leaving a location. (Requires Apple TV 4th Gen.)
- Characteristic Triggers - Activate scenes automatically when you control another product.
- Enhanced Scenes - Make your scenes more powerful with newly added services and characteristics.
Enhanced Scheduling
- Visual Schedule Timeline - Schedules are now displayed in a linear timeline allowing you to quickly see the schedules in your smart home in a similar way to a calendar.
- iDevices Quick Product Schedules - Quickly schedule an individual iDevices product on a single screen, removing the need to create a scene. (For iDevices products only)
- Reusable Schedules - Save schedules and apply them to multiple scenes.
- Initial Thermostat Schedule Setup - New thermostat setup process walks you through setting up your base schedules by asking questions about your day.
Expanded Personalization
- Product and Room Reordering - Customize the order of your room display, placing most frequently used products and rooms at the forefront.
- New Product View - New product view adds product specific animations, enhanced energy reporting, and a filtered visual schedule view.
- Assisted First Time Setup - New initial setup process walks you through getting your app set up for HomeKit.
Improved Energy Reporting
- Home Energy Report - Compare the percentage of energy used for a single iDevices product, versus total energy used from all of your iDevices Products.
- Visual Energy Reporting - View a graph of all iDevices products and their total average energy cost over a specific timeframe.
- Additional bug fixes and UI improvements.
iOS 3.1 | 5/9/17 (iOS and Android)
- iDevices products are now compatible with the Google Assistant! You can now use the Google Assistant to interact with your iDevices smart home products with the power of your voice. iDevices products support direct actions so you can simply say “Ok Google, turn on my lamps” and watch your home come to life. Create a room in the Google Home app, like your Bedroom or Kitchen, and add the products you want for complete home automation. Connect your iDevices products to the Google Assistant in your Connected app's settings.*
- Enhanced Accessibility: The VoiceOver technology support has been greatly enhanced and improved to adhere to Apple Accessibility guidelines. Added support for more native Accessibility gestures and improved app navigation.
- New Grouping: Zones and Service Groups can now be found in the same “Groups” menu, allowing for even more comprehensive product grouping.
- Reusable Custom Colors in Scene Creation: Custom colors that users have created can now be saved and applied to Scenes.
- Additional bug fixes and UI improvements.
*To enable Alexa and/or Google Assistant voice controls, iDevices smart home products require an Alexa-enabled accessory or a Google Assistant-enabled device. To get started, go to your app settings in the iDevices Connected app.
iOS 3.1.1 | 6/21/17
- Additional bug fixes and UI improvements for creating Scenes
iOS 3.1.2 | 6/29/17
- Additional bug fixes and UI improvements
iOS 3.1.3 | 7/5/17
- Wall Switch and Wall Outlet firmware version 1.8.7
iOS 3.1.4 | 8/1/17
- Additional bug fixes and UI improvements
- Switch, Outdoor Switch and Socket firmware version 1.8.7.
iOS 3.1.5 | 8/16/17
- Additional bug fixes and UI improvements.
iOS and Android 3.2 | 8/31/17
- Automatic Home Switching (iOS only): If you have multiple homes, the iDevices Connected app will now use locations services to determine which home you're controlling, and filter your view to that home.
- Improved Energy Monitoring: The iDevices Connected app will now set your energy rate based on your state for even more accurate energy reports. Energy rates are now expanded to included Canadian provinces and territories.
- Recurring Energy Overviews: Receive an updated snapshot of your home's energy usage.
- Additional bug fixes and UI improvements.
iOS 3.2.1 | 9/21/17
- Bug fixes affecting users of iOS 11
- App performance improvements
iOS 3.2.2 | 10/27/17
- Resolved issue with home switching.
- iOS 11 Cloud improvements and fixes.
iOS 3.2.3 | 10/13/17
- iOS 11 crash fixes
- Thermostat firmware version 1.8.7
Android 1.5.20 | 10/17/17
- Fixed a crash relating to Amazon login credentials
- Added updated icons for the different product types (lights/socket, fan, switch)
- Various bug fixes and performance improvements
- New Network Diagnostics integration
- Thermostat firmware version 1.8.7
iOS 3.3 | 10/19/17
- New device icons and animations
- New Network Diagnostics Integration
Android 1.5.21 | 10/20/17
- Fixed a crash issue
iOS 3.3 | 10/25/17
- Bug fixes and improvements
iOS 3.3.2 | 11/2/17
- Bug fixes and improvements
- Resolved an error when creating schedules after updating firmware
iOS 3.3.3 | 11/10/17
- Bug fixes and improvements
Android 1.5.26 | 1/8/18
- Fixes a crash issue
Android 1.5.28 | 1/19/18
- Fixes a crash issue
iOS 3.4 | 2/12/18
- Additional Triggers: If you have a compatible Apple TV, you now have the ability to set new triggers like “Presence” and “Threshold”. New customizations allow you to limit triggers based on the time of day or when someone is home. You can also end triggers automatically.
- Improved Schedules: Now supporting sunrise and sunset schedules, as well as “Adjust Time,” which allows for additional modification. Updated schedules also work with new customizations.
- Enhanced Scenes: You can now turn “Scenes” on or off, as well as deactivate or activate a “Scene” without having to create a new one.
- Popover View: Quick access to app features and details like “Scenes,” schedules and energy report with iPhone 6S and higher using 3D Touch. Older devices supported with “long press”.
- Instant Switch Support: Create an additional control point for iDevices products with this wireless remote wall switch that can be placed anywhere in seconds with the included Command™ Strip from 3M.
- Firmware version 1.9.4: Switch, Outdoor Switch, Socket, Wall Switch, Dimmer Switch, and Wall Outlet.
- Additional bug fixes and UI improvements
Android 1.6.36 | 2/13/18
- Instant Switch Support: Create an additional control point for iDevices products with this wireless remote wall switch that can be placed anywhere in seconds with the included Command™ Strip from 3M.
- Firmware version 1.9.4: Switch, Outdoor Switch, Socket, Wall Switch, Dimmer Switch, and Wall Outlet.
- Additional bug fixes and UI improvements
iOS 3.4.1 | 2/16/18
- Additional bug fixes and UI improvements
iOS 3.4.2 | 2/21/18
- Additional bug fixes and UI improvements
- Accessibility: When the accessibility focus comes to the new Action button, the accessibility navigation stops
- Bug fix for scheduling scenes
- Bug fix for adding product schedules
- Additional bug fixes
Android 1.6.43 | 3/13/18
- Fixes a crash issue
- Adds for support for Wi-Fi passwords over 40 characters
iOS 3.4.4 | 3/14/18
- Fixes a crash issue that could occur when signing in to Amazon account for use with Amazon Alexa or Google Home
iOS 3.5.1 | 4/12/2018
- Resolves crash issues, UI improvements
iOS 3.5.2 | 5/24/2018
- Bug fixes and UI improvements
iOS 3.6 | 6/22/2018
- New toggle controls
- Bug fixes and UI improvements
iOS 3.6.1 | 6/27/2018
- Bug fixes and UI improvements
Android 1.6.92 | 6/27/2018
- New product setup procedure
- New toggle controls
- Bug fixes and UI improvements
iOS 3.6.2 | 7/2/2018
- Fixes issue with Apple Watch app
Android 1.6.95 | 7/18/2018
- Resolves crash issues
iOS 3.6.3 | 8/7/2018
- Bug fixes and UI improvements
iOS 3.6.4 | 8/15/2018
- Fixes an issue where incorrect temperatures displayed for sensors
Android 1.6.101 | 9/19/2018
- Bug fixes
iOS 3.7 | 12/4/2018
- IFTTT Integration
- Bug fixes and UI improvements
Android 1.7.59 | 12/4/2018
- IFTTT Integration
- Bug fixes and UI improvements
iOS 3.7.1 | 12/11/2018
- Bug fixes
iOS 3.7.2 | 1/2/2019
- Bug fixes and UI improvements
- Firmware version 1.9.7: Switch, Outdoor Switch, Socket, Wall Switch, Dimmer Switch, and Wall Outlet
- 3- & 4-way Wall/Dimmer Switch pairing improvements
Android 1.7.65 | 1/2/2019
- Additional bug fixes and UI improvements
- Firmware version 1.9.7: Switch, Outdoor Switch, Socket, Wall Switch, Dimmer Switch, and Wall Outlet
- 3- & 4-way Wall/Dimmer Switch pairing improvements
Android 1.7.67 | 1/14/2019
- Additional bug fixes and UI improvements
iOS 4.0 | 1/21/2019
- Updated Home Screen: Control your entire iDevices smart home from one screen
- New Tab Bar: Easily access top features like Scenes, Schedules, Triggers, and Energy Report
- UI Updates: New year, new look. Our feature screens are now even more intuitive
iOS 4.0.1 | 1/31/2019
- Bug fixes and UI improvements
Android 1.7.76 | 2/6/19
- Additional bug fixes and UI improvements
- Improved connection stability
iOS 4.0.2 | 2/9/2019
- Minor bug fixes
iOS 4.0.3 | 4/16/2019
- Bug fixes and UI improvements
Android 1.7.86 | 5/14/19
- Performance and reliability improvements
- Firmware version 1.9.9:
- Switch, Outdoor Switch, Socket, Wall Switch, Dimmer Switch, and Wall Outlet.
- Includes Bluetooth connectivity improvements, removes beep when Primary and Secondary devices reconnect, IoT improvements, and additional minor bug fixes.
iOS 4.0.4 | 5/14/19
- Performance and reliability improvements
- Firmware version 1.9.9:
- Switch, Outdoor Switch, Socket, Wall Switch, Dimmer Switch, and Wall Outlet.
- Includes Bluetooth connectivity improvements, removes beep when Primary and Secondary devices reconnect, IoT improvements, and additional minor bug fixes.
iOS 4.1 | 9/3/19
- Adds the ability to open the Instinct Switch app from the iDevices Connected app.
Android 1.7.95 | 9/4/19
- Performance and reliability improvements
iOS 4.1.1 | 9/20/19
- Performance and reliability improvements
- Fixed iOS 13 device setup issue
iOS 4.1.2 | 10/10/19
- Performance and reliability improvements
- Fixed iOS 13 device setup and display issues
- Fixed other minor display issues
User Privacy
Resetting products erases all user and home data previously stored.
Adjust location services at any time from your iOS settings.
On iOS devices, be sure iCloud Keychain is turned on.
iDevices allows you to erase data from your products at any time by performing a reset. Resetting iDevices products will clear out all user data from the app and product. This information includes app pairing, Wi-Fi pairing, schedules, scenes and any custom data such as product names and photos.
Examples of when you may want to reset a product:
- When moving to a new home and leaving products behind for the next resident
- After changing the Wi-Fi router, network name or password
- After the product was deleted from the iDevices app
- When you're switching from an iOS device to an Android device or vice versa
Click the product below for reset instructions:
iDevices uses Apple's HomeKit platform to access home data information. Your home data includes the unique product key, product names, home name, rooms within the home, other HomeKit products, groups, scenes, other users, and automations. iDevices only has access to this limited amount of data that is approved through Apple's privacy guidelines. This allows users to setup products, view the existing home and edit the home information.
Enable this setting using the steps below:
- Open your iOS settings
- Scroll down and tap iDevices
- Verify Home Data is on
To ensure Home information is saved and can sync properly, verify iCloud Keychain is enabled: iCloud Keychain
Apple's HomeKit platform allows administrators to easily and securely share home and product control with their friends and family. The admin can share the home to individuals by inviting them with their Apple ID, which allows for the highest level of security. Only individuals invited to share a home can have access to control the products.
Once invited, shared users have access to the home through the iDevices Connected app. This includes home and products, rooms, scenes, and automations. Shared users will not see any custom photos within the app.
Shared users do have the ability to invite or remove additional users to the home, however they will not have privileges to remove the original admin of the home.
All users will have the ability to control the home remotely.
The admin will always have full access to the home and products and can remove invited users at any time.
Click here to learn how to invite a new user to the home: Share Control of your Accessories on iOS
There are several benefits of allowing location services with the iDevices Connected app which allow you to take advantage of some offered features.
For iOS users with multiple homes, Home Switching allows your device to automatically switch to different homes as you near their location.
The iDevices Connected app can use your location to provide an estimated state energy rate and cost for Energy Reporting.
Additionally, when creating location-based automations like triggers on your iOS device, the iDevices Connected app will use your current location and allow you to activate scenes based on your location.
You can enable or disable location services on iOS using the steps below:
- Open your Settings app
- Scroll down and tap iDevices
- Set location to “While Using the App” to disable or “Never” to adjust location services
For Android, iDevices Connected uses your location during setup. Location is required for proximity pairing when setting up an iDevices product.
You can enable or disable location services for Android using the steps below:
- Open your Settings app
- Tap “Apps” or “Applications”
- Tap iDevices
- Tap “Permissions”
- Turn “Your Location” on or off
Apple's HomeKit platform uses iCloud Keychain to securely store your home data through end-to-end encryption, using the highest level of security. Your iCloud Keychain information uses a unique key that is specific to your mobile device and your mobile devices passcode. Your home data includes the unique product key, product names, home name, rooms within the home, other HomeKit products, groups, scenes, other users, and automations.
This allows the home data to securely sync from your primary iOS device to a secondary iOS device such as an iPad, Syncing Between iOS Devices. The HomeKit platform uses iCloud Keychain to securely sync the home data over to additional users you choose to share your home with, Share Control of your Accessories on iOS.
To have access to all the features of iDevices products and the Connected app, it's best to turn on iCloud Keychain. https://support.apple.com/en-us/HT204085
iDevices has created a proprietary (IoT) cloud system so users can securely and anonymously control their iDevices products when they're away. This system uses the highest level of encryption available so your information is kept private and secure.
This remote access system uses 256-bit encryption, the highest AES encryption level established by the U.S. National Institute of Standards and Technology. Our connected products are protected by a certificate-trust relationship that exists only with paired controllers (e.g. smartphone, iPad, voice assistant, etc.). This certificate-trust relationship ensures that if the Wi-Fi network is compromised, iDevices products cannot be accessed by any third party. The iDevices remote access ensures your external IP address is always hidden from third parties and other connected apps. Additionally, personal network credentials are not stored in the cloud or shared with any third party.
Wi-Fi And Network Compatibility
An adequate Wi-Fi network is required to sufficiently operate connected products.
Consider including additional access points for buildings with concrete walls and ceilings, as those can block signal.
Be sure Airtime fairness or Airtime Quality settings are disabled on your router.
Products should be set up on a 2.4GHz network band.
iDevices products require a home Wi-Fi®network with a 2.4 GHz network band (802.11 B/G/N)
Most routers have two network bands, 2.4 GHz and 5 GHz. The 5 GHz network band has faster data speeds, which is great for tasks like browsing the internet and streaming content such as video or gaming. However, 5 GHz has a shorter signal range from the router.
The 2.4 GHz network, while slightly slower in speed, has a much longer signal range from the router making it ideal and more dependable for smart home products. Most smart home products require the 2.4 GHz network band, as this allows users to control products farther from the router and doesn't require continuous streaming.
- Instinct supports the network security setting WPA2 with AES encryption.
- All other iDevices products support None, WPA, or WPA2 with AES encryption.
Additionally, many routers have a setting called “Airtime Fairness” or "Airtime Quality," which often causes products to be unable to join the Wi-Fi network. Typically, this setting is located in the Wireless section of your router settings under the Advanced or Professional tab and is enabled by default. We recommend disabling this setting.
Most routers allow you to access and adjust settings via a web browser or app. Please consult the router's user manual to learn how to connect to your router and adjust its settings.
_______________________________________
The following routers are known to not currently be compatible with iDevices products:
- Actiontec MI424WR
- ARRIS EA9200
- ARRIS TG1672
- ARRIS TG862
- ARRIS TG1682G
- ASKEY Wave2
- ASUS RT-AC1200
- Bell Home Hub 3000
- Business Class Routers
- Eero 6
- Eero Pro 6
- FiOS G1100
- Google Fiber
- Linksys AC1200
- Luxul Mesh systems
- Netgear Orbi (Firmware prior to 2.1.4.16)
- Spectrum RAC2V1K
- Technicolor TC8717T
- Ubee Routers
- Xfinity XB7 (Models CGM4331COM and TG4482A)
Note: Due to firmware, router and mobile device updates, compatibility may change at any time.
If you have questions about the compatibility of your router with iDevices products, please contact our Customer Experience Team at Support@iDevicesinc.com.
iDevices Switch, Outdoor Switch, Socket, Wall Outlet, Wall Switch, and Dimmer Switch are certified by the Wi-Fi Alliance®. The certification doesn’t guarantee iDevices products work with all routers. You can verify compliance on the Wi-Fi Alliance website - www.wi-fi.org - or look for this logo on your networking equipment to ensure compliance:
iDevices products require adequate Wi-Fi strength in the home that covers the product installation area and can should also be able to support a number of connected products and devices.
A stable and capable Wi-Fi network is important when thinking about building a smart home. All routers have a client limit, meaning how many products or devices are connected to the router. Some client limits are very high and therefore are a good choice for your smart home. Many routers supplied by your Internet Service Providers (ISP), and often older routers are not designed to support multiple smart home products. This may result in a difficult setup experience, or even products dropping network connections randomly.
If you have an existing network:
Confirm that your existing network meets the requirements for supporting a smart home, that you have a 2.4GHz band available, and that the Wi-Fi signal is strong in the areas of your home where you plan to install your connected products.
If a network does not yet exist:
When necessary, the physical product installation can be completed before a Wi-Fi network is in place.
Determine if you require a standard consumer network or a larger, professional network setup as noted below. If you have a larger home, you may need to consider multiple access points (APs) throughout the home to ensure the signal is strong and broad. Also consider including additional access points (APs) for buildings with concrete walls and ceilings, as those will also block the Wi-Fi signal. If you have questions about the compatibility of your current router or are looking for router recommendations, please contact the iDevices Customer Experience Team at Support@iDevicesinc.com
Standard Consumer Network Recommendations
Consumer network hardware works well in typical-sized homes with less than 50 connected products. We recommend a mesh network such as Google Wi-Fi or Eero to ensure proper coverage.
Professional Network Recommendations
For larger or more complex structures with more than 50 or so connected products, a more professional hardware setup may be appropriate. These typically include running Cat 5 or 6 throughout the home along with setting up multiple gateways and access points.
Router Setup Tips:
- Set products up on a 2.4 GHz network band, 802.11 b/g/n by having your phone connected to the 2.4GHz network before app pairing.
- Set router network security to None, WPA or WPA2 with AES encryption.
- Guest networks are not supported.
- Be sure Airtime/Wireline Fairness is disabled on the router, when applicable. This feature should be turned off prior to product setup.
- Access points should be set up no more than 20'-30' apart and share the same network name.
After making certain changes to your Wi-Fi® network, your iDevices Products may be unable to communicate with the app, home assistants, and other connected services.
These changes can include:
- Installing a new router and/or access points
- Upgrading firmware on the router and/or access points
- Changing the network name (SSID)
- Changing the network password
When this occurs, the LED night light on your iDevices products will blink orange, or the Thermostat display will show the no Wi-Fi symbol to indicate that it can no longer find the network it was once paired with.
Before changing network equipment, please review the most current network requirements and router compatibility list here: Wi-Fi And Network Compatibility.
When a new router is installed, it may be possible to make the SSID and password exactly the same as it previously was. In some instances, the products will see this new network as the same one it was connected to previously and products may reconnect without issue. Refer to your router's manual for instructions on adjusting the SSID and password.
After setting the SSID and password to what it was previously, reboot the iDevices product by unplugging it and plugging it back in or by pressing the reboot button on any in-wall products. Verify that the LED returns to its normal night light color and the product can be controlled in the iDevices Connected app.
When the settings on the new router are too different from the previous one, the products may not reconnect and will continue to flash orange or display the no Wi-Fi symbol. In this situation, the iDevices products must be reset and setup again to connect to the new Wi-Fi network.
Click on the product below to learn how to reset and reconnect your iDevices product:
Need Further Assistance? We're Here To Help.
Our Customer Experience Team is available Mon - Fri 9am - 5:30pm EST