
Wall Switch
Installation
Wall Switch can be for a single pole setup, or for use with 3- and 4- way configurations when using multiple Wall Switches.
In 3- and 4- way configurations, traveler wire should not be used.
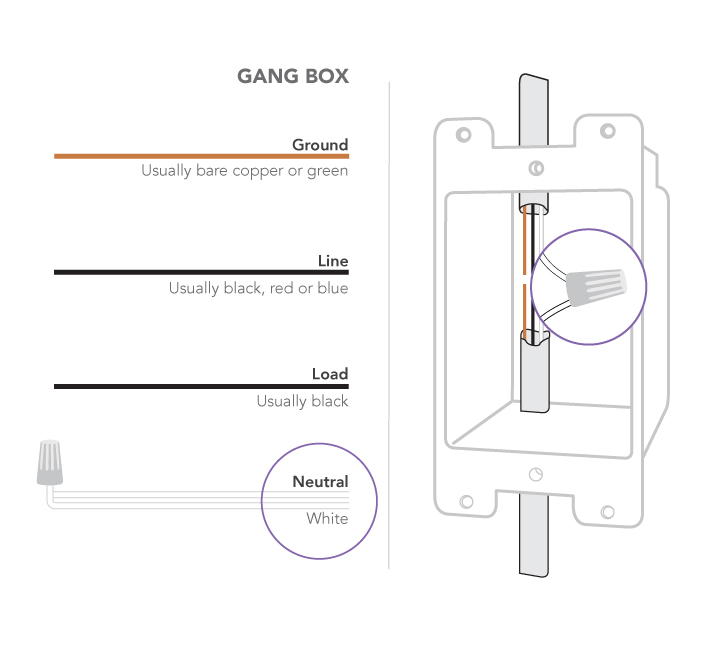
A neutral wire must be present in each gang box.
All iDevices products work with both iOS and Android mobile devices.
Your safety is important to us. Electricity is dangerous and can cause personal injury and property damage if handled improperly. A working knowledge of electrical installation is required to install this product. If you are not comfortable working with electricity, do not attempt to install the iDevices Wall Switch and seek professional assistance from a qualified electrician.
Installation - Single Pole:
Single pole switches are used to control one or more lights or fixtures from a single location.
1. Turn OFF the power at the circuit breaker.
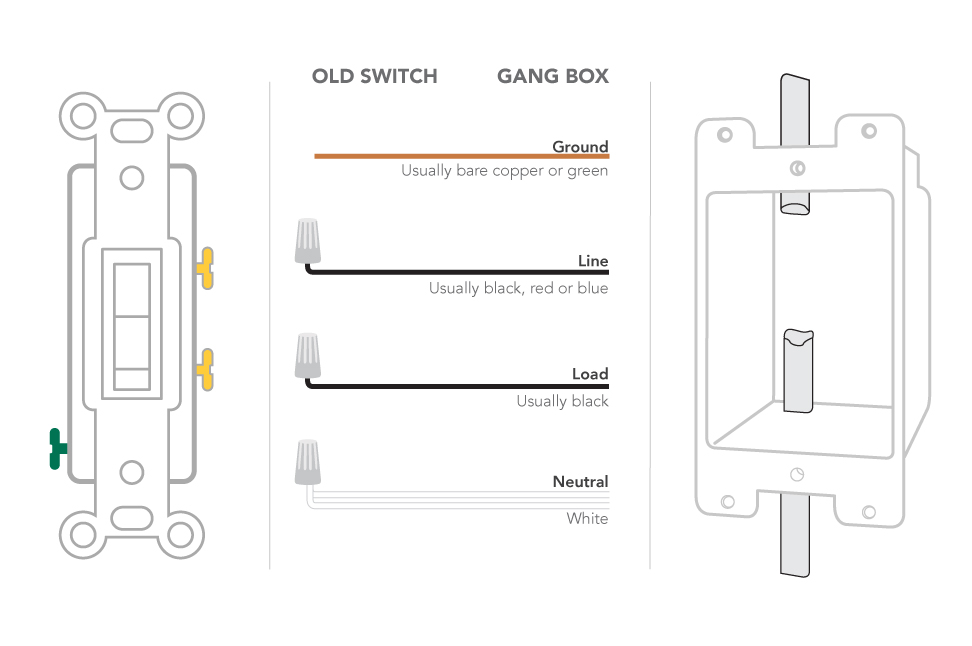
2. Remove the existing faceplate and switch from the gang box. Take a photo of the existing wiring for future reference.
3. Confirm the gang box contains a neutral wire (typically white). If there are no neutral wires present, you may need to run additional wires; please consult a qualified electrician.
Note: Your home's wiring may differ; please consult a qualified electrician.
4. Remove both wires from the terminals of the existing switch and cap with the provided wire nuts. Note: If you have more than two wires connected to your switch (not including the bare copper or green-coated ground wire), please see the 3- and 4-way installation instructions. It's not necessary to remove the ground wire.
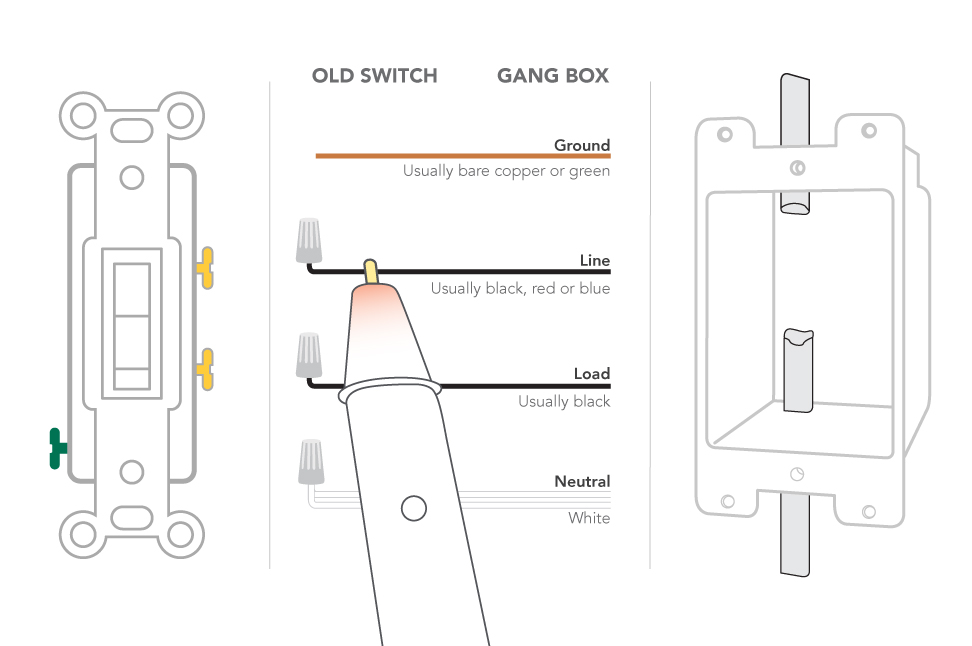
5. Turn the power back ON at the breaker. Using your voltage detector to identify which of the two wires you removed is energized. This is the “line” wire. The wire that is not energized is the “load” wire. Note these two wires for future reference.
6. Turn the power back OFF at the breaker and install the iDevices Wall Switch according to the diagram. Ensure all wire nuts are securely fastened.

7. Install the Wall Switch into the gang box and install the faceplate.
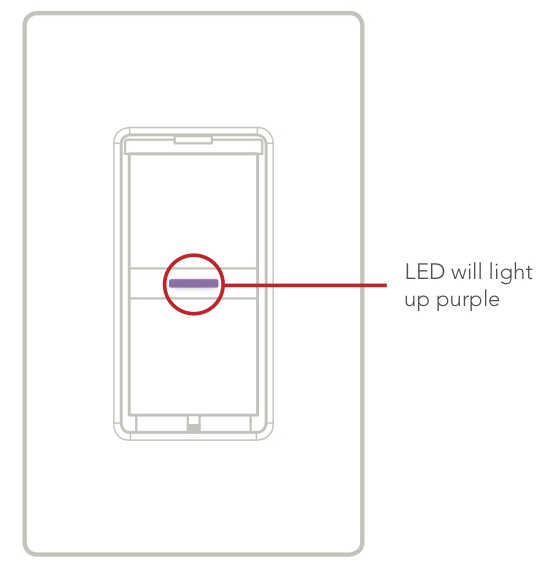
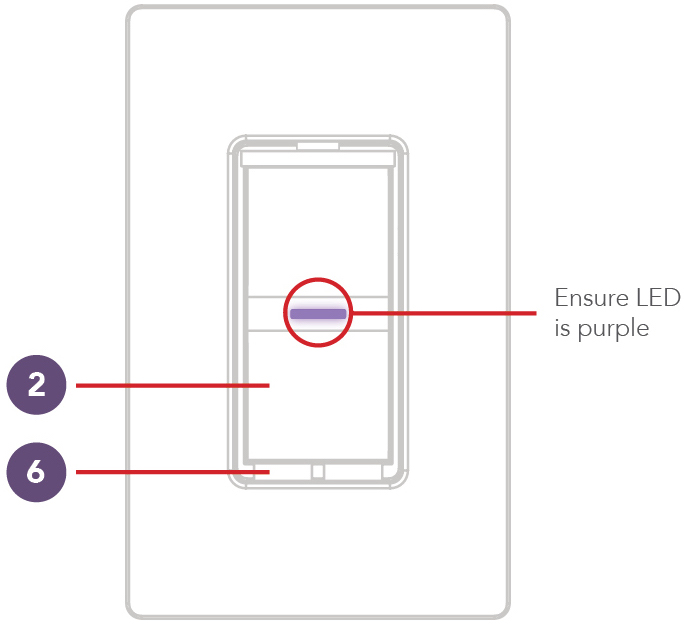
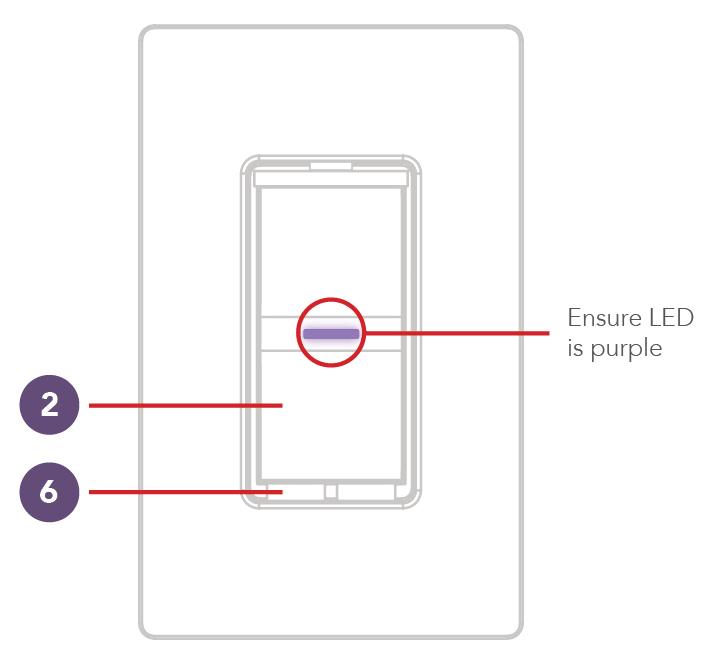
8. Turn the power back ON at the circuit breaker and confirm that the LED on the Wall Switch lights up purple.
For instructions on setup, follow the links below:
Your safety is important to us. Electricity is dangerous and can cause personal injury and property damage if handled improperly. A working knowledge of electrical installation is required to install this product. If you are not comfortable working with electricity, do not attempt to install the iDevices Wall Switch and seek professional assistance from a qualified electrician.
Note: For 3- and 4-way setups, the iDevices Wall Switches communicate via Bluetooth® technology. In order for the Wall Switches to communicate properly, all switches need to be replaced with iDevices Wall Switches.
Distance: The distance between the primary and secondary switches can range depending on the Bluetooth signal strength between them. Typically they best perform less than 30 feet apart, but that can vary depending on the environment or obstructions.
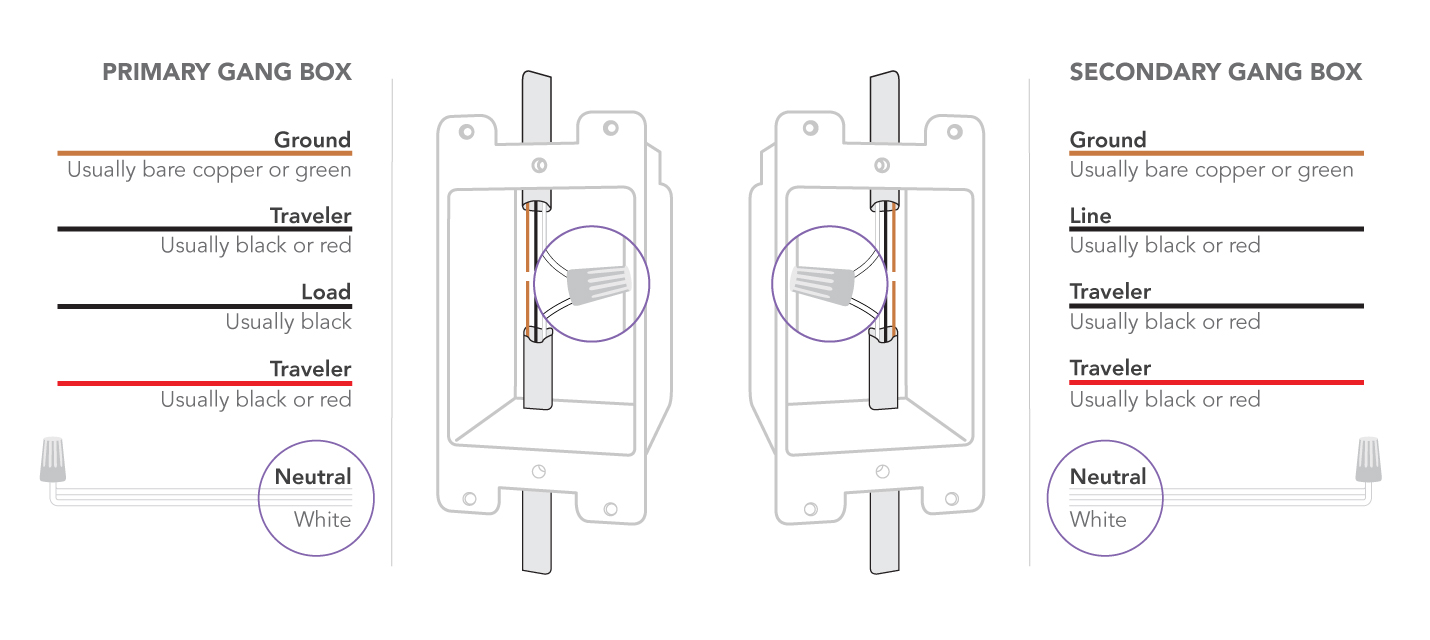
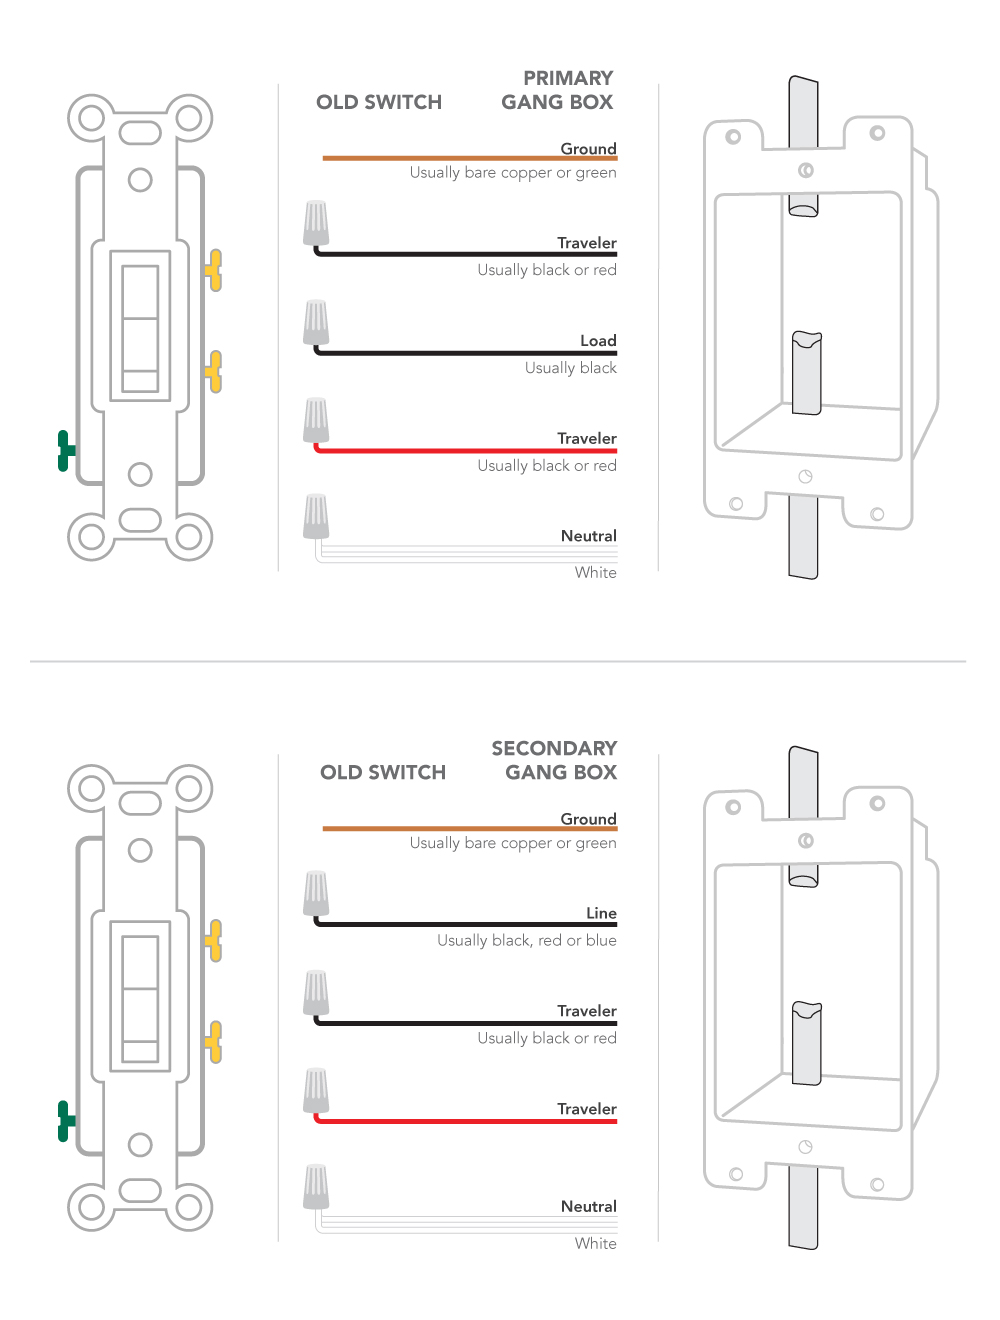
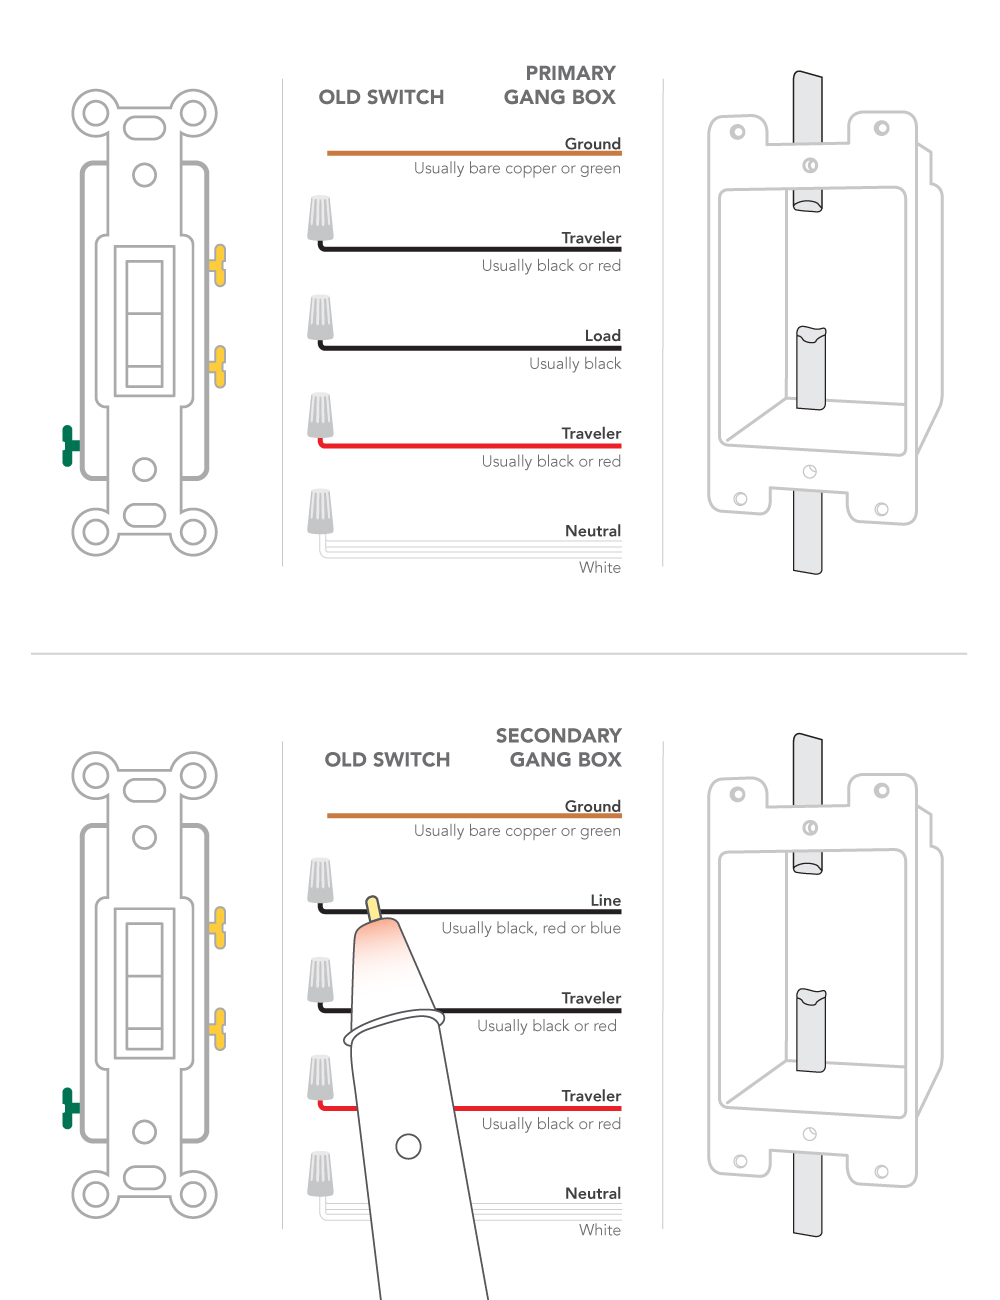
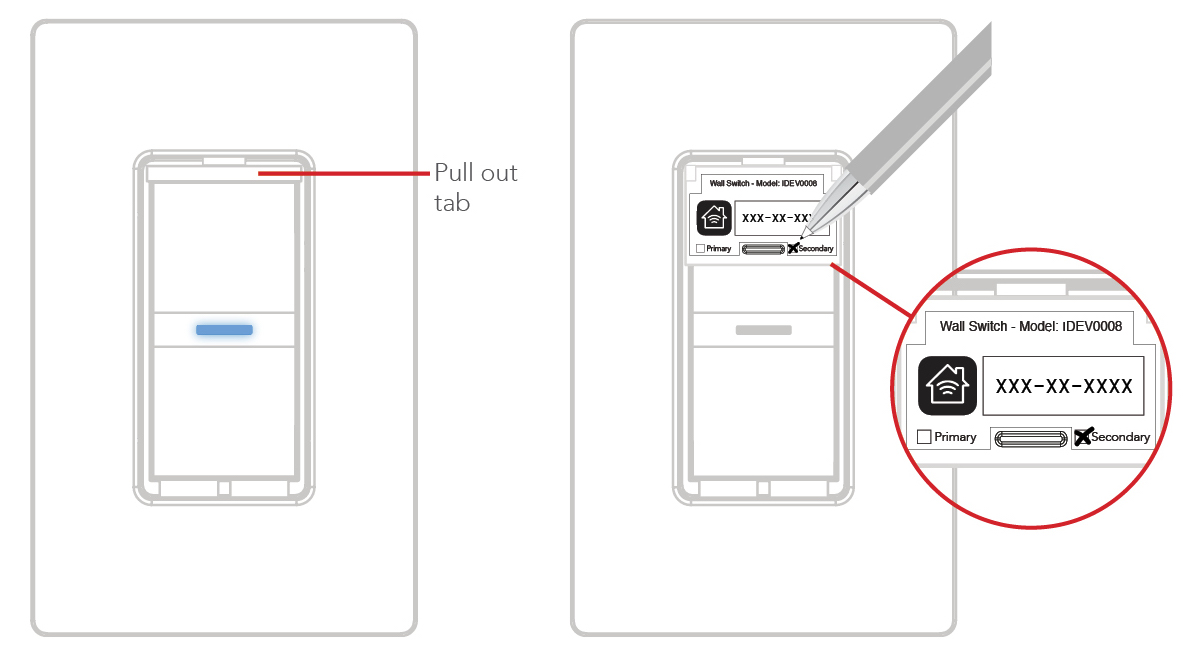
Installation - 3-way: 3- and 4-way switches are used to control one or more lights or fixtures from 2 or 3 switch locations, such as the top and bottom of a flight of stairs. 1. Turn OFF the power at the circuit breaker. 2. Remove the existing faceplates and switches from the gang boxes. Take a photo of the existing wiring for future reference. 3. Confirm that each gang box contains a neutral wire (typically white). If there are no neutral wires present, you may need to run additional wires; please consult a qualified electrician. Note: Your home's wiring may differ; please consult a qualified electrician. 4. Remove the wires from the common terminal on both of the existing switches and cap with the provided wire nuts. Note: The common terminals usually have a screw that is either black or copper in color. 5. Turn the power back ON at the circuit breaker. Using your voltage detector, identify which of the two wires you removed from the common terminal is energized. This is the “line” wire. Mark this wire as the Secondary (S) Switch Position. You will need to refer to this during the Wireless Communication Setup. The wire you removed from the common terminal that is not energized is the “load” wire. Mark this wire as the Primary (P) Switch Position. You will need to refer to this during the Wireless Communication Setup. 6. Turn power back OFF at the circuit breaker. 7. Install the iDevices Wall Switches according to the diagram. Ensure the wire nuts are securely fastened. 8. Install the Wall Switches into the gang boxes and install the faceplates. 9. Extend the pull out tab on the front of the Wall Switch connected to the line wire (identified in step 5). Using a ballpoint pen, put an “X” in the box to indicate that this is the Secondary Switch. 10. Extend the pull out tab on the front of the Wall Switch connected to the load wire (identified in step 5). Using a ballpoint pen, put an “X” in the box to indicate that this is the Primary Switch. 11. Turn the power back ON at the circuit breaker and confirm that the LED on both Wall Switches light up purple. 12. You are now ready to pair your Primary and Secondary Switches. For instructions, follow the links below: Installation - 4-way: In a 4-way installation, you will follow the same process as a 3-way installation, which is listed above. However, in a 4-way setup you'll have one additional switch that is specifically a 4-way switch. You'll notice that this switch has 2 red wires and 2 black wires connected to it (If your 4-way switch has 2 white wires and 2 red wires connected to it, your configuration is not compatible with the iDevices Wall Switch). 1. Remove all wires from the 4-way switch and cap both red wires with wire nuts. 2. Then tie the 2 black wires along with the black "Line" wire on the iDevices Wall Switch together with a wire nut. 3. Connect the white wire on the iDevices Wall Switch to the neutral wire (usually white) in the gang box and cap with a wire nut. 4. Finally, cap the remaining red wire on the iDevices Wall Switch. This Wall Switch will serve as another secondary Switch. 5. Follow step 12 above to pair the Primary Switch to the Secondary Switches. Note: Your home's wiring may differ; please consult a qualified electrician.


In 3 and 4-way configurations, the primary Wall or Dimmer Switch must be identified for pairing devices together via Bluetooth.
After Bluetooth pairing is complete, the primary switch is connected to the iDevices Connected app.
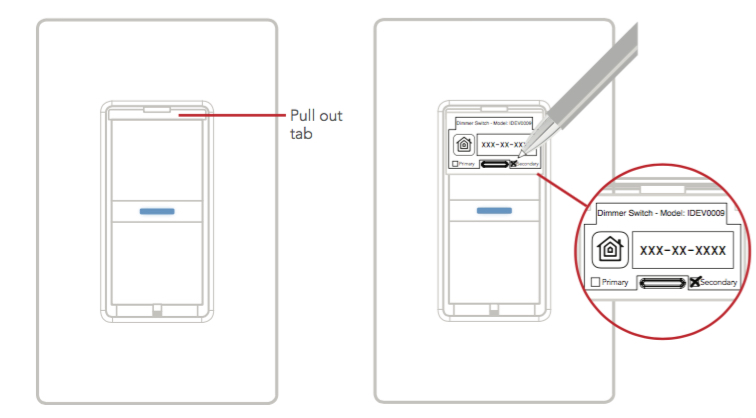
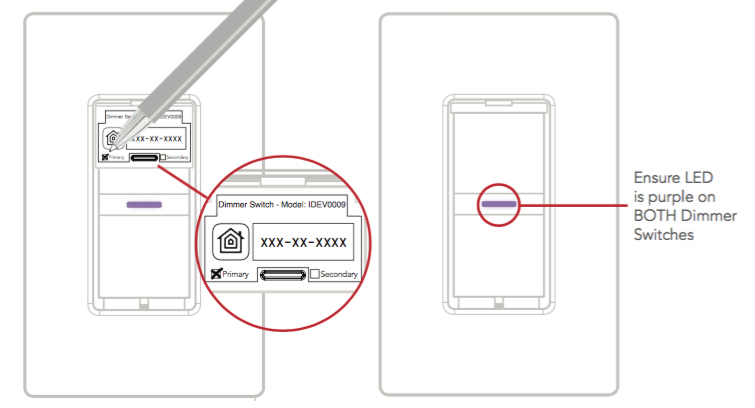
Method 1: Extend the pull-out tab on the Wall or Dimmer Switch (4 on the diagram shown below). There should be a check in the box indicating if this is the primary or secondary location.
Method 2: If the pull-out tab is not marked to indicate which is primary or secondary and you performed the installation yourself, the primary location is the Wall or Dimmer Switch in which all three wires were connected to the wires in the gang box (load, line and neutral).
Method 3: If the pull-out tab is not marked to indicate which is primary or secondary and the Wall or Dimmer Switches were pre-installed, we can determine which location is the primary by attempting to place the switches into Wi-Fi pairing mode.
- Press and hold button 6 for 3 seconds until the LED flashes blue rapidly
- Then press button 1 once:
- If the LED flashes red and beeps, then returns to solid purple, this is a secondary Wall or Dimmer Switch. Try the next switch in the 3- or 4-way configuration.
- If the LED flashes blue slowly this indicates this is the primary location which is now in Wi-Fi pairing mode and can now be paired to the iDevices Connected app.
Method 4: If the boxes are not marked to indicate which is Primary or Secondary and the Wall or Dimmer Switches were pre-installed, we can determine which location is the Primary by resetting all switches on the circuit and testing to see which location is able to control the fixture.
- Press and hold button 6 for 10 seconds until LED blinks red. The LED should change to solid purple after the reset is complete. Repeat at each location.
- Move to each switch and attempt to turn the fixture on and off. The primary switch will be the only switch that will control the fixture
- Extend the pull-out tab at this location and mark this as the primary.
After identifying the primary and secondary switches, you can now pair the Dimmer Switches back together: Pairing Switches Together
Before pairing the primary switch to your mobile device, 3 and 4-way configurations for Wall Switches must first be paired together using Bluetooth. To pair the switches together, follow the steps below:

- Ensure power/breaker is turned back ON and the LED on both Wall Switches are solid purple.
- Locate the primary switch. Hold 6 until the LED rapidly flashes blue (4 seconds) then release.
- Then, tap 1 to enter pairing mode. The LED will slowly flash blue.
- Next, locate the secondary switch.
- Repeat the pairing steps above on the secondary switch. Hold 6 until the LED rapidly flashes blue (4 seconds) then release.
- Next tap 1 to begin the pairing mode. The LED will slowly flash blue.
- The secondary switch will search and pair to the primary switch. The LED on each switch will rapidly blink green 5 times and each Wall Switch will beep 5 times to indicate the pairing process is complete.
For a 4-way configuration, repeat the steps above. Starting with the primary switch again and pairing to the remaining secondary Wall Switch.
If you have difficulty pairing, visit: Troubleshooting 3- and 4-way Pairing
If you are setting up a single-pole configuration, the Wall Switch pairs directly to the Wi-Fi® network. For setting up a single-pole Wall Switch, please skip to the “Primary Wall Switch Wi-Fi Pairing” section below.
In a 3- or 4-way configuration, the Wall Switches must first pair to each other using Bluetooth, followed by the Wi-Fi network pairing process. Begin with the “3- and 4-way Bluetooth Pairing” steps immediately below, then continue on to the Wi-Fi pairing process.
3- and 4-way Bluetooth Pairing:
1. Locate the primary Wall Switch, press and hold button 6 for 3 seconds and release when the LED rapidly flashes blue.
2. Next, tap button 1 to enter the Bluetooth pairing mode. The LED will slowly flash blue.
3. Locate the secondary Wall Switch and repeat steps 1 and 2 to place the secondary Wall Switch into pairing mode.
4. Wait momentarily while the secondary Wall Switch searches and pairs to the primary Wall Switch. The LED on each Wall Switch will rapidly blink green 5 times and each Wall Switch will beep 5 times to indicate the pairing process is complete.
5. For 4-way configurations repeat steps 1 through 4 to pair the remaining secondary Wall Switch to the primary.
6. On the primary Wall Switch, press and hold button 6 for 3 seconds and release when the LED rapidly flashes blue.
Primary Wall Switch Wi-Fi Pairing:
1. On the Wall Switch, press and hold button 6 for 3 seconds and release when the LED rapidly flashes blue.
2. Next, tap button 2 to begin the Wi-Fi connection process. The LED will slowly flash blue.
3. Launch the iDevices Connected app and you will be guided through the process of connecting to the network. For iOS devices, you will need the HomeKit™ setup code on the pull-out tab of your primary Wall Switch.
Setting up your Wall Switch:
After installing in your iDevices Wall Switch and completing the pairing process, follow the steps below to connect the Wall Switch to your iOS device:
In the screens below, we're using an iDevices Switch, but the setup process is similar for Wall Switch.
1. Download the latest version of the iDevices Connected app here:

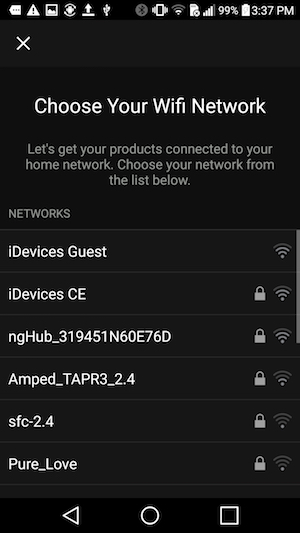
2. Before pairing the iDevices product to your Wi-Fi® network, ensure that your iOS device is connected to a 2.4 GHz Wi-Fi band.
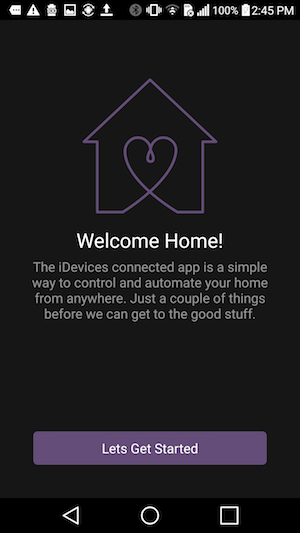
3. Open the iDevices Connected app and allow all of the prompts that appear on-screen. If you are unsure if you allowed all prompts, please go to your iOS Settings > iDevices and make sure everything is turned ON.
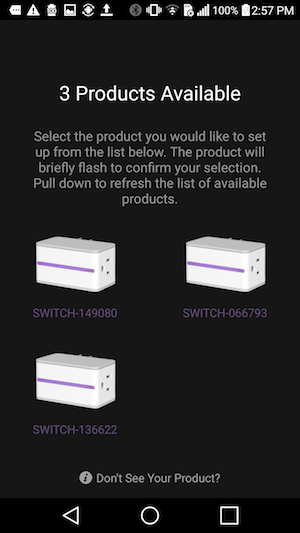
4. If this is a new home, tap the “Add my Product” button. For adding to an existing home, tap on the menu button (☰) then, “Add Product.
5. Tap the product you will be setting up.
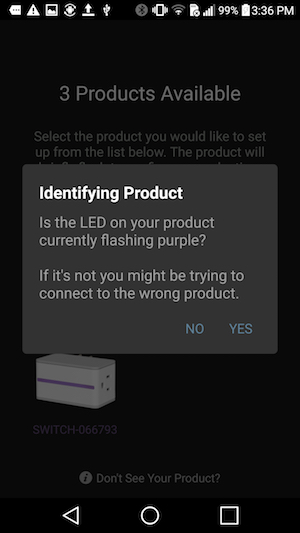
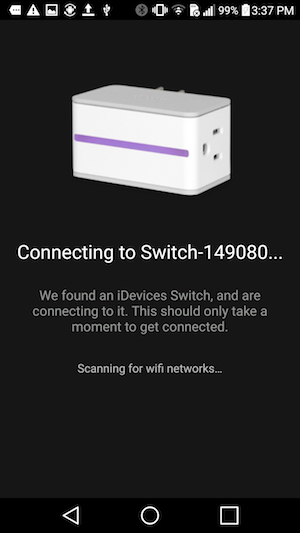
6. Confirm the product is ready to be set up. Tap “Yes, I am Ready.” The iDevices Connected app may walk you through additional steps to determine if the product is ready for setup.
7. Scan the 8-digit HomeKit setup code for the product.
8. Select the product from the available accessories.
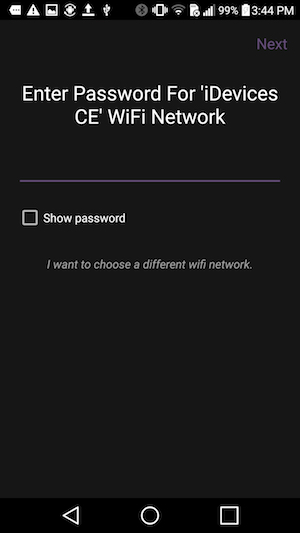
9. Tap “Allow” to connect the accessory to your Wi-Fi network.
Note: Your iOS device will automatically send the password information to the product; you will not be asked to type the password. This process may take a moment.
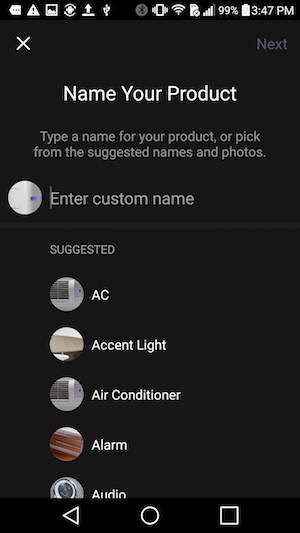
10. Tap “Switch” to create a customized name for the product in the app. Visit Naming Products and Rooms to learn best practices for naming.
11. Customize the night light name to control it with Siri. If your product does not have an LED night light, the setup will continue directly to the next step.
12. On iOS 13, you'll be prompted to add the product to suggested Scenes, then tap "Done."
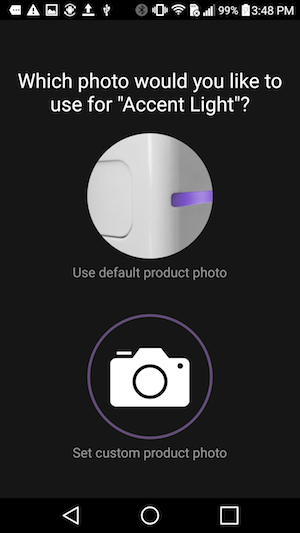
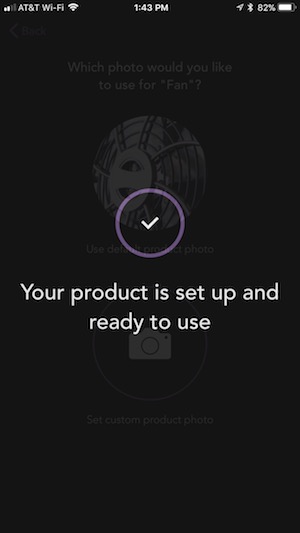
13. Choose a photo for the product; you can use the default photo or set a custom photo.
14. Next, the iDevices Connected app will walk you through any additional customizations or settings for your specific product.
Note: If you're on iOS 14, after adding and customizing your product, the app may show a “Loading…” screen. Tap the X in the upper left-hand corner to close the window and ensure the product you added is available for control from the home dashboard.
Wireless Communication Setup:
The wireless setup is a two-step process for 3- and 4-way Wall Switch configuration. First you will pair the primary Wall Switch to the secondary Wall Switch, then you will add the primary Wall Switch to your Wi-Fi® network.
1. Ensure power/breaker is turned back ON and the LED on both Wall Switches are solid purple.
2. Locate the primary Wall Switch. Hold 6 until the LED rapidly flashes blue (3 seconds) then release. Next tap 1 to enter pairing mode. The LED will slowly flash blue.
Next, locate the secondary Wall Switch. Repeat the steps above on the secondary Wall Switch by holding 6 until the LED rapidly flashes blue (3 seconds) then release. Next tap 1 to begin the pairing mode. The LED will flash blue slowly.
The secondary Wall Switch will search and pair to the primary Wall Switch. The LED on each Wall Switch will rapidly blink green 5 times and each Wall Switch will beep 5 times to indicate the pairing process is complete.
For 4-way, repeat the steps above again to pair the primary Wall Switch to the remaining secondary Wall Switch.
Connecting To The Wireless Network:
1. On the primary Wall Switch, press and hold 6 for 3 seconds and release when the LED rapidly flashes blue. Next Tap 2 to begin the Wi-Fi connection process.
2. Launch the iDevices Connected app and you will be guided through the process of connecting your Wall Switches.
Android Setup:
Before pairing the iDevices product to your Wi-Fi® network, ensure that your Wi-Fi network is running on a 2.4 GHz b/g/n Wi-Fi band and using either None, WPA or WPA2 network security with AES encryption. If you have multiple wireless networks such as a guest network, a 2.4 GHz network, and a 5 GHz network, please connect your phone or tablet to the 2.4 GHz network for initial setup. iDevices products can't be set up on guest networks. Download the latest version of the iDevices Connected app here:

Android Setup:
In this example setup, we'll be using an iDevices Switch. The setup process is similar for each iDevices product.
1. Please ensure Bluetooth is enabled on your Android device. Bluetooth is used to pair your Android device and Smart Home product.
2. Please ensure Wi-Fi is enabled on your Android device. After pairing is complete, all communication between your Android device and the iDevices product is done via Wi-Fi.
3. Make a note of your Wi-Fi network name and password for later in the setup process.
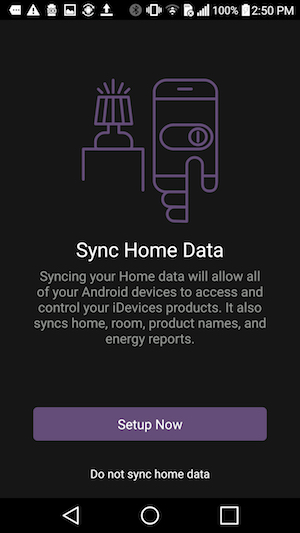
4. Locate and launch the iDevices Connected app, if this is your first iDevices product you will be walked through setting up your home.
5. Tap "Setup Now" to sync the home data to a chosen Google account.
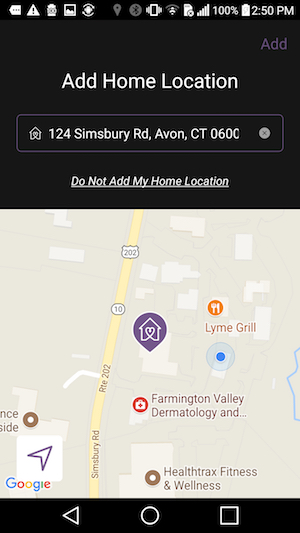
6. Add your Home Location. This allows the iDevices Connected app to get an estimated energy cost for your area, if your iDevices product supports Energy Reporting.
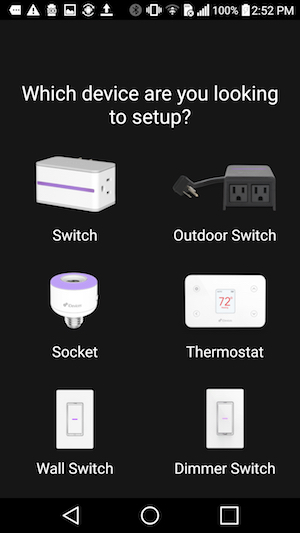
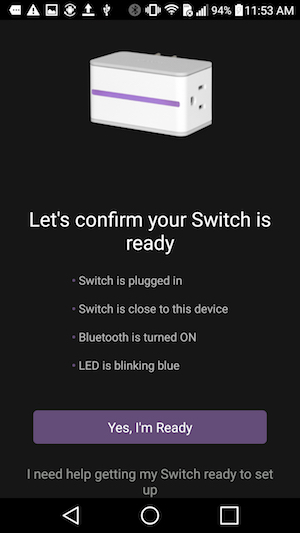
7. Select the device you are adding to the iDevices Connected app and confirm the product is ready to be setup. Then, tap “Yes, I am Ready.” The iDevices Connected app may walk you through additional steps to determine the product is ready to set up.
8. The app will locate any products in range. Tap the product in the app and confirm the product identified itself, tap "Yes" to continue. If you did not see the product identify itself, tap "No" and select another device.
9. The iDevices Connected app will begin the pairing process to the product. Hold your Android phone or tablet within 1 inch of the product, as the app uses Bluetooth proximity to establish the initial connection.
10. Choose the 2.4 GHz Wi-Fi network your Android device is connected to and enter the password. Then, tap "Next" to connect the product to your Wi-Fi network.
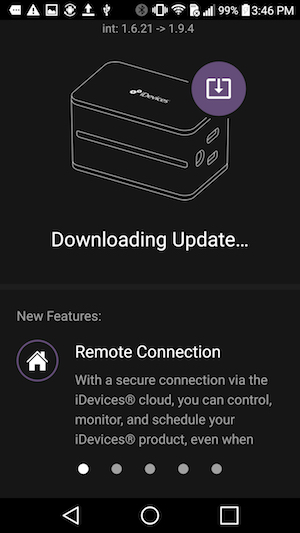
11. After the Wi-Fi connection is complete, the app will walk you through running any necessary firmware updates.
12. Next, the iDevices Connected app will walk you through setting the product name, photo and any additional customizations for your specific product.
13. The setup is complete - you can now use your product!
The iDevices Wall Switch is compatible with both iOS and Android devices. For the best user experience, if you plan on using your device with both iOS and Android, it's recommended that Wall Switch is setup first with the iOS device. Once both setups are completed, any available firmware updates can be run from either the iOS or the Android device.
Note: When using the iDevices Wall Switch with both an iOS and Android device, schedules set up on the Android device will be overwritten by any iOS device running iOS 10 that attempts to create a schedule. In order to see your home and products on the Android device, you must walk through the pairing process for each of your iDevices products.
After completing the initial setup, follow these steps to put Wall Switch into pairing mode for setup on the second device:
- On the Primary Switch press and hold the pairing setup button 6 for 3 seconds, and release when the LED rapidly flashes blue.
- Next, tap 2, and the LED will turn solid blue indicating Wall Switch is waiting for the mobile device to initiate and complete pair set up.

In the box:
- 1 Wall Switch
- 2 Mounting Screws
- 4 Wire Nuts
Using Your Wall Switch
The button controls of Wall Switch operate similar to any standard rocker switch.
The Wall Switch night light is controlled independently from the switch and can be customized.
Wall Switch should be used indoors between 32°F - 104°F.

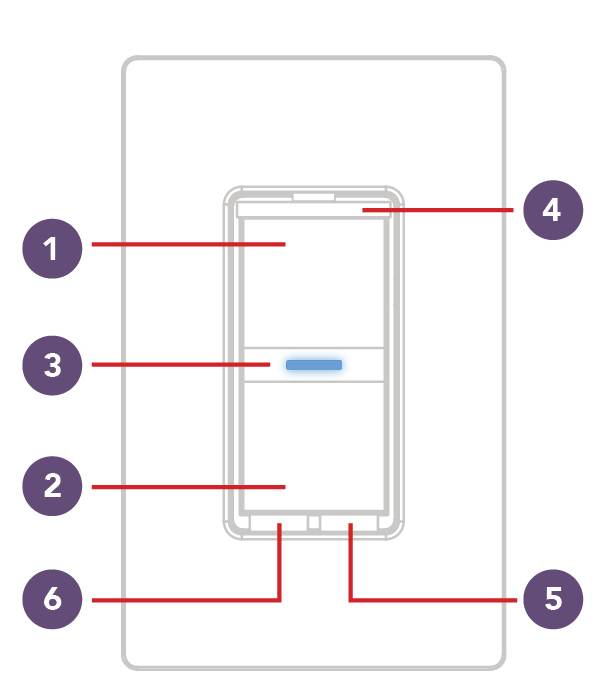
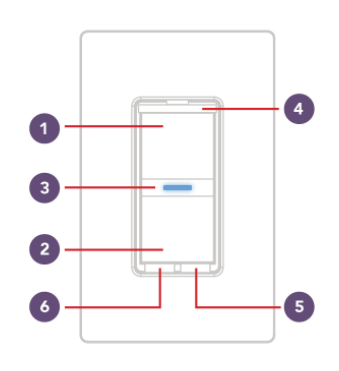
1- Turn Light On
- Used also for 3-way, 4-way pairing
2- Turn Light Off
- Used also for connecting to Wi-Fi®
3- Status LED/Night Light
- Provides setup status and used as a night light during operation
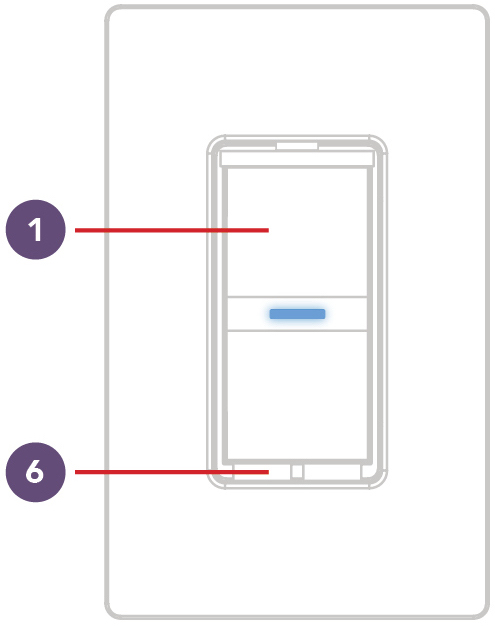
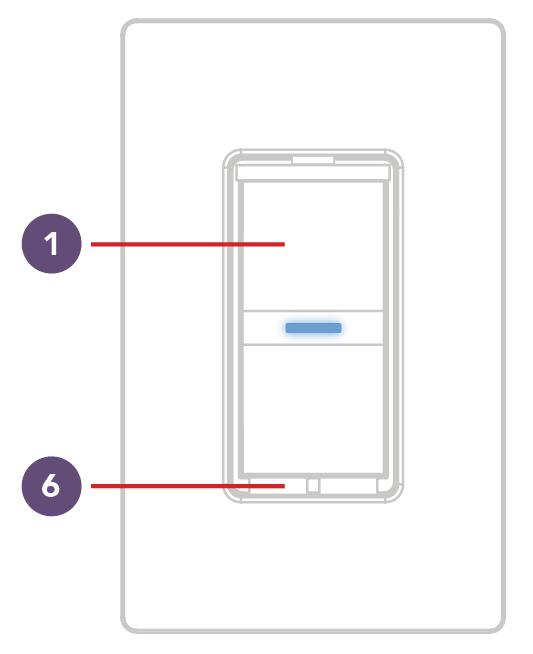
4- Pull Out Tab
- Refer to this when prompted to enter your HomeKit setup code during the setup on a iOS device; also used to document the Wall Switch as the Primary or Secondary in a 3-way or 4-way configuration
5- Device Reboot
- Pressing this cycles power to the device
6- Pairing Setup Button or Device Reset
- Used to wirelessly pair multiple Wall Switches for 3- and 4-way configurations and for connecting to Wi-Fi
- DEVICE RESET: Press and hold for 10 seconds until LED blinks red. Note: Resetting the device will remove all pairings, schedules and scenes associated with this product.
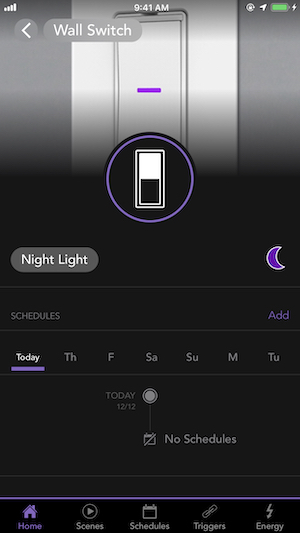
There is an onboard night light on the iDevices Wall Switch, which can be controlled independently of the accessory. The color of the night light can be changed or can be turned off completely through the iDevices Wall Switch accessory page on the iDevices Connected App.
To control the night light:
- Tap on the name of the product
- Use the moon icon to the right of “Night Light” to turn the night light on or off
- Tap on “Night Light” to access the custom color and brightness controls
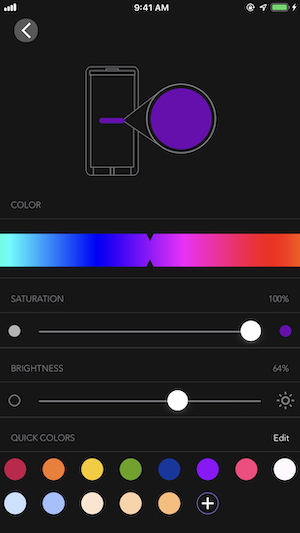
Move the color slider left and right to change color, or customize further using the saturation and brightness sliders.
You can also save your favorite color settings as “Quick Colors” by tapping the +, allowing you to quickly switch between your favorite colors.
On iOS devices you can also ask Siri® to turn the night light on or off. For example, "Hey Siri, Turn off my Wall Switch night light.”
In the video walk-through below, we're using the night light on Socket as an example:
After downloading the latest iDevices Connected app, every time you launch the app, it will scan your local network for known iDevices products that need updated firmware. If you have a firmware update, you will see a notification icon in the upper right corner. If your firmware is up-to-date, you will not see the icon.
If your product is paired to both an iOS device and an Android device, you should only attempt to update the product from one of the devices.
To Start Firmware Updates:
1. Tap the notification icon in the iDevices Connected app:
On iOS: Tap the notification icon in the top right-hand corner.
On Android: Tap the notification icon in the lower right-hand corner.
2. Tap the update icon to the right of the product to start the download and installation of the new firmware for all available products.
3. For both iOS and Android, the iDevices Connected app has to be running in the foreground throughout the entire update process. If the app is closed or sent to the background, the update process will pause. Depending on the iDevices product, a typical firmware update will last 5-7 minutes.
Note: During the download and installation process, it's normal for the product LED to flash and the connected accessory to turn on and off.
To ensure safe usage of your iDevices Wall Switch and to prevent damages not covered under the 2-Year Limited Warranty provided with your iDevices Wall Switch, please follow the below guidelines.
RISK OF ELECTRIC SHOCK, SEVERE BURNS, AND FIRE: Your safety is important to us. Electricity is dangerous and can cause personal injury and property damage if handled improperly. A working knowledge of electrical installation is required to install this product. If you are not comfortable working with electricity, don't attempt to install the iDevices Wall Switch and seek professional assistance from a qualified electrician.
- Wall Switch is not intended for critical medical or life support equipment.
- Wall Switch is certified for use in the US and Canada only.
- Use caution when using the iDevices Wall Switch to control any appliances which produce heat or mechanical motion, or could create a hazardous condition when operated while unattended.
- Wall Switch must be installed in a manner that conforms to all applicable national, state, and local building codes.
- Wall Switch is intended for dry, indoor use only.
- Use with branch circuit breaker 20A or less.
- Ambient operating conditions: 32º F to 104º F (0º C to 40º C), 0-90% humidity, non-condensing.
- Notice - Use only copper or copper-clad wire with this device.
- Wherever possible, install the iDevices Wall Switch in a non-metallic gang box and use a non-metallic faceplate, as metal gang boxes and faceplates can decrease the Wi-Fi signal strength.
- Wall Switch is not user-serviceable. Do not attempt to open the enclosure for any reason.
Problem Solving
Rebooting the device can quickly resolve many issues.
A blinking orange LED indicates the product is no longer connected to the Wi-Fi network or internet.
Be sure to turn on iCloud Keychain to avoid any HomeKit errors.
If you are experiencing issues, follow the steps below to reset your Wall Switch.
Note: Resetting the device will remove all pairings, schedules, and scenes associated with this product.
Resetting:
- Delete the Wall Switch from the iDevices app:
- For iOS: Tap on the Wall Switch, tap the product name in the upper left-hand corner, scroll down and tap “Delete.”
- For Android: Tap on the Wall Switch, tap the 3 dots, tap “Edit Product,” scroll down and tap “Delete Product.”
- Press and hold button 6 for 10 seconds until LED blinks red. The LED should change to solid purple after the reset is complete. Note: A reset must be performed on each Wall Switch in 3- and 4-way configurations.
- Wait 5 seconds after the reset before putting the Wall Switch into pairing mode.

Pairing:
Single pole Wi-Fi Pairing:
- On the Wall Switch, press and hold button 6 for 3 seconds and release when the LED rapidly flashes blue.
- Next, tap button 2 to begin the Wi-Fi connection process. The LED will slowly flash blue.
- Open the iDevices Connected app and re-add your Wall Switch.
3- and 4- way Bluetooth and Wi-Fi Pairing:
- Locate the primary Wall Switch, press and hold button 6 for 3 seconds and release when the LED rapidly flashes blue.
- Next, tap button 1 to enter the Bluetooth pairing mode. The LED will slowly flash blue.
- Locate the secondary Wall Switch and repeat steps 1 and 2 to place the secondary Wall Switch into pairing mode.
- Wait momentarily while the secondary Wall Switch searches and pairs to the primary Wall Switch. The LED on each Wall Switch will rapidly blink green 5 times and each Wall Switch will beep 5 times to indicate the pairing process is complete.
- For 4-way configurations repeat steps 1 through 4 to pair the remaining secondary Wall Switch to the primary.
- On the primary Wall Switch, press and hold button 6 for 3 seconds and release when the LED rapidly flashes blue.
- Next, tap button 2 to begin the Wi-Fi connection process. The LED will slowly flash blue.
- Open the iDevices Connected app and re-add your Wall Switch.
For 3 and 4-way configurations, Wall Switches must first be paired together using Bluetooth before the primary switch can be added to the network and app.
If you're having difficulty pairing, try the steps below:
- Verify that all switches installed in the 3- and 4-way configuration match. The Wall Switch will not pair with the Dimmer Switch.
- Ensure the power/breaker is turned back ON and the LED on the Wall Switches is solid purple.
- Power cycle ALL Wall Switches installed in the home by pressing 5 once.
Once all Wall Switches have been power cycled, follow the steps below to pair the Wall Switches:
- Locate the primary switch location. This is the only switch that can control the light prior to pairing.
- Hold 6 until the LED rapidly flashes blue (4 seconds) then release. Then, tap 1 to enter pairing mode. The LED will slowly flash blue.
- Next, locate the secondary switch.
- Repeat the steps above on the secondary switch by holding 6 until the LED rapidly flashes blue (4 seconds) then release. Then, tap 1 to begin the pairing mode. The LED will slowly flash blue.
- The secondary switch will search and pair to the primary switch. The LED on each switch will rapidly blink green 5 times and each Wall Switch will beep 5 times to indicate the pairing process is complete.
For a 4-way configuration, repeat the steps above. Start with the primary switch again and pair to the remaining secondary Wall Switch.
If pairing is unsuccessful, we recommend updating the devices to the latest firmware in the iDevices Connected app.
First, pair each Wall Switch to the app as if it were a single-pole switch:
Wall Switch Setup on iOS 11 and Later
Once paired, update all products that have available firmware updates. To learn how to download new firmware, visit: Downloading New Firmware
After all firmware updates have been completed, reset the Wall Switches and attempt the pairing process again. To learn how to reset your Wall Switch, visit: Resetting Wall Switch
If you continue to experience pairing issues after updating the firmware, the Wall Switches may be too far apart or there may be objects in-between the switches causing decreased Bluetooth signal strength. Metal gang boxes, metal faceplates, walls, doors, and refrigerators are a few examples of items in the home that can weaken the Bluetooth signal.
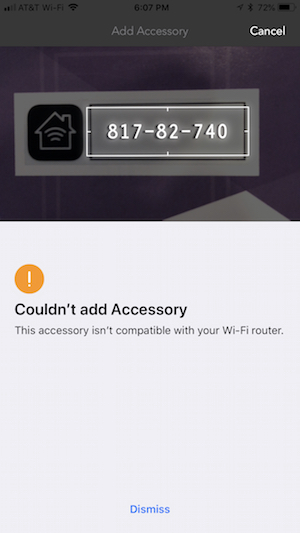
During the setup process, you may receive the error, "Couldn't Add Accessory." This is typically an indication that the iDevices product is having trouble connecting to your Wi-Fi® network.
Begin by restarting your iOS device, router, and any access points. Then, try the setup procedure in the iDevices Connected app again.
If you continue to receive the error "Couldn't Add Accessory", try the steps below:
- Reboot the Wall Switch by pressing the lower right-hand button below the rocker once.
- Put the Wall Switch into pairing mode:
-
- Hold the bottom left-hand button below the rocker for 4 seconds, then let go.
- Press the bottom of the rocker once like you're turning the light OFF.
- Monitor the LED for the following status changes:
-
| LED flashes green then changes to solid blue |
Indicates Wall Switch has joined the Wi-Fi network. Try the setup procedure in the iDevices Connected app again:
|
| LED slowly flashes blue |
Indicates Wall Switch did not join the Wi-Fi network. Continue to the steps below. |
- Open your iOS Settings app.
- Tap Wi-Fi.
- The Wall Switch will appear under “Set Up New Device...” towards the bottom of the screen.
- Tap the Wall Switch.
- Ensure that the network selected is your 2.4GHz Wi-Fi network. Then, tap Next.
- The settings app will attempt to pair your Wall Switch to your Wi-Fi network.
If the Wall Switch joins the Wi-Fi network, try the setup procedure in the iDevices Connected app again.
If you receive the error, "An Unexpected Error Occurred. Try Again." it's likely that there is a router setting or compatibility issue. To learn more about the network requirements, visit: Wi-Fi and Network Compatibility
If the LED on your iDevices Wall Switch is blinking orange, this indicates that the product can no longer connect to the Wi-Fi® network it was once paired with. This occurs when changes were made to the wireless network, such as a change to the network name, password or security settings, or there's been new network equipment installed in the home. The LED may also blink orange if the internet is out. If this is the case, then the LED will return to normal once internet access is restored.
If the Wall Switch does not automatically reconnect after internet access is restored, reboot the Wall Switch by pressing the bottom right-hand button below the rocker.
If changes are made to the network or net equipment is installed, the products must be reset and setup again to connect to the new Wi-Fi network. Follow the steps below to reset your Wall Switch and set it up again.
Note: Resetting the Wall Switch will remove all pairings, schedules and scenes associated with this product.
- Delete the Wall Switch from the iDevices Connected app. (Tap on the product name, then tap on the product name in the upper-left corner and scroll down, tap “Delete.”)
- Hold down the bottom left-hand button on the Wall Switch until the LED light rapidly flashes red.
- Continue holding the button for an additional 5 seconds.
- Let go of the button on the Wall Switch.
- The LED light should return to a solid purple. Place the Wall Switch in pairing mode by holding the bottom left button for 3 seconds, then press Off on the Wall Switch.
- The LED light should continually flash blue. This is an indication that the Wall Switch is ready for pairing.
- Open the iDevices Connected app.
- Tap on the menu button (☰) then, tap "Add Product."
- Follow the on-screen directions to finish the setup.
After making certain changes to your Wi-Fi® network, your iDevices Products may be unable to communicate with the app, home assistants, and other connected services.
These changes can include:
- Installing a new router and/or access points
- Upgrading firmware on the router and/or access points
- Changing the network name (SSID)
- Changing the network password
When this occurs, the LED night light on your iDevices products will blink orange, or the Thermostat display will show the no Wi-Fi symbol to indicate that it can no longer find the network it was once paired with.
Before changing network equipment, please review the most current network requirements and router compatibility list here: Wi-Fi And Network Compatibility.
When a new router is installed, it may be possible to make the SSID and password exactly the same as it previously was. In some instances, the products will see this new network as the same one it was connected to previously and products may reconnect without issue. Refer to your router's manual for instructions on adjusting the SSID and password.
After setting the SSID and password to what it was previously, reboot the iDevices product by unplugging it and plugging it back in or by pressing the reboot button on any in-wall products. Verify that the LED returns to its normal night light color and the product can be controlled in the iDevices Connected app.
When the settings on the new router are too different from the previous one, the products may not reconnect and will continue to flash orange or display the no Wi-Fi symbol. In this situation, the iDevices products must be reset and setup again to connect to the new Wi-Fi network.
To learn how to reset and reconnect your iDevices Wall Switch, visit: Resetting Wall Switch
The LED night light is used to indicate the product's status during product setup or to report something that requires attention.
Blue Flashing

Indicates during initial setup:
The primary Wall Switch is waiting for the mobile device to complete pairing to both Wi-Fi and the iDevices Connected app.
Resolution:
Open the iDevices app and start the setup process:
Wall Switch Setup on iOS 11 and Later
Indicates during a 3-, 4-way setup:
Wall Switch is in Bluetooth pairing mode for connecting multiple Wall Switches in 3- or 4-way configurations.
Resolution:
Put any secondary Wall Switches into Bluetooth pairing mode to connect them.
Pairing Switches Together
Solid Blue
Indicates:
Wall Switch is connected to the Wi-Fi network but has not yet paired to the iDevices Connected app.
Resolution:
Open the app and retry the setup process:
Wall Switch Setup on iOS 11 and Later
Slow Blue Flashing

Indicates:
Bluetooth or Wi-Fi pairing mode has expired.
Resolution:
Reboot the Wall Switch by pressing the bottom right-hand button. Once the LED returns to solid purple, retry the setup process:
Wall Switch Setup on iOS 11 and Later
Green Flashing

Indicates during initial setup:
Once the Wall Switch connects to the Wi-Fi network, it will flash green for 1 second.
Indicates reconnection to the network:
If the Wall Switch has lost connection to the Wi-Fi network, the LED will flash green for 1 second to indicate when it has reconnected to the Wi-Fi network.
Resolution:
No action needed in either instance.
Orange Flashing

Indicates:
Wall Switch has lost the connection to the Wi-Fi network, or the Wi-Fi network has gone down.
Resolution:
Reconnect product to the Wi-Fi network:
Wi-Fi Network Not Found
Red Flashing

Indicates:
The product is being reset.
Resolution:
Once the LED returns to solid purple, the Wall is ready to be set up again through the iDevices Connected app:
Wall Switch Setup on iOS 11 and Later
Purple Flashing

Indicates firmware being updated:
A firmware update is being installed onto the product.
Resolution:
Keep the app in the open until the firmware update is complete.
Indicates product being identified:
Wall Switch has received a request from the app to identify itself.
Resolution:
No action needed.
Solid Purple
Indicates:
Default LED night light color after pairing has completed.
Resolution:
Customize the nightlight to your preference.
If during the setup process the iDevices Connected app says "No Products Available" on iOS 10 or if the accessory does not appear on the page "Select an accessory to add to Home" on iOS 11 and later, try the steps below:
Press the button on the bottom right-hand corner of the Wall Switch to reboot the product. If the LED changes to solid blue, it has joined the network.
Continue with the steps below on iOS 10:
- Open the iDevices Connected app.
- Tap on menu (☰) in the upper left-hand corner.
- Select "Add Product."
- This first search looks for products that need to connect to the Wi-Fi® network. Since your Wall Switch is already connected to the network, select "Got an error or started setting up in another app?”
- The app will search for approximately 20 seconds, and will then bring up the product to complete the HomeKit™ pairing.
- Attempt the setup process again.
Continue with the steps below on iOS 11 and later:
- Open the iDevices Connected app.
- Tap on menu (☰) in the upper left-hand corner.
- Select "Add Product."
- Attempt the setup process again.
If your Wall Switch still does not show up after it has successfully been added to your network, please try the following steps, then repeat the steps above again:
- Go to iOS Settings > iDevices. Make sure everything is turned ON. If Home Data was turned off, turn it on. In Settings > Wi-Fi, turn Wi-Fi off, then on again.
- Go to iOS Settings > iCloud. Make sure you are logged in to your iCloud account and that iCloud Drive, Home and Keychain are turned ON
- Restart your iOS device and router
If your iDevices Wall Switch shows "Product Unavailable" in the iDevices Connected app when you're not connected to your home Wi-Fi® network and you do not have an Apple Home Hub, try the following:
- Connect to your home Wi-Fi network
- Verify you can control all of your iDevices products within the iDevices Connected app
- Delete the iDevices Connected app from your device (you will not have to reset or set up your products)
- Download the iDevices Connected app from the Apple App Store
- When you open the iDevices Connected app, allow all of the prompts to ensure the app can connect to your home data
- Confirm you can control your products
- Then, test remote your connectivity by temporarily turning off Wi-Fi on your device
- Open the iDevices Connected app and confirm you can control your products
If your iDevices Wall Switch shows "Product Unavailable" in the iDevices Connected app while connected to your home Wi-Fi network, try the following:
- In the settings of your iOS device, turn Wi-Fi off and turn it back on
- Open the iDevices Connected app and tap the retry arrows to reconnect to your Wall Switch
If turning Wi-Fi off and back on does not resolve the issue, reboot your Wall Switch:
- Press the Device Reboot button 5 on the bottom right-hand corner of the Wall Switch
- Open the iDevices Connected app and tap the retry arrows to reconnect to your Wall Switch
If rebooting the Wall Switch does not resolve the issue, follow the steps below to reset your Wall Switch and set it up again:
Note: Resetting the Wall Switch will remove all pairings, schedules, and scenes associated with this product.
- Delete the Wall Switch from the iDevices Connected app:
- Tap on the Wall Switch, tap the product name in the upper left-hand corner, scroll down and tap “Delete”
- Hold down button 6, on the bottom left-hand corner on Wall Switch until the LED light rapidly flashes red for 5 seconds
- Let go of the button on the Wall Switch, the Wall Switch LED light will turn solid purple
- Put the Wall Switch into pairing mode by holding button 6 for 3 seconds until the LED rapidly flashes blue; let go and tap 2
- The LED will flash blue indicating the Wall Switch is ready for pairing
- Open the iDevices Connected app
- Tap the menu (☰)
- Tap "+ Add Product"
- Follow the on-screen directions to finish the setup
After the Wall Switch is reconnected, make sure you complete any available firmware updates as this will most likely resolve the connection issue you were experiencing. For instructions on updating the firmware, read Downloading New Firmware.
If you're experiencing an issue with your iDevices product, a quick reboot can resolve many issues. After rebooting the device using the steps below, it will take several moments to restart, then reconnect to the Wi-Fi network. Rebooting the product will not affect your schedules or customizations applied to the product.
Switch and Outdoor Switch:
- Unplug the device, then plug it back in.
Socket:
- Unscrew the entire Socket from the fixture, then screw it back in.
Wall Switch and Dimmer Switch:
- Press the bottom right-hand button below the rocker once.
Wall Outlet:
- Press the small circle button next to the LED once.
Thermostat:
- Pull the Thermostat off the mounting plate, then place it back on.
Instinct:
- Gently pull the bottom right-hand button below the rocker out 1/4". Then, press the button back in.
Instant Switch:
- Remove the battery, then place it back in.
During the setup process, you may see the error, “This accessory isn't compatible with your Wi-Fi router.” This notification usually occurs when your iOS device is not connected to the 2.4GHz network band and does not necessarily mean the router is incompatible.
Follow these steps to connect your iOS device to a 2.4GHz network for setup. Note: After the product setup is complete, you may move your phone back to a 5GHz network.
- Open your iOS settings app and tap Wi-Fi.
- If you have a 2.4GHz network option, select that. Otherwise, you may need to contact your internet service provider or router manufacturer for help identifying the 2.4GHz network.
- Once you are on the right network, the network information will be handed off to the product automatically.
- Return to the iDevices Connected App.
- Add the accessory again.
- Once the setup and any firmware updates are completed, you may reconnect your iOS device back to the 5GHz network.
When the iDevices Connected app says "iCloud is Synchronizing," this indicates that your iOS device is attempting to sync home data from your iCloud account. While this sync is in process, Apple's HomeKit platform will not allow the product setup to proceed.
Typically, the issue resolves itself after several hours. Please wait for a few hours and then try again.
If the issue persists settings may need to be adjusted, try the steps below:
- Open your iOS Settings app
- Tap your name at the top of the Settings app
- Tap iCloud
- Ensure Keychain and Home are both turned ON
- Check the iDevices Connected app, if "iCloud is Synchronizing" has disappeared, continue with product setup.
If "iCloud is Synchronizing" continues to show:
- Open the Apple Home App which will show “Loading Accessories and Scenes."
- After approximately 30 minutes, the option "Reset Home Configuration..." will appear at the bottom of the Home app.
- Tap "Reset Home Configuration..." to reset the Home data.
- Once the reset is complete, you can return to the iDevices Connected app to set up your product.
Compatibility
Requirements
- Home Wi-Fi® (802.11 B/G/N)
- None, WPA or WPA2 (AES) Network Security
For more details on router compatibility and changing your router security settings,click here
All iDevices products are certified by the Wi-Fi Alliance®. The certification doesn't guarantee iDevices products work with all routers. You can verify compliance on the Wi-Fi Alliance website -www.wi-fi.org- or look for this logo on your networking equipment to ensure compliance:
Note: Due to firmware, router and mobile device updates, compatibility may change at any time.
When installing the iDevices Wall Switch into a 3- or 4-way configuration, all the switches should be iDevices Wall Switches for the circuit to function properly.
iOS:
- HomeKit™ Requires an iPhone, iPad, or iPod touch with iOS 10 or later
- iCloud® account using iCloud Keychain®
- Requires an Android™ 4.3+ device with Bluetooth® technology
- Google Account to sync home data and device names across devices
- Free iDevices Connected App
- Requires a 120VAC "Line" (usually black, blue or red) And "Neutral" Wire (usually white)
- Input: 120-277VAC, 50/60Hz
- Output: 120-277VAC, 50/60Hz
- Resistive: 1800W @ 120-277VAC, 15A/6.5A
- Tungsten: 960W @ 120VAC, 8A
- Tungsten: 1800W @ 277VAC, 6.5A
- Motor: 1HP @ 120 & 277VAC
- Ballast: 10A @ 277VAC
- Wall Switch fits into any standard size gang box and fits any standard rocker style faceplate
- Height: 4.13", Depth: 1.72", Width: 1.77"
Using the iDevices Connected app, users can securely access and control iDevices products from anywhere through our own encrypted IoT infrastructure. The iDevices Connected app automatically allows you to control your iDevices products when you're away from your home Wi-Fi network.
For HomeKit™ features such as Siri® voice control, an Apple TV® (3rd generation or later) is required for use outside of your home. Ensure Apple TV® is signed in with the same iCloud® account on your iOS device, and that Keychain® is turned on.
For users with an iOS device running iOS 10 or later, that would like to remotely control HomeKit compatible accessories with the Apple Home app, an Apple Home Hub is required. Devices that can be setup as an Apple Home Hub are: Apple TV 4K, Apple TV 4th generation with tvOS 10 or later, HomePod, or iPad with iOS 10 or later. The device you set up as a home hub must remain in your home, connected to your home Wi-Fi network, plugged into power and powered on.
For more information on using an Apple Home Hub: Click Here
To learn more about the iDevices Connected app setup and compatibility, visit the iDevices Connected app support page here
Remote Access Requirements
Use Instinct remotely with the Amazon Alexa app.
All other produts work remotely through the iDevices Connected App.
Instinct
Use the Amazon Alexa app to access and control your Instinct remotely. For more information on controlling Instinct, visit Controlling Instinct in the Amazon Alexa app
Switch, Outdoor Switch, Socket, Thermostat, Wall Outlet, Wall Switch and Dimmer Switch
Using the iDevices Connected app, users can securely access and control iDevices products from anywhere through our own encrypted IoT infrastructure. The iDevices Connected app automatically allows you to control your iDevices products when you're away from your home Wi-Fi network.
For HomeKit™ features such as Siri® voice control, an Apple TV® (3rd generation or later) is required for use outside of your home. Ensure Apple TV® is signed in with the same iCloud® account on your iOS device, and that Keychain® is turned on.
For users with an iOS device running iOS 10 or later, that would like to remotely control HomeKit compatible accessories with the Apple Home app, an Apple Home Hub is required. Devices that can be setup as an Apple Home Hub are: Apple TV 4K, Apple TV 4th generation with tvOS 10 or later, HomePod, or iPad with iOS 10 or later. The device you set up as a home hub must remain in your home, connected to your home Wi-Fi network, plugged into power and powered on.
For more information on using an Apple Home Hub: Click Here
Wi-Fi And Network Compatibility
An adequate Wi-Fi network is required to sufficiently operate connected products.
Consider including additional access points for buildings with concrete walls and ceilings, as those can block signal.
Be sure Airtime fairness or Airtime Quality settings are disabled on your router.
Products should be set up on a 2.4GHz network band.
iDevices products require a home Wi-Fi®network with a 2.4 GHz network band (802.11 B/G/N)
Most routers have two network bands, 2.4 GHz and 5 GHz. The 5 GHz network band has faster data speeds, which is great for tasks like browsing the internet and streaming content such as video or gaming. However, 5 GHz has a shorter signal range from the router.
The 2.4 GHz network, while slightly slower in speed, has a much longer signal range from the router making it ideal and more dependable for smart home products. Most smart home products require the 2.4 GHz network band, as this allows users to control products farther from the router and doesn't require continuous streaming.
- Instinct supports the network security setting WPA2 with AES encryption.
- All other iDevices products support None, WPA, or WPA2 with AES encryption.
Additionally, many routers have a setting called “Airtime Fairness” or "Airtime Quality," which often causes products to be unable to join the Wi-Fi network. Typically, this setting is located in the Wireless section of your router settings under the Advanced or Professional tab and is enabled by default. We recommend disabling this setting.
Most routers allow you to access and adjust settings via a web browser or app. Please consult the router's user manual to learn how to connect to your router and adjust its settings.
_______________________________________
The following routers are known to not currently be compatible with iDevices products:
- Actiontec MI424WR
- ARRIS EA9200
- ARRIS TG1672
- ARRIS TG862
- ARRIS TG1682G
- ASKEY Wave2
- ASUS RT-AC1200
- Bell Home Hub 3000
- Business Class Routers
- Eero 6
- Eero Pro 6
- FiOS G1100
- Google Fiber
- Linksys AC1200
- Luxul Mesh systems
- Netgear Orbi (Firmware prior to 2.1.4.16)
- Spectrum RAC2V1K
- Technicolor TC8717T
- Ubee Routers
- Xfinity XB7 (Models CGM4331COM and TG4482A)
Note: Due to firmware, router and mobile device updates, compatibility may change at any time.
If you have questions about the compatibility of your router with iDevices products, please contact our Customer Experience Team at Support@iDevicesinc.com.
iDevices Switch, Outdoor Switch, Socket, Wall Outlet, Wall Switch, and Dimmer Switch are certified by the Wi-Fi Alliance®. The certification doesn’t guarantee iDevices products work with all routers. You can verify compliance on the Wi-Fi Alliance website - www.wi-fi.org - or look for this logo on your networking equipment to ensure compliance:
iDevices products require adequate Wi-Fi strength in the home that covers the product installation area and can should also be able to support a number of connected products and devices.
A stable and capable Wi-Fi network is important when thinking about building a smart home. All routers have a client limit, meaning how many products or devices are connected to the router. Some client limits are very high and therefore are a good choice for your smart home. Many routers supplied by your Internet Service Providers (ISP), and often older routers are not designed to support multiple smart home products. This may result in a difficult setup experience, or even products dropping network connections randomly.
If you have an existing network:
Confirm that your existing network meets the requirements for supporting a smart home, that you have a 2.4GHz band available, and that the Wi-Fi signal is strong in the areas of your home where you plan to install your connected products.
If a network does not yet exist:
When necessary, the physical product installation can be completed before a Wi-Fi network is in place.
Determine if you require a standard consumer network or a larger, professional network setup as noted below. If you have a larger home, you may need to consider multiple access points (APs) throughout the home to ensure the signal is strong and broad. Also consider including additional access points (APs) for buildings with concrete walls and ceilings, as those will also block the Wi-Fi signal. If you have questions about the compatibility of your current router or are looking for router recommendations, please contact the iDevices Customer Experience Team at Support@iDevicesinc.com
Standard Consumer Network Recommendations
Consumer network hardware works well in typical-sized homes with less than 50 connected products. We recommend a mesh network such as Google Wi-Fi or Eero to ensure proper coverage.
Professional Network Recommendations
For larger or more complex structures with more than 50 or so connected products, a more professional hardware setup may be appropriate. These typically include running Cat 5 or 6 throughout the home along with setting up multiple gateways and access points.
Router Setup Tips:
- Set products up on a 2.4 GHz network band, 802.11 b/g/n by having your phone connected to the 2.4GHz network before app pairing.
- Set router network security to None, WPA or WPA2 with AES encryption.
- Guest networks are not supported.
- Be sure Airtime/Wireline Fairness is disabled on the router, when applicable. This feature should be turned off prior to product setup.
- Access points should be set up no more than 20'-30' apart and share the same network name.
After making certain changes to your Wi-Fi® network, your iDevices Products may be unable to communicate with the app, home assistants, and other connected services.
These changes can include:
- Installing a new router and/or access points
- Upgrading firmware on the router and/or access points
- Changing the network name (SSID)
- Changing the network password
When this occurs, the LED night light on your iDevices products will blink orange, or the Thermostat display will show the no Wi-Fi symbol to indicate that it can no longer find the network it was once paired with.
Before changing network equipment, please review the most current network requirements and router compatibility list here: Wi-Fi And Network Compatibility.
When a new router is installed, it may be possible to make the SSID and password exactly the same as it previously was. In some instances, the products will see this new network as the same one it was connected to previously and products may reconnect without issue. Refer to your router's manual for instructions on adjusting the SSID and password.
After setting the SSID and password to what it was previously, reboot the iDevices product by unplugging it and plugging it back in or by pressing the reboot button on any in-wall products. Verify that the LED returns to its normal night light color and the product can be controlled in the iDevices Connected app.
When the settings on the new router are too different from the previous one, the products may not reconnect and will continue to flash orange or display the no Wi-Fi symbol. In this situation, the iDevices products must be reset and setup again to connect to the new Wi-Fi network.
Click on the product below to learn how to reset and reconnect your iDevices product:
Need Further Assistance? We're Here To Help.
Our Customer Experience Team is available Mon - Fri 9am - 5:30pm EST