
Thermostat
Installation
Ensure there is a 24VAC Common Wire.
The iDevices Thermostat is only compatible with low voltage, 24 volt systems. High voltage systems are not compatible.
For heat pump systems, make a note as to if the system has an "O" or "B" type reversing valve for later in the installation.
All iDevices products work with both iOS and Android mobile devices.
Below is a brief overview of the Thermostat installation process:
- Turn the power to your HVAC system OFF.
- Remove the faceplate of your old thermostat and photograph the existing wiring configuration.
- Disconnect your old thermostat's wall plate and secure the wires.
- Mount your iDevices Thermostat mounting plate and attach wires to match your system's configuration.
- Attach your iDevices Thermostat to the mounting plate.
- Turn the power back ON.
- Configure the iDevices Thermostat to work with your HVAC system type.
- Download the free iDevices Connected app.
- Connect your iDevices Thermostat to your home network and pair it to your iDevices Connected app.
- Set up and customize your iDevices Thermostat within the iDevices Connected app.
Prior to Installation
- Be sure to test your existing system and check that the heating and/or cooling functions normally before disconnecting any wires.
- When testing, do not select COOL mode if the outside temperature is below 50°F (10°C), as this could damage the cooling system.
- If you have a heat pump system, check the settings on your old thermostat and make a note of whether you have an “O” or “B” type reversing valve.
Removing the Old Thermostat
1. Turn the power to your HVAC system OFF at the breaker box or the main switch controlling your heating/cooling system.
2. Confirm that the power is OFF by adjusting the temperature on your old thermostat and ensure your system doesn't turn on.
3. Carefully remove the faceplate of your old thermostat.
4. Take a picture of your old thermostat's wire arrangement to reference later on.
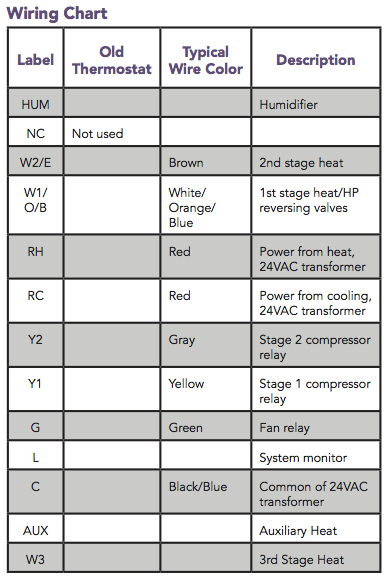
5. Make note of the current locations of each colored wire by referencing the Wiring Chart below.
Note: If you see any A, X, or P wires, please contact us to check system compatibility at 888.313.7019
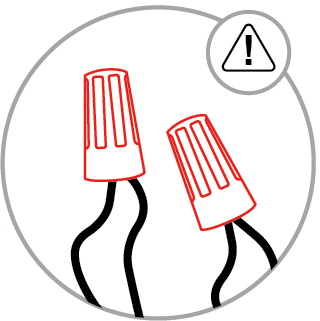
6. Make sure you don't have any 120/240V wires (look for thick black wires with wire nuts.) If you do, the iDevices Thermostat is not compatible with your system. If you are unsure, call us at 888.313.7019.
7. Record the locations of any jumpers and note whether there is a wire connected to RC and/or RH.
8. Lastly, disconnect the wires from the old thermostat and remove it from the wall.
Tip: Ensure the wires don't fall back into the wall by gently wrapping them around a pen.
Installing the New Thermostat
1. Line up the iDevices Thermostat mounting plate on the wall. Check that it is level and the wires are able to fit through the hole on the mounting plate. Use a pencil to mark the wall anchor locations on the wall.
2. Set the mounting plate aside and drill two holes (3/16” diameter) where you just marked.
3. Install the provided wall anchors, line up the mounting plate to the holes and using the provided screws, attach the mounting plate to the wall.
4. In the installation guide, head over to the Wiring Configuration section and find the wiring that is closest to your old thermostat. Note which system you have to reference later. To view the Wiring Configurations online, Click Here
5. Connect the wires to the mounting plate according to the wiring chart above, photos you took earlier, and the wiring configuration you noted for step 4.
Note: To prevent electrical shorts and damage to your new Thermostat or home, ensure all of the wire connections are secure and that bare wires are not touching each other. Insulate any bare wires with electrical tape as necessary.
6. Push any excess wires back into the wall cavity and attach your iDevices Thermostat to the mounting plate.
7. Turn the power back on at the breaker box or switch that controls your heating/cooling system.
Note: After changing modes, there is a standard 5-7 minute delay before the Thermostat will call for heating or cooling to protect the compressor for air conditioners and heat pump systems. During this delay, the temperature setpoint on the Thermostat display will show in black. Once the 5-7 minute delay has passed and the Thermostat calls for heating or cooling, the temperature setpoint will then show in red for heating and blue for cooling.
iDevices Thermostat requires a 24V common or 'C' wire, which provides continuous power for features like Wi-Fi connectivity and the backlit display. If the previous thermostat did not have a common wire and used batteries for power or you had a mercury thermostat, there are several options available to connect a common wire. All options require a common terminal at your HVAC control board.
Locating your HVAC control board and identifying the common terminal:
The HVAC control board is where the thermostat wires connect to your heating and cooling system. In most cases the control board can be found at your furnace or air handler. If you're unable to locate your HVAC control board or are uncomfortable doing so, please contact a certified HVAC technician in your area for additional assistance.
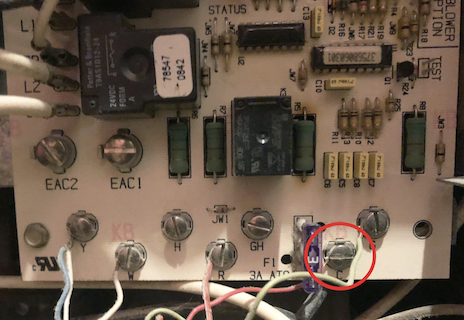
Once you've located the HVAC control board, verify there is a common terminal. The common terminal may be labeled C, 24VAC or COMM. Below is a photo a typical HVAC control board with the common terminal circled in red:
Option 1 – Connect an extra wire at the existing thermostat:
Check your current wiring for extra wires the previous thermostat did not utilize. If your HVAC system is compatible, we can use an extra wire as the Common wire. Extra wires may also be tucked behind the thermostat or in the wall, pull gently on the bundle of wires or shine a flash light into the wall to see if any extra wires are present.
If you located an extra wire, we'll want to ensure the wire is connected to Common terminal at the HVAC control board. Use the steps above to locate the HVAC control board, and identify the common terminal. Connect the same extra wire located at the Thermostat to the Common terminal at the HVAC control board. Once the wire is connected to the Common terminal, turn the breaker on and verify your Thermostat has powered on.
Option 2 - iDevices Thermostat Wire Adapter:
If the current thermostat has at least 3 wires and your HVAC control board has a common terminal, we can use the Thermostat Wire Adapter (https://store.idevicesinc.com/thermostat-wire-adapter/) to power the iDevices Thermostat. The Thermostat Wire Adapter works by running two signal wires for your HVAC system over one wire, freeing up the other to be used as the common wire. Use the steps above to locate the HVAC control board, and identify the common terminal.
Option 3 – Run a new bundle of wires:
Depending on the location of the Thermostat and HVAC system within your home, you may be able to run a new wire bundle with more available wires. Before doing so, use the steps above to locate the HVAC control board, and ensure there is a common terminal. If you're unsure if running a new wire bundle is the best option for your home, please contact a certified HVAC technician in your area for additional assistance.
For reference, standard wiring assignments for typical HVAC systems are provided below.

*With the iDevices Thermostat the terminal labeled “HUM” serves as a multi-purpose relay to allow for Humidification, Dehumidification, W3 (3rd Stage Heat) or AUX heat (for heat pump systems). To learn how to set the HUM relay for your system: Click Here
The following wiring configurations are compatible with the iDevices Thermostat. Locate the wiring that matches closest to your system. You will also need to know the system stage and type for reference when setting your iDevices Thermostat.
iDevices Thermostat requires a 24V Common or 'C' wire, which provides power for features like Wi-Fi connectivity and the backlit display. If your current Thermostat does not have a 24V common wire there are some options available for compatibility, visit: Locating the Required 24V Common Wire
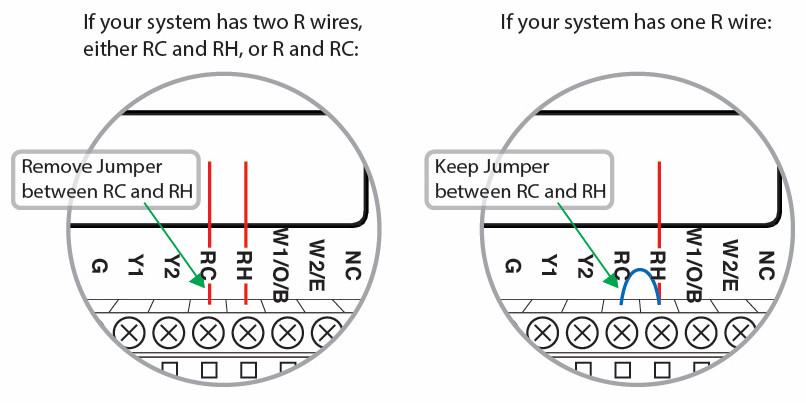
Identify the Available R Wires
- Check the wiring at your old thermostat to see if it has one or two R wires.
- If you have one R wire, connect it to RH at the iDevices Thermostat and leave the blue jumper in-place to RC.
- If you have two R wires, connect RC to RC and R/RH to RH and remove the jumper.
Note: In the diagrams below, the dotted lines indicate optional wires that may not be applicable to your specific HVAC system.
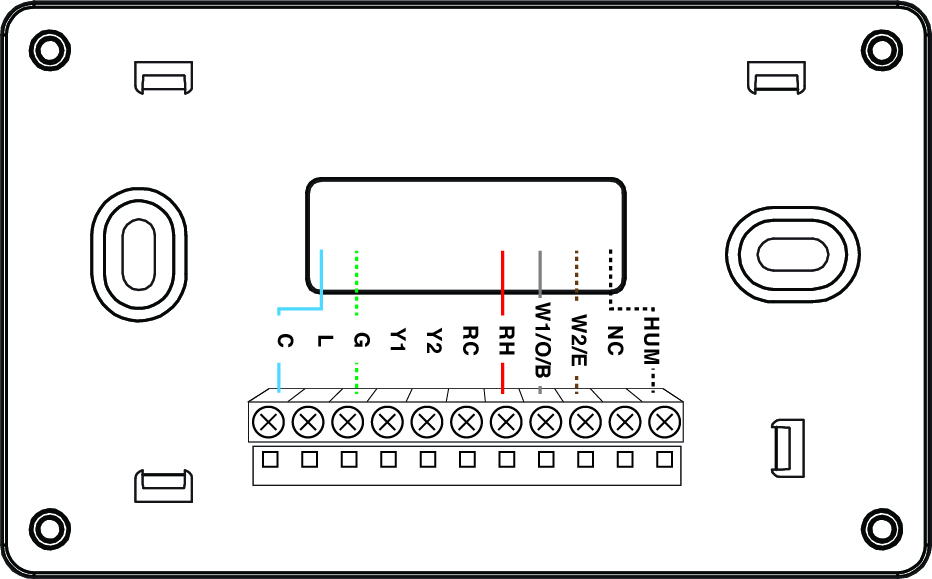
Heat Only (One, Two or Three Stages)
Stage: Non-HP
Type: HE for electric, HG for gas/oil systems
Fan wire G optional for HG type
G wire is not required for hot-water baseboard or steam radiator systems. If the G wire is not connected for warm air heating systems, the "Fan On" mode will not be available. Connect the W2 wire (2nd Stage Heat) if available. The HUM relay can be used for Humidification, Dehumidification or as a W3 (3rd Stage Heat) relay.
Cool Only (One or Two Stages)
Stage: Non-HP
Type: HE
The Y2 wire (2nd Stage Cooling) is optional if available. The HUM relay can be used for Humidification, Dehumidification or as a W3 (3rd Stage Heat) relay.

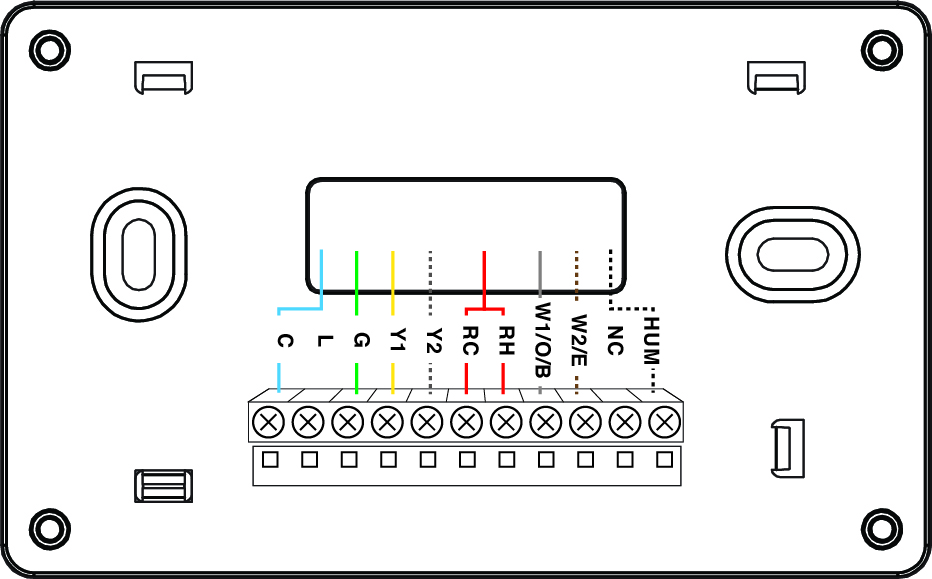
Heat (One, Two or Three Stages) and Cool (One or Two Stages)
Stage: Non-HP
Type: HE for electric, HG for gas/oil systems
The Y2 wire (2nd Stage Cooling) and W2 wire (2nd Stage Heating) are optional if available. The HUM relay can be used for Humidification, Dehumidification or as a W3 (3rd Stage Heat) relay.
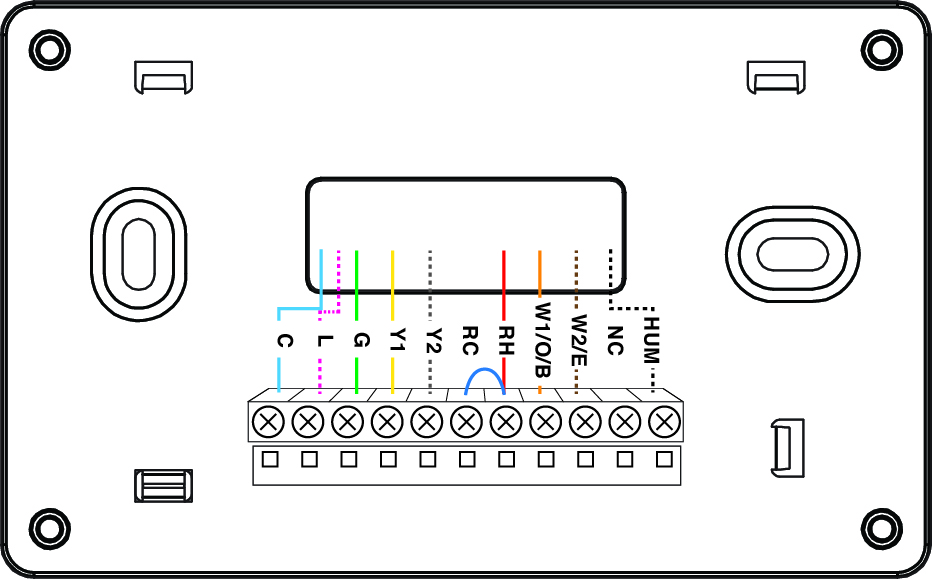
Heat Pump (One or Two Stages with AUX/ Emergency Heat)
Stage: HP
Type: HE for electric, HG for gas/oil systems
O/B Type: According to the previous thermostat setting
The System Indicator (L), 2nd Stage (Y2) and Emergency Heat (E) wires are optional if available. The HUM relay can be used for Humidification, Dehumidification or as an Aux (Auxiliary Heat) relay.
After walking through the setup on the Thermostat, the display will show the 8-digit pairing code, follow the steps below to connect the Thermostat to your iOS device:
Note: If the Thermostat display shows "Connecting to Network," visit: Display Shows Connecting to Network
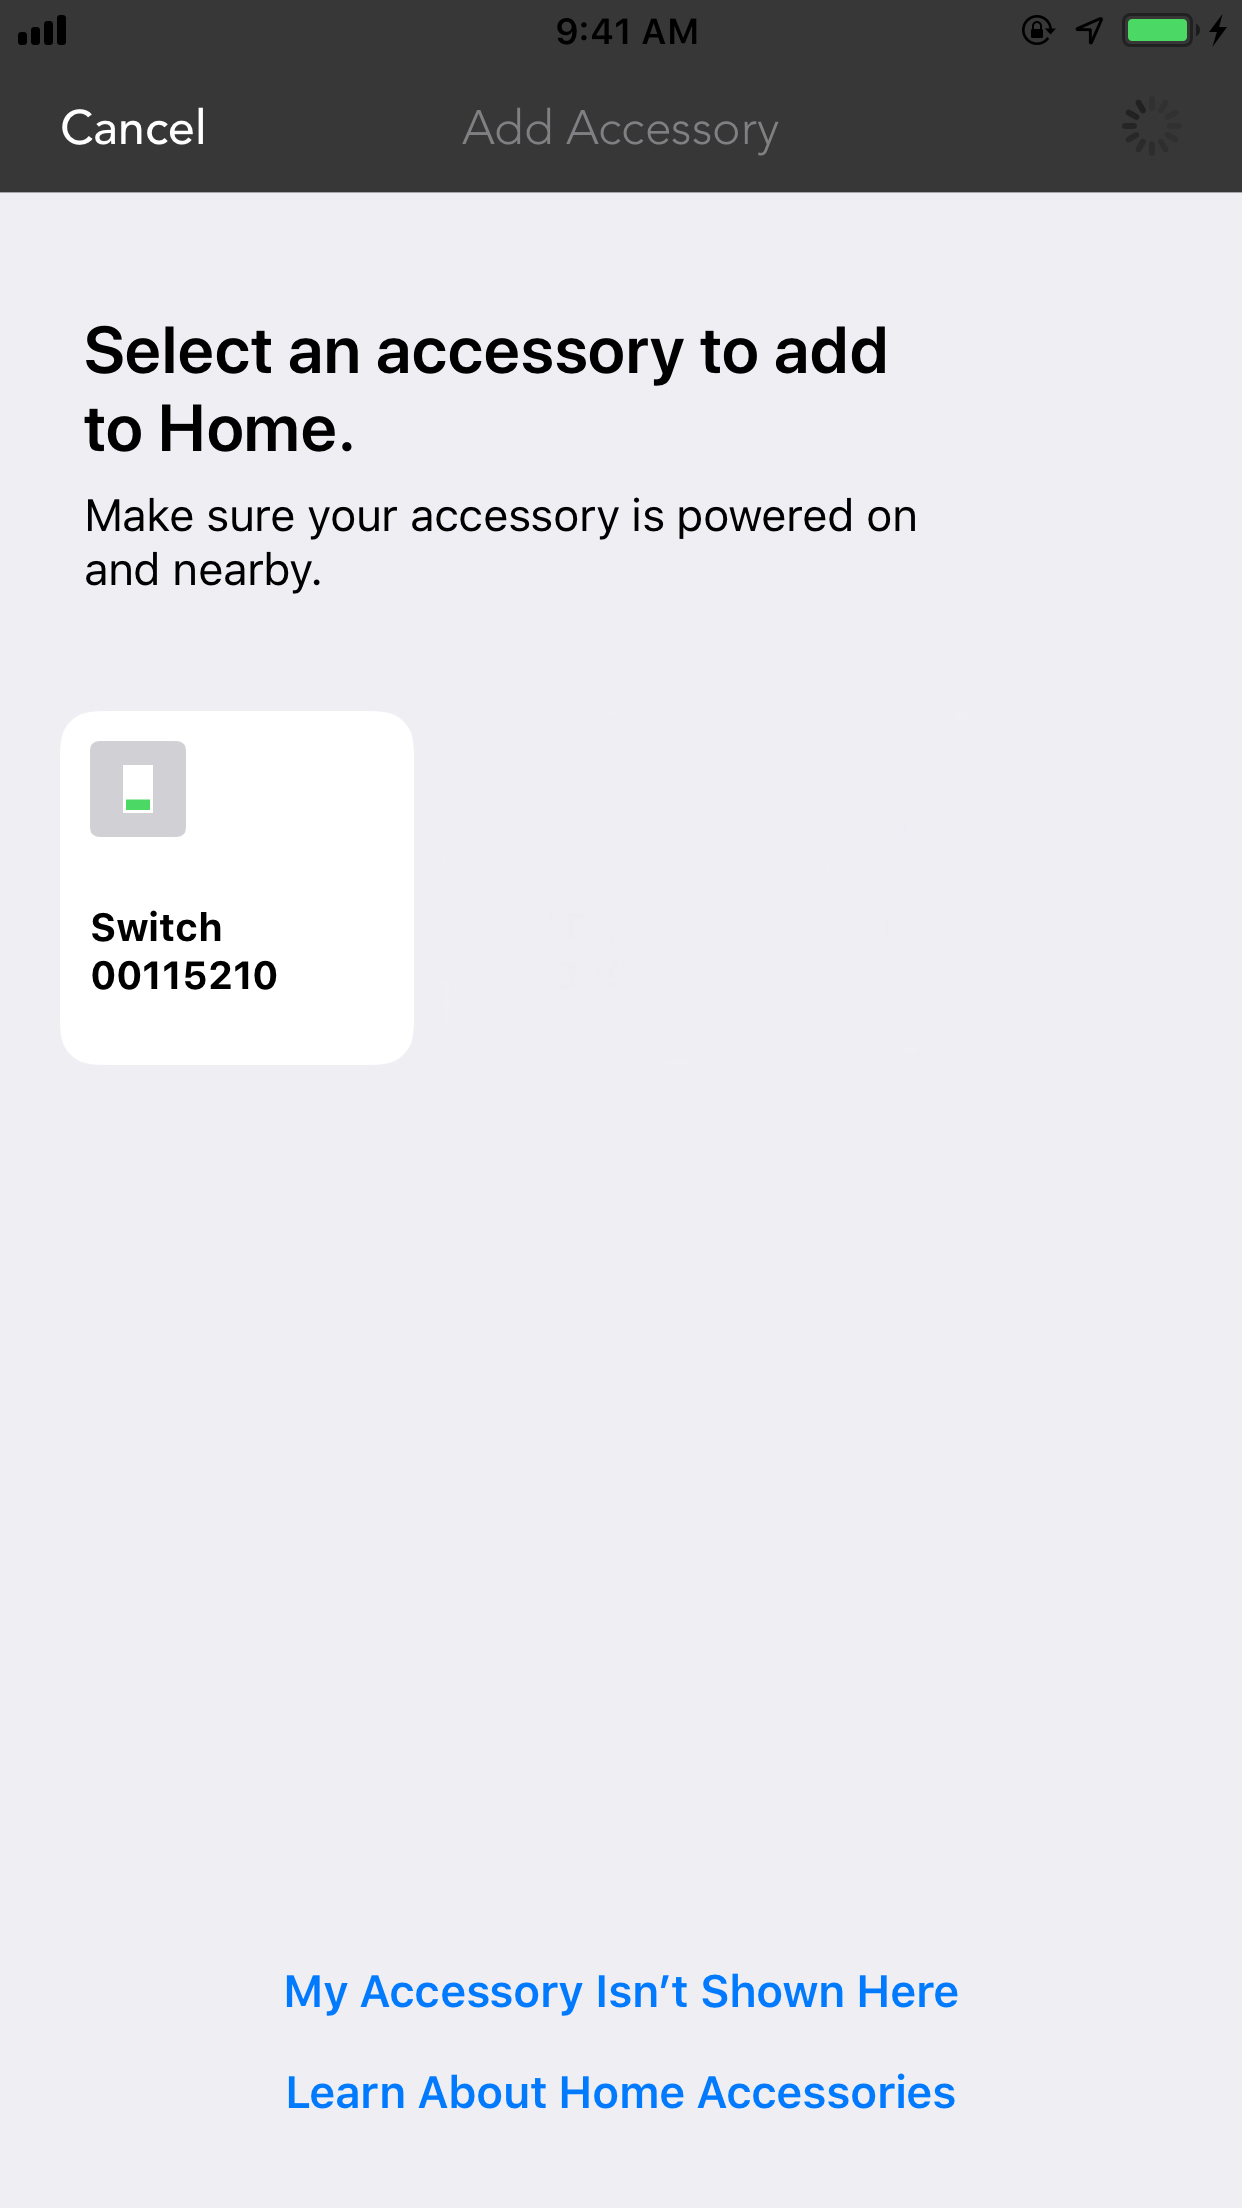
In the screens below, we're using an iDevices Switch, but the setup process is similar for Thermostat.
1. Download the latest version of the iDevices Connected app here:

2. Before pairing the iDevices Switch to your Wi-Fi® network, ensure that your iOS device is connected to a 2.4 GHz Wi-Fi band.
3. Open the iDevices Connected app and allow all of the prompts that appear on-screen. If you are unsure if you allowed all prompts, please go to your iOS Settings > iDevices and make sure everything is turned ON.
4. If this is a new home, tap the “Add my Product” button. For adding to an existing home, tap on the menu button (☰) then, “Add Product.
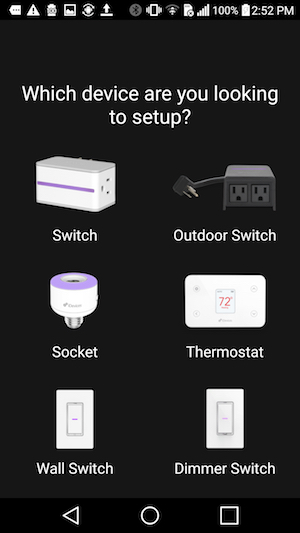
5. Tap the product you will be setting up.
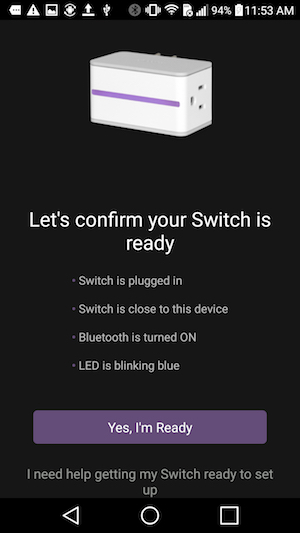
6. Confirm the product is ready to be set up. Tap “Yes, I am Ready.” The iDevices Connected app may walk you through additional steps to determine if the product is ready for setup.
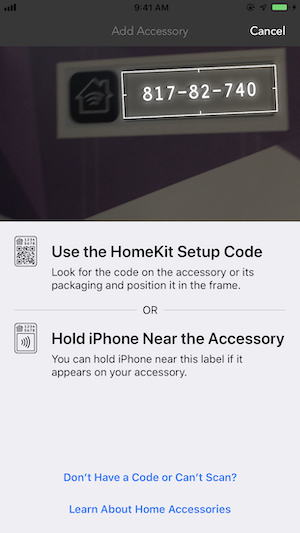
7. Scan the 8-digit HomeKit setup code for the product.
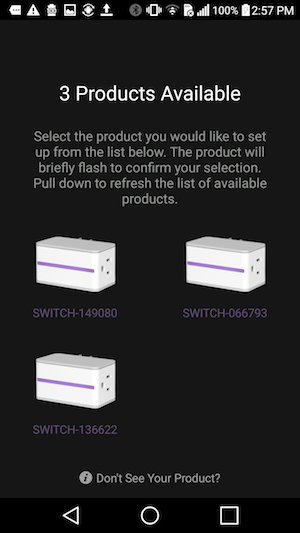
8. Select the product from the available accessories.
9. Tap “Allow” to connect the accessory to your Wi-Fi network.
Note: Your iOS device will automatically send the password information to the product; you will not be asked to type the password. This process may take a moment.
10. Tap “Switch” to create a customized name for the product in the app. Visit Naming Products and Rooms to learn best practices for naming.
11. Customize the night light name to control it with Siri. If your product does not have an LED night light, the setup will continue directly to the next step.
12. On iOS 13, you'll be prompted to add the product to suggested Scenes, then tap "Done."
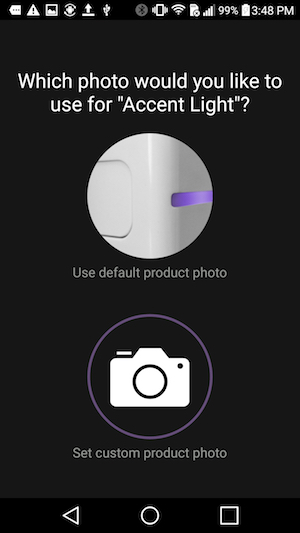
13. Choose a photo for the product; you can use the default photo or set a custom photo.
14. Next, the iDevices Connected app will walk you through any additional customizations or settings for your specific product.
Note: If you're on iOS 14, after adding and customizing your product, the app may show a “Loading…” screen. Tap the X in the upper left-hand corner to close the window and ensure the product you added is available for control from the home dashboard.
Note: After changing modes, there is a standard 5-7 minute delay before the Thermostat will call for heating or cooling to protect the compressor for air conditioners and heat pump systems. During this time, the setpoint on the Thermostat display will show in black. Once the delay has passed and the Thermostat calls for heating or cooling, the setpoint will show in red for heating or blue for cooling.
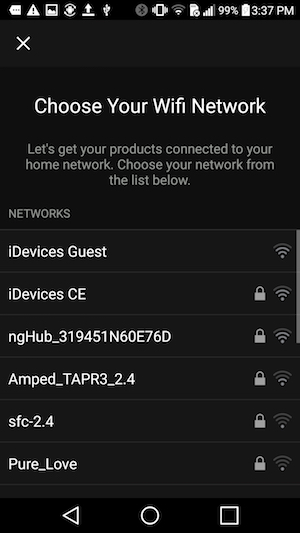
Before pairing the iDevices product to your Wi-Fi® network, ensure that your Wi-Fi network is running on a 2.4 GHz b/g/n Wi-Fi band and using either None, WPA or WPA2 network security with AES encryption. If you have multiple wireless networks such as a guest network, a 2.4 GHz network, and a 5 GHz network, please connect your phone or tablet to the 2.4 GHz network for initial setup. iDevices products can't be set up on guest networks. Download the latest version of the iDevices Connected app here:

Android Setup:
In this example setup, we'll be using an iDevices Switch. The setup process is similar for each iDevices product.
1. Please ensure Bluetooth is enabled on your Android device. Bluetooth is used to pair your Android device and Smart Home product.
2. Please ensure Wi-Fi is enabled on your Android device. After pairing is complete, all communication between your Android device and the iDevices product is done via Wi-Fi.
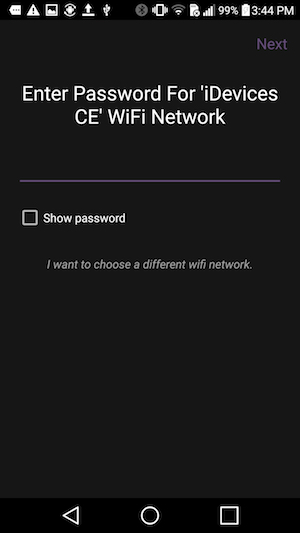
3. Make a note of your Wi-Fi network name and password for later in the setup process.
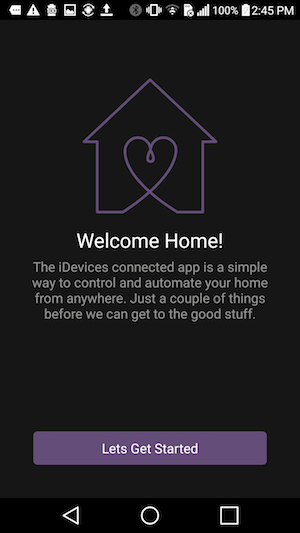
4. Locate and launch the iDevices Connected app, if this is your first iDevices product you will be walked through setting up your home.
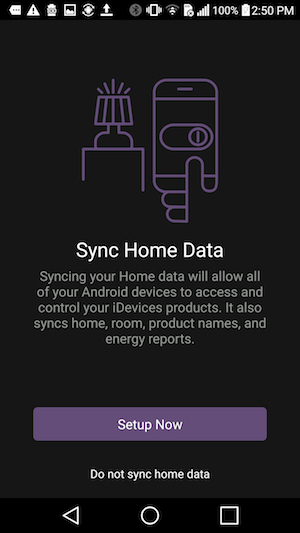
5. Tap "Setup Now" to sync the home data to a chosen Google account.
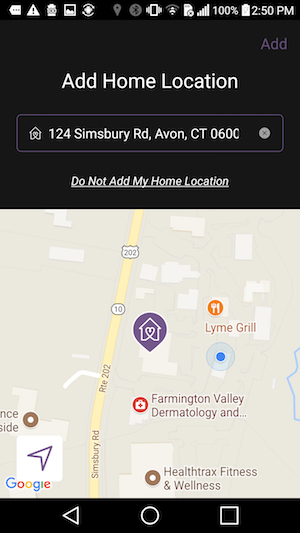
6. Add your Home Location. This allows the iDevices Connected app to get an estimated energy cost for your area, if your iDevices product supports Energy Reporting.
7. Select the device you are adding to the iDevices Connected app and confirm the product is ready to be setup. Then, tap “Yes, I am Ready.” The iDevices Connected app may walk you through additional steps to determine the product is ready to set up.
8. The app will locate any products in range. Tap the product in the app and confirm the product identified itself, tap "Yes" to continue. If you did not see the product identify itself, tap "No" and select another device.

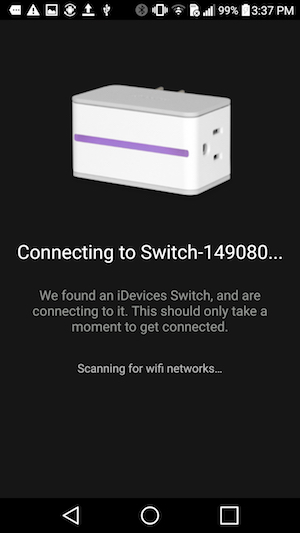
9. The iDevices Connected app will begin the pairing process to the product. Hold your Android phone or tablet within 1 inch of the product, as the app uses Bluetooth proximity to establish the initial connection.
10. Choose the 2.4 GHz Wi-Fi network your Android device is connected to and enter the password. Then, tap "Next" to connect the product to your Wi-Fi network.
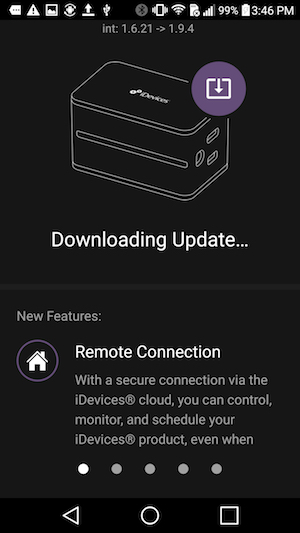
11. After the Wi-Fi connection is complete, the app will walk you through running any necessary firmware updates.
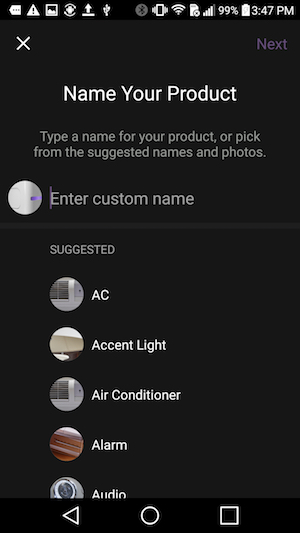
12. Next, the iDevices Connected app will walk you through setting the product name, photo and any additional customizations for your specific product.
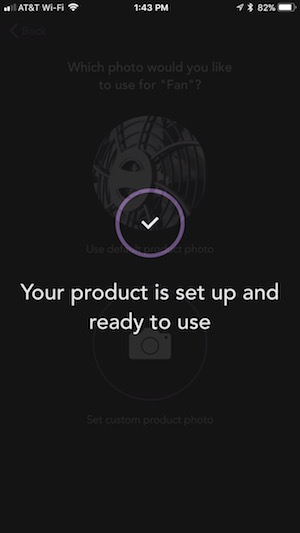
13. The setup is complete - you can now use your product!
iDevices Thermostat is compatible with both iOS and Android devices. If you plan on using your device with both iOS and Android, it's recommended that Thermostat be set up first with the iOS device. Once both setups are completed, any available firmware updates can be run from either the iOS or the Android device.
- Tap the Gear button on the iDevices Thermostat.
- Tap the down arrow until you reach Setup, tap the Gear button to select Setup.
- Tap the Gear button to select Connection.
- You will see both iOS and Android listed; it will let you know which device is paired and which is unpaired. Select the unpaired device using the arrow buttons, tap the Gear button to select and start the setup process via the iDevices app.
Note: When using the iDevices Thermostat with both an iOS and Android device, schedules set up on the Android device will be overwritten by any iOS device running iOS 10 that attempts to create a schedule. In order to see your home and products on the Android device, you must walk through the pairing process for each of your iDevices products.
After changing modes, there is a standard 5-7 minute delay before the Thermostat will call for heating or cooling. This is done to protect the compressor for air conditioners and heat pump systems from excessive wear.
During this time, the setpoint on the Thermostat display will show in black. Once the delay has passed and the Thermostat calls for heating or cooling, the setpoint will show in red for heating or blue for cooling.
After installing the iDevices Thermostat, test your HVAC system using the steps below:
- Set your iDevices Thermostat to HEAT mode. Adjust the temperature set point above the ambient temperature in the room, and verify that the heat turns on.
- Set your iDevices Thermostat to COOL mode (if outside temperature is above 50°F). Adjust the temperature set point below the ambient temperature in the room, and verify that the cooling turns on.
- If your system has dual fuel sources (heat pump plus electric or fuel-fired emergency heat), set your iDevices Thermostat to EMERGENCY HEAT mode. Adjust the temperature set point above the ambient temperature in the room and verify that the heat turns on.
- If all of the available system modes function properly, the test is complete.
Note: After changing modes, there is a standard 5-7 minute delay before the Thermostat will call for heating or cooling to protect the compressor for air conditioners and heat pump systems. During this time, the setpoint on the Thermostat display will show in black. Once the delay has passed and the Thermostat calls for heating or cooling, the setpoint will show in red for heating or blue for cooling.
If your Thermostat is running the latest firmware, you will be walked through setting the HVAC type during the initial setup on the Thermostat display, prior to pairing to your phone. If your Thermostat is on older firmware, you'll be brought through pairing to your phone first, then you must set HVAC Type to ensure the system runs properly. Follow the steps below:
- Press the gear button on your iDevices Thermostat.
- Use the arrow buttons to scroll to 'Setup' and press the gear button to select.
- Use the arrow buttons to scroll to 'HVAC TYPE' and press the gear button to select.
- Using the arrow buttons to scroll and the gear button to select, set the Stage and Type for your system configuration:
- Stage: HP (Heat Pump) OR Non HP (Non Heat Pump or Conventional)
- Type: HE (Electric Heat) OR HG (Gas or Fuel Oil)
- If you have a heat pump, set O/B Type appropriate for your system.
The iDevices Thermostat works with HVAC systems that have humidification & dehumidification features. The terminal labeled “HUM” serves as a multi-function relay to allow for Humidification, Dehumidification, W3 (3rd Stage Heat) or AUX heat (for heat pump systems) when supported by the HVAC system.
Humidification:
Humidification is applicable to Heat, Auto Heat, or Emergency Heat modes and can be set for dependent or independent use. When humidification is set to dependent, humidification will only occur when heating is active. When set to independent, humidification can occur when the system is in Heat, Auto Heat, or Emergency Heat Modes, but not actively heating.
Dehumidification:
Dehumidification works in Cool, Heat, or Auto modes. This feature kicks on when humidity rises above the dehumidification setpoint and remains active until the humidity drops below the dehumidification set point.
W3/AUX:
W3/AUX is an additional heat source that's typically meant to supplement Heat Pump systems. Aux heat is usually triggered when the ambient temperature is 2-2.5° degrees below the set point.
To learn how to set configure the HUM relay, visit: Configuring the HUM Relay
The Terminal labeled “HUM” serves as a multi-purpose relay to allow for Humidification, Dehumidification, W3 (3rd Stage Heat) or AUX heat (for heat pump systems).
If the Thermostat is on the latest firmware, you'll be walked through configuring the HUM Relay during the initial setup on the Thermostat display, prior to pairing to the iDevices Connected app.
If you're not walked through setting this configuration during initial setup, run any applicable firmware updates once you've paired to the iDevices Connected app. For instructions on updating the firmware, Click Here. Then, follow these steps to set up the HUM relay for your system:
- Press the Gear on the Thermostat
- Use the arrows to scroll down to “Setup”
- Press the Gear to select “Setup”
- Press down to “Relay” and press the Gear to select.
- Select the 'Relay' for your system using arrow buttons.
- Press the Gear to continue.
- The Thermostat will display a summary of the settings you've selected.
The following is a list of abbreviations you will see throughout the installation guide and support articles related to the iDevices Thermostat.
HVAC: Heating, Ventilation and Air Conditioning system
HP: Heat Pump System. This type of HVAC system uses a compressor with a reversing valve to provide both heating and cooling capability.
HE: Electrically heated central heating system. This system uses an electric heating element along with a fan and ducting. Sometimes used as AUX/Emergency heat with a heat pump system. Electric baseboard heaters are not included in this system type.
HG: Fuel-fired central heating system. This system uses a gas or oil burner along with a fan and ducting or a hot water baseboard system. Can be used as a standalone heating system or as AUX/ Emergency heat with a heat pump system.
O/B: This option selects the type of reversing valve for heat pump systems. An “O” reversing valve is energized when cooling and a “B” reversing valve is energized when heating. Most systems use an O type reversing valve. Rheem and Ruud typically use a B type reversing valve. If you are unsure, contact your Heat Pump manufacturer.
In the box:
- Thermostat Faceplate
- Thermostat Mounting Plate
- 2 Screws
- 2 Screw Anchors
Using Your Thermostat
The iDevices Thermostat has advanced tuning controls, which allow you to control energy usage by determining when and how long your HVAC system runs.
Features include Preheat/Precool, Span, which controls how long your system will run, Deadband, which allows for a temperature range around the Auto set point.
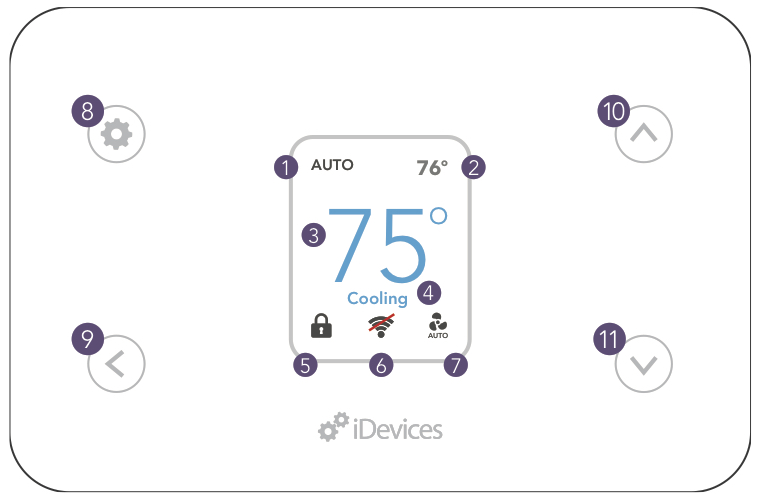
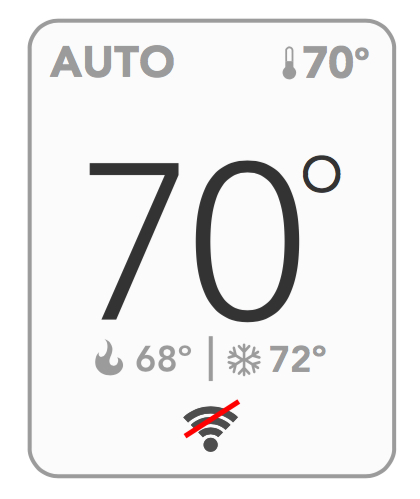
1- System Mode
- Mode currently running (Off, Auto, Heat, Cool or Emergency Heat)
2- Ambient Temperature
- Ambient Temperature at the location of the Thermostat
3- Desired Temperature
- Temperature set by user via the Thermostat, iDevices app or Schedule
4- HVAC State
- Indicates if the Thermostat is currently calling for Heating or Cooling
5- Button Lock
- Indicates if Thermostat is locked. Press and hold Gear 8 for 5 seconds to lock or unlock the Thermostat
6- Connection Status
- Indicates important status changes:
- Wi-Fi icon appears to indicate Thermostat cannot reach the Wi-Fi network
- iDevices Connected app icon appears if Thermostat is not paired to a mobile device
- Triangle with “!” appears if L-wire is connected and detects an alert
7- Fan Mode
- Indicates if fan is set to Auto or On
8- Settings/Select
- Enter the setting menu or select items
9- Back
- Navigate back to the previous menu
10- Temp/Navigate Up
- From the main screen easily adjust the temperature up or navigate up within the menu
11- Temp/Navigate Down
- From the main screen easily adjust the temperature down or navigate down within the menu
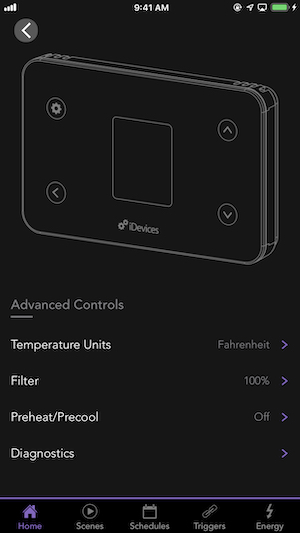
The iDevices Thermostat has advanced tuning controls, which allow you to control energy usage by determining when and how long your HVAC system runs. When you tap on the Thermostat, scroll down and tap "View All Options." This will bring you to the advanced tuning controls.
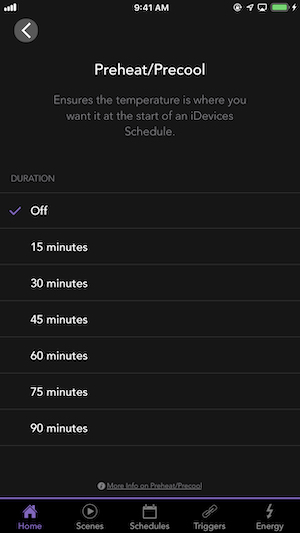
With Preheat/Precool set to OFF, the iDevices Thermostat will activate your HVAC system precisely at the time you set in a Schedule.
Since it takes some time to heat or cool your home to the desired set temperature, the temperature in your home may not always exactly match your set schedule. With the iDevices Thermostat, Preheat/Precool helps to correct this.
Preheat/Precool gradually starts heating or cooling your home before the set schedule period begins, enabling your home to be at your desired temperature exactly when you want it to be.
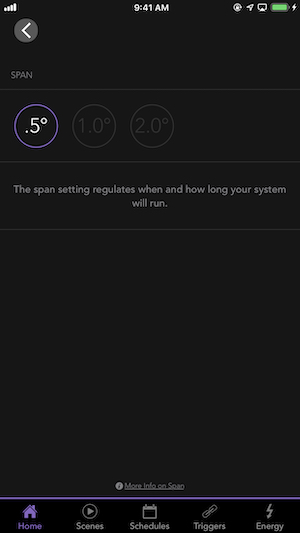
Span
The span setting regulates when and how long your system will run. The span has been set at the factory to 0.5º (in Fahrenheit mode) which will allow the system to turn on 1ºF above or below the set temperature and run for 1ºF above or below the set temperature.
Example: If your thermostat is set to turn on at 72º in heat mode, with a span setting of 2, your thermostat will activate your furnace when the room temperature hits 71º and shut it down when it reaches 73º. For cooling at 72º with a span of 2, your air conditioner will activate at 73º and shut down at 71º. This setting can be changed to 0.5º, 1º, or 2º.
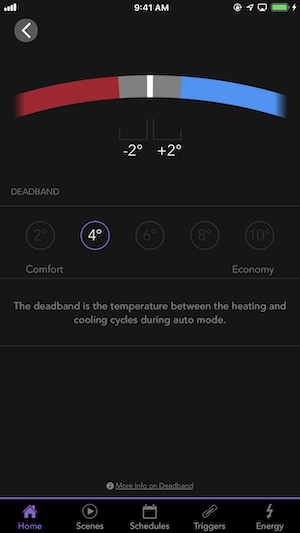
Deadband
The deadband represents a temperature range around the AUTO mode set point that is your “comfort zone”. For example, with a 4° wide deadband and a setpoint of 70°, the deadband will be 68° - 72°. This keeps the system from bouncing quickly between heating and cooling when in AUTO mode.
When temperatures fall within the deadband, neither heating nor cooling can occur. A larger deadband will have your system run more economically, while a smaller deadband will have your system hold the temperature closer to the setpoint and increase comfort. The deadband does not affect your thermostat's operation when in HEAT, COOL, or EMERGENCY HEAT modes.
Example: If you have an 8º deadband and you set your desired temperature to 70º in AUTO mode, your heating set point will be 66º and your cooling set point will be 74º.
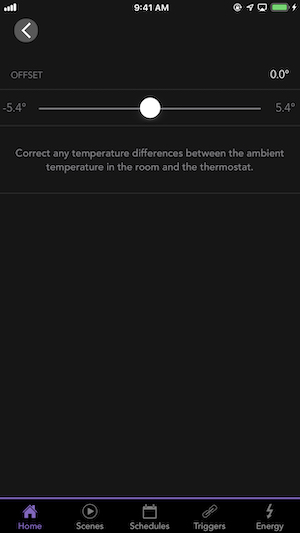
Offset
Offset allows you to adjust the ambient temperature readings of your Thermostat. If you notice that your Thermostat is reading higher or lower than you prefer, you can adjust the reading here. The Offset value that you set will be added or subtracted from the unit's ambient temperature reading. The offset value adjusts both the displayed ambient temperature and the ambient temperature value used to determine when the heating or cooling turns on.
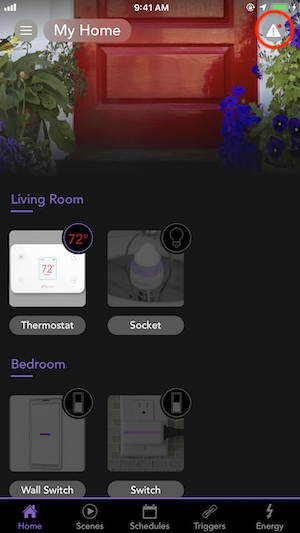
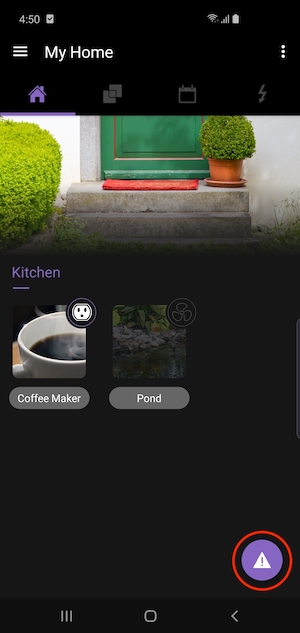
After downloading the latest iDevices Connected app, every time you launch the app, it will scan your local network for known iDevices products that need updated firmware. If you have a firmware update, you will see a notification icon in the upper right corner. If your firmware is up-to-date, you will not see the icon.
If your product is paired to both an iOS device and an Android device, you should only attempt to update the product from one of the devices.
To Start Firmware Updates:
1. Tap the notification icon in the iDevices Connected app:
On iOS: Tap the notification icon in the top right-hand corner.
On Android: Tap the notification icon in the lower right-hand corner.
2. Tap the update icon to the right of the product to start the download and installation of the new firmware for all available products.
3. For both iOS and Android, the iDevices Connected app has to be running in the foreground throughout the entire update process. If the app is closed or sent to the background, the update process will pause. Depending on the iDevices product, a typical firmware update will last 5-7 minutes.
Note: During the download and installation process, it's normal for the product LED to flash and the connected accessory to turn on and off.
The iDevices Thermostat allows users to set the lowest temperature to 50º and the highest temperature to 100º. This is referred to as the "set point." These set point settings protect your HVAC system from damage when temperatures outside are very cold or very hot, this range is typical of most thermostats.
To ensure safe usage of your iDevices Thermostat and to prevent damages not covered under the products 2-year Limited Warranty, please adhere to the following guidelines:
Your safety comes first! If you don't feel comfortable installing your iDevices Thermostat, contact a local HVAC contractor.
- Avoid close proximity to pacemakers. FCC - Wireless Devices and Health Concerns
- iDevices Thermostat is certified for use in the US, Canada, and Australia only.
- Do not set the unit to COOL mode if the outside temperature is below 50ºF (10ºC). This could damage your system.
- iDevices Thermostat uses capacitive touch buttons. All that is needed to activate the buttons is a gentle touch. Be careful not to press too firmly on the buttons to avoid causing damage.
- iDevices Thermostat must be installed in a manner that conforms to all applicable national, state, and local building codes.
- Only use an electrical input between 18-30VAC. Power inputs outside of this range could cause damage to the iDevices Thermostat and/or your HVAC system.
- Turn all power to your old thermostat and HVAC system OFF before installing or removing the iDevices Thermostat.
- Do not expose the iDevices Thermostat to any form of liquid. If cleaning is required, it must be done with cleaning wipes or solutions approved for use with electronics.
- Keep excessive dust and debris from getting in the vents on the housing of your iDevices Thermostat. This could cause the temperature sensor to read inaccurately.
- Ambient operating conditions: 32º F to 104º F (0º C to 40º C), 0-90% humidity, non-condensing.
- Do not attempt to open, service or otherwise modify the iDevices Thermostat or its internal components.
Thermostat Wire Adapter
The Thermostat Wire Adapter allows you to add a 24VAC Common wire to a system that doesn't currently have one.
Be sure your HVAC control board has a 24VAC Common terminal.
The installation of the iDevices Thermostat Wire Adapter and all wiring must conform to local and national electrical codes. Improper wiring or installation may cause damage to this product, your Thermostat, your HVAC system or your home, and could result in personal injury.
The iDevices Thermostat Wire Adapter is intended to share two Thermostat signals over one wire, so that you can add a C wire to a system that doesn't currently have one. Your system will need at least 3 physical wires between the HVAC control board and the Thermostat, as well as an accessible C/Common terminal on the HVAC control board or transformer to connect to.
The iDevices Thermostat Wire Adapter should be installed in or near the HVAC system control board or furnace, or another dry, indoor location. Find a location with easy access to the wires that run between the HVAC unit and the Thermostat. If needed, you can use two #8 screws (not included) to mount the wire adapter to a convenient surface.
WIRING REQUIREMENTS
- Acceptable Wire: 24-18AWG
- Wire Length (total wire length between HVAC system and Thermostat): 18 AWG: 195 feet 24 AWG: 65 feet
- All wires and connections should conform to applicable local and national electrical codes.
Note: The Wire Adapter should not be used to “share” either the R (or RC/RH) wire or the C wire. Both the R wire for the system and the C wire must each be separate, physical wires, or damage to the system or Thermostat, or unintended/undesirable system operation may result.
ELECTRICAL SPECIFICATIONS
Rated Input:
Voltage: 18 to 30VAC, 50Hz or 60Hz
Current consumption: 30mA at 24VAC when W & Y are connected
Terminals: RC, RH, Y, W, C, G
Rated Output:
Voltage: 18 to 30VAC, 50Hz or 60Hz Class 2
Current rate: 5 Amps
Terminals: RC, RH, Y, W, C, G
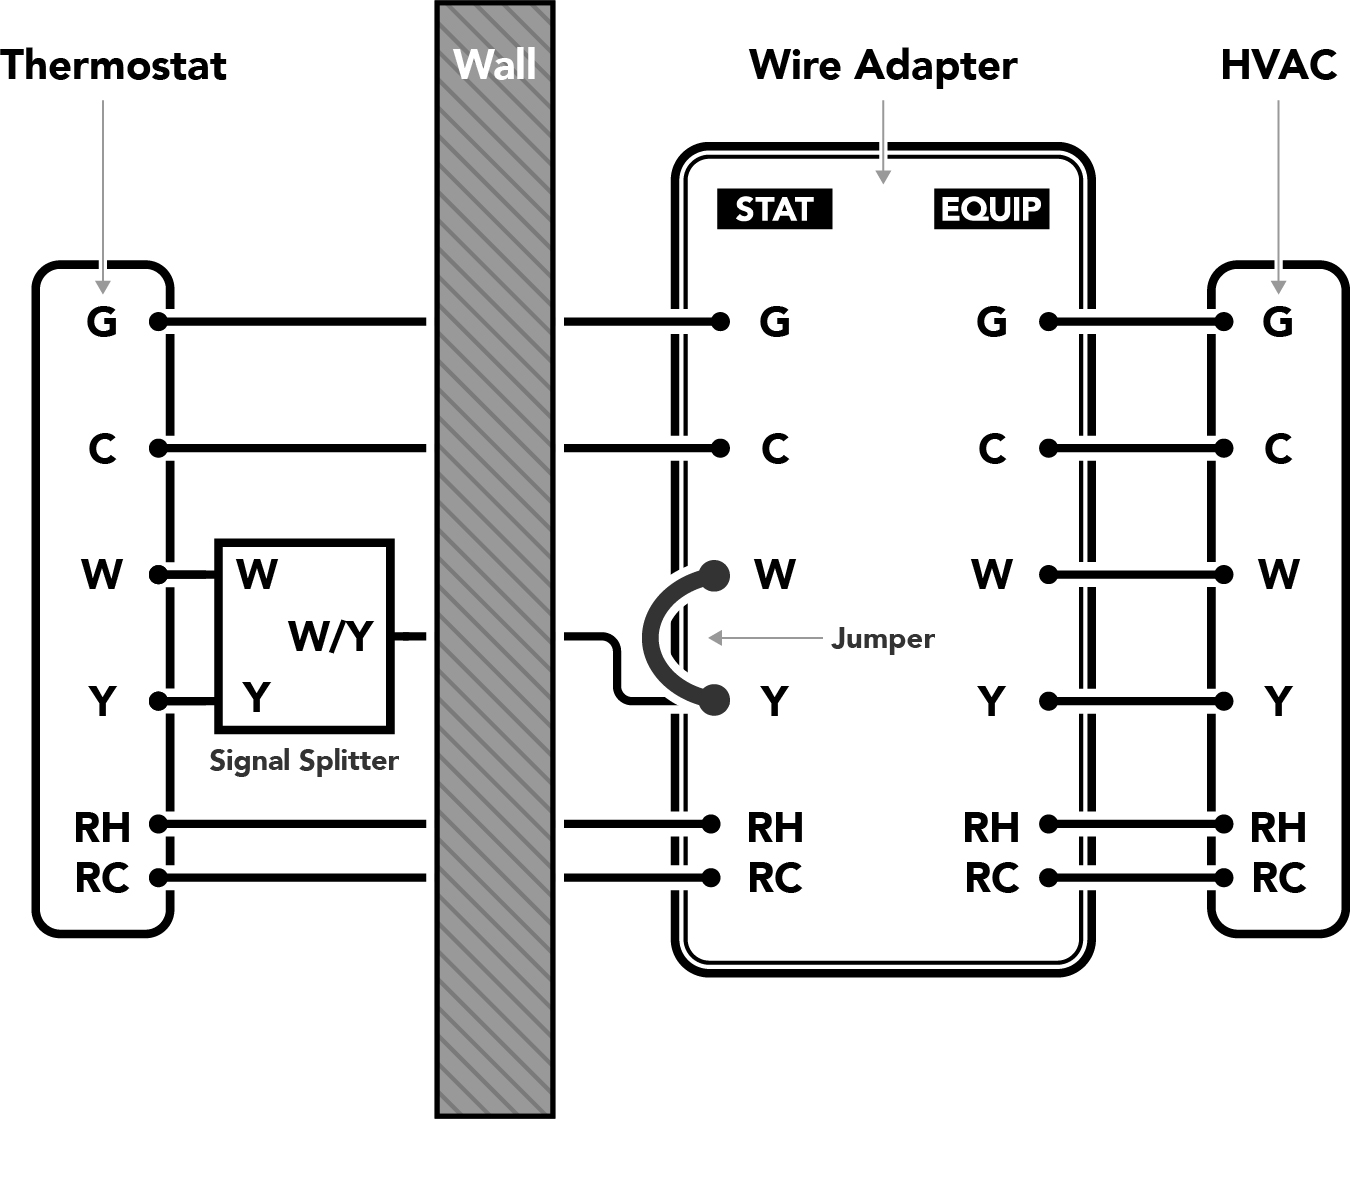
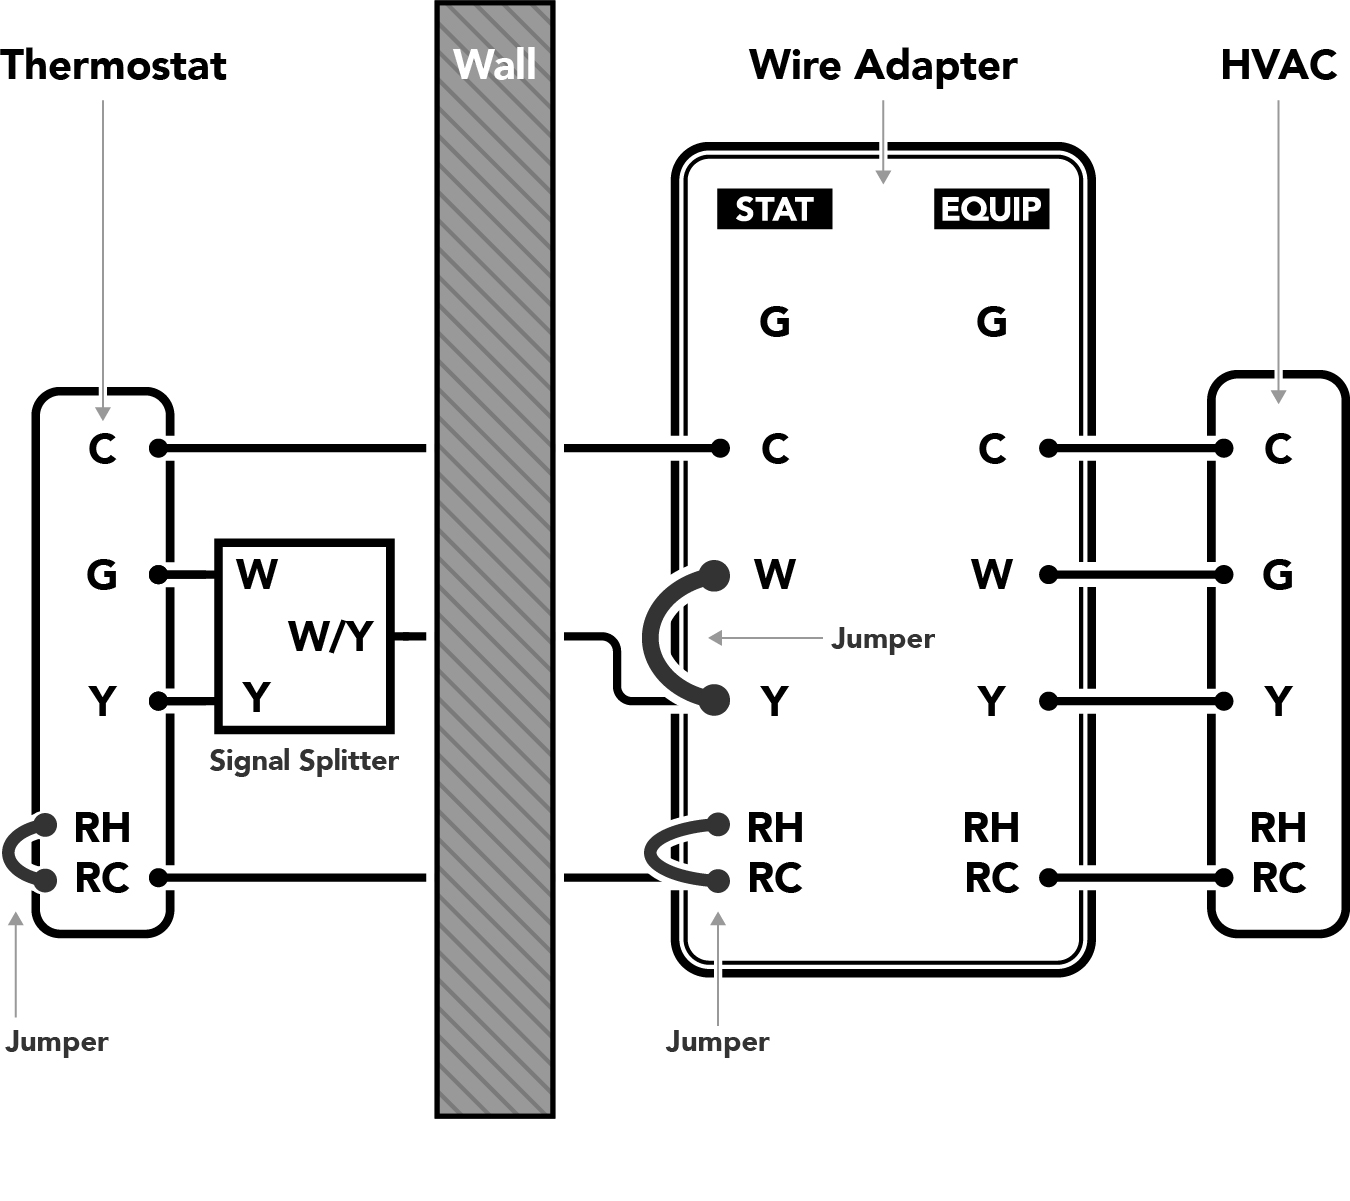
CONVENTIONAL (HEAT + AC) 4 WIRES

- Connect the RC, Y, W, C, and G terminals on the EQUIP side of the Wire Adapter to the corresponding terminals on the HVAC control board. Use the provided length of wire if necessary.
- Connect the existing R and G wires (that come from the Thermostat) to the RC and G terminals on the STAT side of the Wire Adapter. Leave the Jumper in place between RC-RH. Note: If the system does not have a G wire, do not connect any of the G terminals.
- Connect one of the remaining two wires (that come from the Thermostat) to the Y terminal on the STAT side of the Wire Adapter. Leave the Jumper in place between W-Y.
- Connect the last remaining wire (that comes from the Thermostat) to the C terminal on the STAT side of the Wire Adapter.
- Cap or tape the ends of any unused wires.
Note: Any additional wires not shown on the diagram can be routed around the wire adapter, directly from the HVAC system to the Thermostat.
AT THE THERMOSTAT:
- Connect the R and G wires coming from the wall to the RC and G terminals on the Thermostat. Leave the Jumper in place between RC-RH. Note: If the system does not have a G wire, do not connect anything to the G terminal.
- Find the end of the wire you selected in step 3 above, insert it into the screw clamp on the Signal Splitter, and tighten the screw. Connect the W leg of the Signal Splitter to the W terminal of the Thermostat, and the Y leg of the Signal Splitter to the Y terminal of the Thermostat.
- Connect the wire you selected in step 4 above to the C terminal of the Thermostat.
- Arrange the wires to fit in the recess in the rear of the Thermostat, and press the Thermostat into place on the mounting plate. Be sure that there are no bare wires in contact with each other.
CONVENTIONAL (HEAT + AC) 5 WIRES
- Connect the RC, RH, Y, W, C, and G terminals on the EQUIP side of the Wire Adapter to the corresponding terminals on the HVAC control board. Use the provided length of wire if necessary.
- Connect the existing RC, RH, and G wires (that come from the Thermostat) to the RC, RH, and G terminals on the STAT side of the Wire Adapter. Remove the Jumper between RC-RH. Note: If the system does not have a G wire, do not connect any of the G terminals.
- Connect one of the remaining two wires (that come from the Thermostat) to the Y terminal on the STAT side of the Wire Adapter. Leave the Jumper in place between W-Y.
- Connect the last remaining wire (that comes from the Thermostat) to the C terminal on the STAT side of the Wire Adapter.
- Cap or tape the ends of any unused wires.
Note: Any additional wires not shown on the diagram can be routed around the wire adapter, directly from the HVAC system to the Thermostat.
AT THE THERMOSTAT:
- Connect the RC, RH, and G wires coming from the wall to the RC, RH, and G terminals on the Thermostat. Remove the Jumper between RC-RH. Note: If the system does not have a G wire, do not connect anything to the G terminal.
- Find the end of the wire you selected in step 3 above, insert it into the screw clamp on the Signal Splitter, and tighten the screw. Connect the W leg of the Signal Splitter to the W terminal of the Thermostat, and the Y leg of the Signal Splitter to the Y terminal of the Thermostat.
- Connect the wire you selected in step 4 above to the C terminal of the Thermostat.
- Arrange the wires to fit in the recess in the rear of the Thermostat, and press the Thermostat into place on the mounting plate. Be sure that there are no bare wires in contact with each other.
CONVENTIONAL (HEAT + FAN)
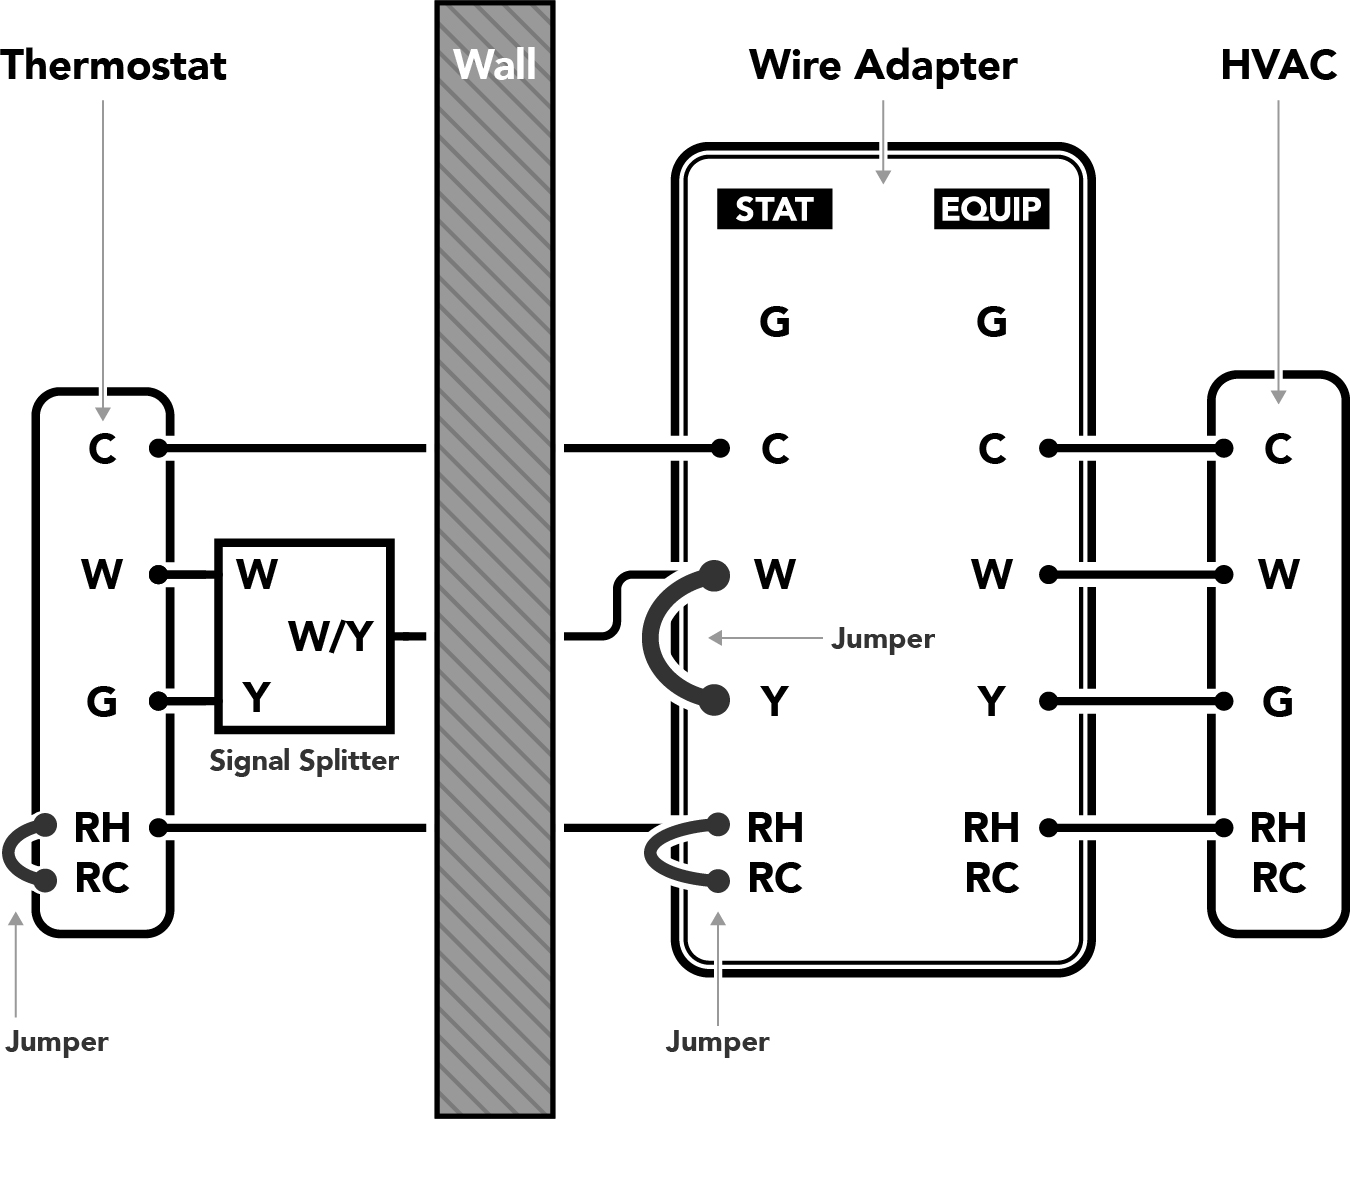
- Connect the R, W, and C terminals on the EQUIP side of the Wire Adapter to the corresponding terminals on the HVAC control board. Connect the G terminal on the HVAC board to the Y terminal on the Wire Adapter. Use the provided length of wire if necessary.
- Connect the existing R wire (that comes from the Thermostat) to the RH terminal on the STAT side of the Wire Adapter. Leave the Jumper in place between RC- RH.
- Connect one of the remaining two wires (that come from the Thermostat) to the W terminal on the STAT side of the Wire Adapter. Leave the Jumper in place between W-Y.
- Connect the last remaining wire (that comes from the Thermostat) to the C terminal on the STAT side of the Wire Adapter.
Note: Any additional wires not shown on the diagram can be routed around the wire adapter, directly from the HVAC system to the Thermostat.
AT THE THERMOSTAT:
- Connect the R and G wires coming from the wall to the RH and G terminals on the Thermostat. Leave the Jumper in place between RC-RH.
- Find the end of the wire you selected in step 3 above, insert it into the screw clamp on the Signal Splitter, and tighten the screw. Connect the W leg of the Signal Splitter to the W terminal of the Thermostat, and the Y leg of the Signal Splitter to the G terminal of the Thermostat.
- Connect the wire you selected in step 4 above to the C terminal of the Thermostat.
- Arrange the wires to fit in the recess in the rear of the Thermostat, and press the Thermostat into place on the mounting plate. Be sure that there are no bare wires in contact with each other.
CONVENTIONAL (AC + FAN)
- Connect the R, Y, and C terminals on the EQUIP sideof the Wire Adapter to the corresponding terminals on the HVAC control board. Connect the G terminal on the HVAC board to the W terminal on the Wire Adapter. Use the provided length of wire if necessary.
- Connect the existing R wire (that comes from the Thermostat) to the RC terminal on the STAT side of the Wire Adapter. Leave the Jumper in place between RC- RH.
- Connect one of the remaining two wires (that come from the Thermostat) to the Y terminal on the STAT side of the Wire Adapter. Leave the Jumper in place between W-Y.
- Connect the last remaining wire (that comes from the Thermostat) to the C terminal on the STAT side of the Wire Adapter.
Note: Any additional wires not shown on the diagram can be routed around the wire adapter, directly from the HVAC system to the Thermostat.
AT THE THERMOSTAT:
- Connect the R and G wires coming from the wall to the RH and G terminals on the Thermostat. Leave the Jumper in place between RC-RH.
- Find the end of the wire you selected in step 3 above, insert it into the screw clamp on the Signal Splitter, and tighten the screw. Connect the W leg of the Signal Splitter to the W terminal of the Thermostat, and the Y leg of the Signal Splitter to the G terminal of the Thermostat.
- Connect the wire you selected in step 4 above to the C terminal of the Thermostat.
- Arrange the wires to fit in the recess in the rear of the Thermostat, and press the Thermostat into place on the mounting plate. Be sure that there are no bare wires in contact with each other.
HEAT PUMP SYSTEM
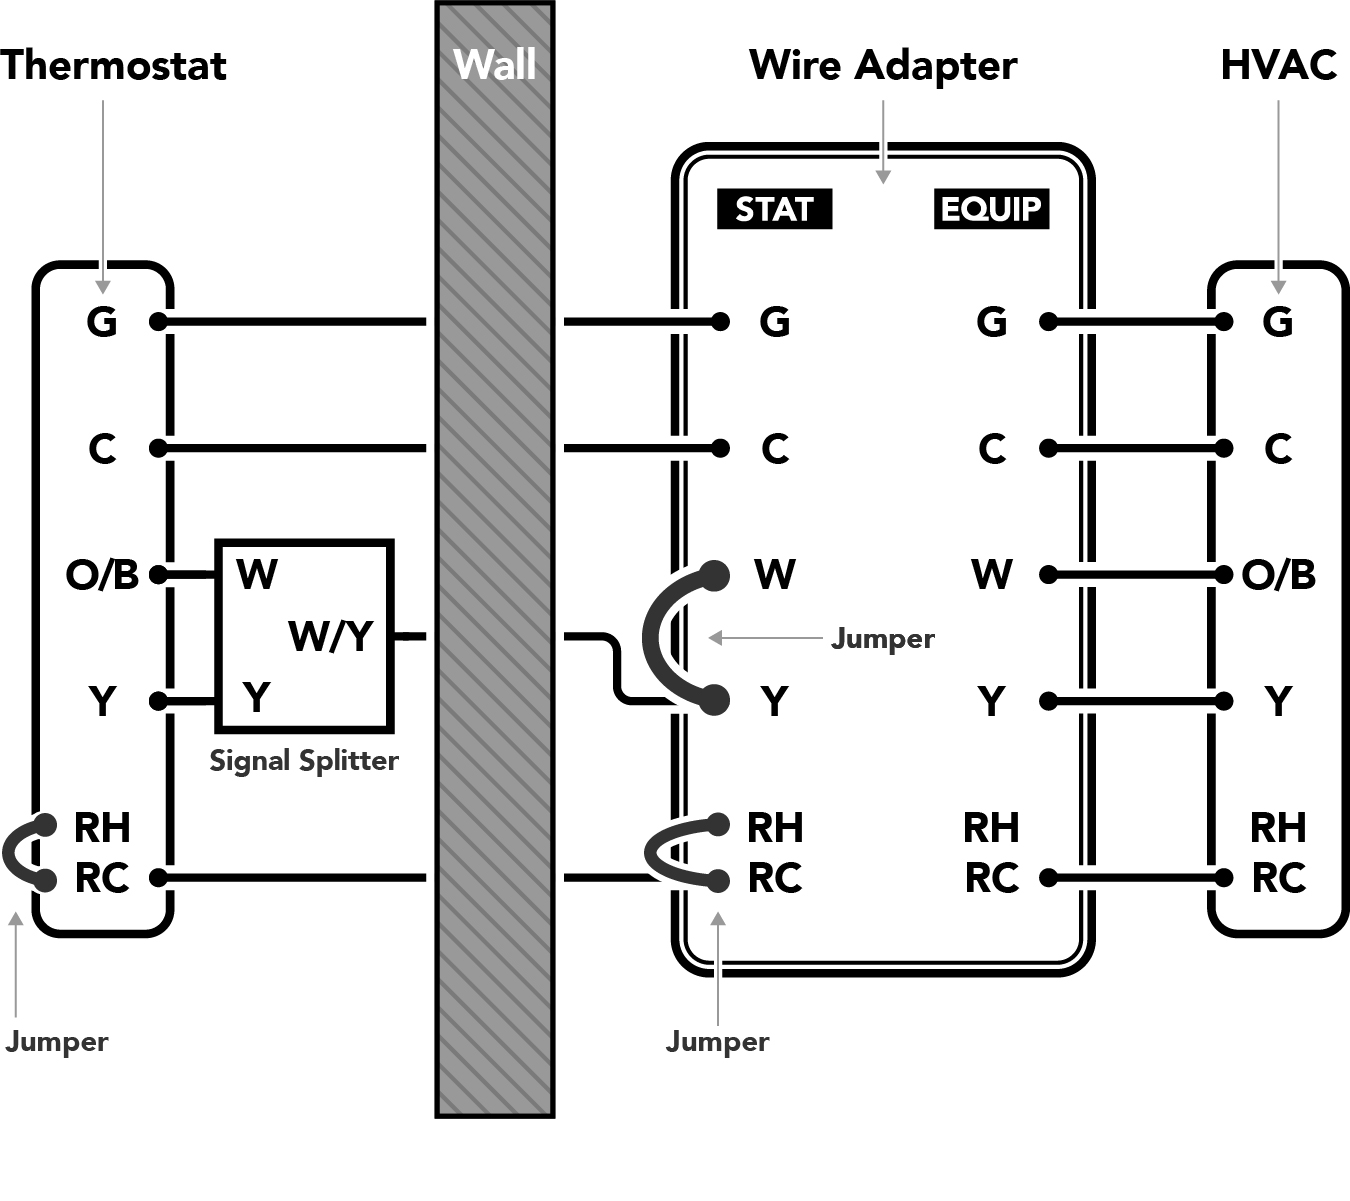
AT THE FURNACE OR HVAC SYSTEM:
- Connect the RC, Y, C, and G terminals on the EQUIP side of the Wire Adapter to the corresponding terminals on the HVAC control board. Connect the O/B (or O, or B) wire on the HVAC control board to the W terminalof the Wire Adapter. Use the provided length of wire if necessary.
- Connect the existing R and G wires (that come from the Thermostat) to the RC and G terminals on the STAT side of the Wire Adapter. Leave the Jumper in place between RC-RH. Note: If the system does not have a G wire, do not connect any of the G terminals.
- Connect one of the remaining two wires (that come from the Thermostat) to the Y terminal on the STAT side of the Wire Adapter. Leave the Jumper in place between W-Y.
- Connect the last remaining wire (that comes from the Thermostat) to the C terminal on the STAT side of the Wire Adapter.
- Cap or tape the ends of any unused wires.
Note: Any additional wires not shown on the diagram can be routed around the wire adapter, directly from the HVAC system to the Thermostat.
AT THE THERMOSTAT:
- Connect the R and G wires coming from the wall to the RC and G terminals on the Thermostat. Leave the Jumper in place between RC-RH. Note: If the system does not have a G wire, do not connect anything to the G terminal.
- Find the end of the wire you selected in step 3 above, insert it into the screw clamp on the Signal Splitter, and tighten the screw. Connect the W leg of the Signal Splitter to the O/B terminal of the Thermostat, and the Y leg of the Signal Splitter to the Y terminal of the Thermostat.
- Connect the wire you selected in step 4 above to the C terminal of the Thermostat.
- Arrange the wires to fit in the recess in the rear of the Thermostat, and press the Thermostat into place on the mounting plate. Be sure that there are no bare wires in contact with each other.
Problem Solving
Rebooting the device can quickly resolve many issues.
Unplugging and re-plugging Thermostat to its mounting plate will reboot the device.
Be sure to turn on iCloud Keychain to avoid any HomeKit errors.
If you are experiencing issues with your Thermostat, or if you would like to set up your product on a different Wi-Fi network, follow the steps below to reset your Thermostat.
Note: Resetting the device will remove all pairings, schedules and scenes associated with this product.
- Delete the Thermostat from the iDevices app:
- For iOS: Tap on the Thermostat, tap the product name in the upper left-hand corner, scroll down and tap “Delete”.
- For Android: Tap on the Thermostat, tap the 3 dots, tap “Edit Product”, scroll down and tap “Delete Product”.
- On the face of the Thermostat, tap the Gear button
- Scroll to Setup using the up and down arrows and tap the Gear again to select
- Scroll to Reset and select it
- Press and hold the Gear button for 10 seconds until the Thermostat says "Restored"
- The Thermostat will walk you through setting up the details of your HVAC system
- Open the iDevices Connected app
- Tap "Add Product"
- Follow the on-screen directions to finish the setup
Depending on the firmware version, the Thermostat may display "Connecting to Network" instead of continuing with the pairing process to iOS or Android. Follow the steps below to get the pairing code and complete the setup process:
- On an iOS device, open the Settings app.
- Tap Wi-Fi.
- A section labeled “Set Up New Device...” with the Thermostat listed below will appear towards the bottom of the screen after a few moments.
- Tap the Thermostat that is listed below “Set Up New Device...”.
- Ensure that the network selected is your 2.4GHz Wi-Fi network. Then, tap Next.
- The settings app will attempt to pair your Thermostat to your Wi-Fi network.
Once the Thermostat joins your Wi-Fi network, the 8-digit HomeKit pairing code will appear on the Thermostat display. Open the iDevices Connected app tap on the menu button (☰) then, “Add Product." The iDevices Connected app will guide you through the rest of the setup process.
After setup is completed, download any new firmware updates for your Thermostat. To learn how to update your firmware, visit: Downloading New Firmware
During the setup process, you may receive the error, "Couldn't Add Accessory." This is typically an indication that the iDevices product is having trouble connecting to your Wi-Fi® network.
Begin by restarting your iOS device, router, and any access points. Then, try the setup procedure in the iDevices Connected app again.
If you continue to receive the error "Couldn't Add Accessory", try the steps below:
- Reboot the Thermostat. Without pressing the buttons on the Thermostat faceplate, remove the Thermostat from the mounting plate and then place it back on.
- Put the Thermostat back into pairing mode by tapping the Gear button, select "Setup", select "Connection", select "iOS", the 8-digit pairing code will display on the screen.
- Open your iOS Settings app.
- Tap Wi-Fi.
- A section labeled “Set Up New Device...” with the Thermostat listed below it may appear towards the bottom of the screen after a few moments:
| If this section does not appear |
Indicates Thermostat has joined the Wi-Fi network. Try the setup procedure in the iDevices Connected app again:
|
| If this section does appear |
Indicates Thermostat did not join the Wi-Fi network. Continue to the steps below. |
- Tap the Thermostat that is listed below “Set Up New Device...”.
- Ensure that the network selected is your 2.4GHz Wi-Fi network. Then, tap Next.
- The settings app will attempt to pair your Thermostat to your Wi-Fi network.
If the Thermostat joins the Wi-Fi network, try the setup procedure in the iDevices Connected app again.
If you receive the error, "An Unexpected Error Occurred. Try Again." it's likely that there is a router setting or compatibility issue. To learn more about the network requirements, visit: Wi-Fi and Network Compatibility
If the display on your product is showing the Wi-Fi logo with a red line through it in the bottom center, this indicates that the product can no longer connect to the Wi-Fi network it was once paired with. This occurs when changes are made to the wireless network such as: a new network name, change in password or security settings, internet is down or there's been new network equipment installed in the home. When internet is restored, the Thermostat will reconnect to the Wi-Fi network automatically. If it does not automatically reconnect, reboot the Thermostat by pulling the Thermostat off the mounting plate and placing it back on.
If new network equipment is installed or network settings have been changed, the products must be reset and setup again to connect to the new Wi-Fi network. Follow the steps below to reset your product and set it up again. Note: Resetting the device will remove all pairings, schedules and scenes associated with this product.
- Delete the Thermostat from the iDevices app (Tap on the Thermostat, tap the edit button, scroll down and tap delete)
- On the face of the Thermostat, tap the Gear button
- Scroll to Setup using the up and down arrows and tap the Gear again to select
- Scroll to Reset and select it
- Press and hold the Gear button for 10 seconds until the Thermostat says "Restored"
- The Thermostat will restart and walk you through the setup process.
- Open iDevices Connected, tap "Add Product"
- Follow the on-screen directions to finish the setup
If during the setup process the iDevices Connected app says "No Products Available" on iOS 10 or if the accessory does not appear on the page "Select an accessory to add to Home" on iOS 11 and later, try the steps below:
Without pressing the buttons on the Thermostat faceplate, remove the iDevices Thermostat from the mounting plate and then put it back on. Put the Thermostat back into pairing mode by tapping the Gear, select "Setup", select "Connection", select "iOS" — the 8-digit pairing code will display on the screen.
Continue with the steps below on iOS 10:
- Open the iDevices Connected app.
- Tap on menu (☰) in the upper left-hand corner.
- Select "Add Product."
- This first search looks for products that need to connect to the Wi-Fi® network. Since your Wall Switch is already connected to the network, select "Got an error or started setting up in another app?”
- The app will search for approximately 20 seconds, and will then bring up the product to complete the HomeKit™ pairing.
- Attempt the setup process again.
Continue with the steps below on iOS 11 and later:
- Open the iDevices Connected app.
- Tap on menu (☰) in the upper left-hand corner.
- Select "Add Product."
- Attempt the setup process again.
If your Thermostat still does not show up after it has successfully been added to your network, please try the following steps, then repeat the steps above again:
- Go to iOS Settings > iDevices. Make sure everything is turned ON. If Home Data was turned off, turn it on. In Settings > Wi-Fi, turn Wi-Fi off, then on again.
- Go to iOS Settings > iCloud. Make sure you are logged in to your iCloud account and that iCloud Drive, Home and Keychain are turned ON.
- Restart your iOS device and router.
When trying to pair an iDevices product to your Android device there are typically two instances in which you will receive the message “No Android Products Found.”
Instance 1: The iDevices product is not in pairing mode. Verify the display shows "Android Setup" and is directing you to open the iDevices Connected app. If it doesn't or it's already paired to an iOS device, follow these steps to place the Thermostat in Android pairing mode:
- Tap the gear on the Thermostat
- Arrow down to "Setup" and tap the gear to select
- Arrow down to "Connection" and tap the gear to select
- Arrow down to "Android" and tap the gear to select
- The display will show "Android Setup" and will direct you to open the iDevices Connected app
Instance 2: The iDevices product does not have Android compatible firmware. To verify this, open the Bluetooth settings in your Android device settings. If you do not see the iDevices product listed, it does not have the compatible firmware. Additionally, if you are not walked through a setup after powering on your Thermostat and the display reads “Connecting Thermostat To Network…”, the Thermostat does not have the latest firmware. Some retailers do not carry iDevices products with the latest Android compatible firmware.
If you have an Apple iPhone, iPad or iPod touch running at least iOS 10, you are able to pair the product and update the firmware. For instructions on updating the firmware, Click Here. Once the update is completed the product can be reset and paired with the Android device.
If you do not have access to an Apple mobile device to update your iDevices product, please contact the iDevices Customer Experience Team at Support@iDevicesinc.com and we will work to resolve the issue with you.
If your iDevices Thermostat shows "Product Unavailable" in the iDevices Connected app when you're not connected to your home Wi-Fi® network and you do not have an Apple Home Hub, try the following:
- Connect to your home Wi-Fi network
- Verify you can control all of your iDevices products within the iDevices Connected app
- Delete the iDevices Connected app from your device (you will not have to reset or set up your products)
- Download the iDevices Connected app from the Apple App Store
- When you open the iDevices Connected app, allow all of the prompts to ensure the app can connect to your home data
- Confirm you can control your products
- Then, test remote your connectivity by temporarily turning off Wi-Fi on your device
- Open the iDevices Connected app and confirm you can control your products.
If your iDevices Thermostat shows "Product Unavailable" in the iDevices Connected app while connected to your home Wi-Fi network, try the following:
- In the settings of your iOS device, turn Wi-Fi off and turn it back on
- Open the iDevices Connected app and tap the retry arrows to reconnect to your Thermostat
If turning Wi-Fi off and back on does not resolve the issue, reboot your Thermostat:
- Remove the Thermostat faceplate from the mounting plate
- Ensure that you do not have any buttons pressed on the Thermostat and place the Thermostat on the mounting plate
- Open the iDevices Connected app and tap the retry arrows to reconnect to your Thermostat
If rebooting the Thermostat and plugging it back in does not resolve the issue, follow the steps below to reset your Thermostat and set it up again:
Note: Resetting the device will remove all pairings, schedules, and scenes associated with this product.
- Delete the Thermostat from the iDevices app:
- Tap on the Thermostat, tap the product name in the upper left-hand corner, scroll down and tap “Delete”
- On the face of the Thermostat, tap the Gear to select
- Scroll to Setup using the up and down arrows, tap the Gear to select
- Scroll to Reset, tap the Gear to select
- Press and hold the Gear button for 10 seconds until the Thermostat says "Restored"
- The Thermostat will walk you through setting up the details of your HVAC system
- Open iDevices Connected app
- Tap "Add Product"
- Follow the on-screen directions to finish the setup
After the Thermostat is reconnected, make sure you complete any available firmware updates as this will most likely resolve the connection issue you were experiencing. For instructions on updating the firmware, visit: Downloading New Firmware.
If you're experiencing an issue with your iDevices product, a quick reboot can resolve many issues. After rebooting the device using the steps below, it will take several moments to restart, then reconnect to the Wi-Fi network. Rebooting the product will not affect your schedules or customizations applied to the product.
Switch and Outdoor Switch:
- Unplug the device, then plug it back in.
Socket:
- Unscrew the entire Socket from the fixture, then screw it back in.
Wall Switch and Dimmer Switch:
- Press the bottom right-hand button below the rocker once.
Wall Outlet:
- Press the small circle button next to the LED once.
Thermostat:
- Pull the Thermostat off the mounting plate, then place it back on.
Instinct:
- Gently pull the bottom right-hand button below the rocker out 1/4". Then, press the button back in.
Instant Switch:
- Remove the battery, then place it back in.
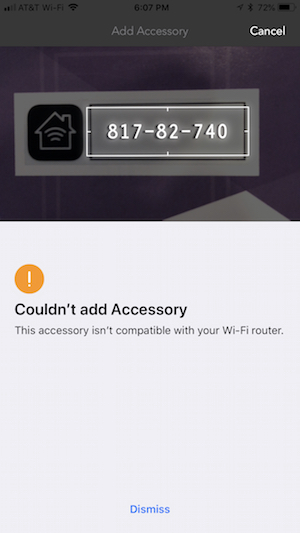
During the setup process, you may see the error, “This accessory isn't compatible with your Wi-Fi router.” This notification usually occurs when your iOS device is not connected to the 2.4GHz network band and does not necessarily mean the router is incompatible.
Follow these steps to connect your iOS device to a 2.4GHz network for setup. Note: After the product setup is complete, you may move your phone back to a 5GHz network.
- Open your iOS settings app and tap Wi-Fi.
- If you have a 2.4GHz network option, select that. Otherwise, you may need to contact your internet service provider or router manufacturer for help identifying the 2.4GHz network.
- Once you are on the right network, the network information will be handed off to the product automatically.
- Return to the iDevices Connected App.
- Add the accessory again.
- Once the setup and any firmware updates are completed, you may reconnect your iOS device back to the 5GHz network.
After making certain changes to your Wi-Fi® network, your iDevices Products may be unable to communicate with the app, home assistants, and other connected services.
These changes can include:
- Installing a new router and/or access points
- Upgrading firmware on the router and/or access points
- Changing the network name (SSID)
- Changing the network password
When this occurs, the LED night light on your iDevices products will blink orange, or the Thermostat display will show the no Wi-Fi symbol to indicate that it can no longer find the network it was once paired with.
Before changing network equipment, please review the most current network requirements and router compatibility list here: Wi-Fi And Network Compatibility.
When a new router is installed, it may be possible to make the SSID and password exactly the same as it previously was. In some instances, the products will see this new network as the same one it was connected to previously and products may reconnect without issue. Refer to your router's manual for instructions on adjusting the SSID and password.
After setting the SSID and password to what it was previously, reboot the iDevices product by unplugging it and plugging it back in or by pressing the reboot button on any in-wall products. Verify that the LED returns to its normal night light color and the product can be controlled in the iDevices Connected app.
When the settings on the new router are too different from the previous one, the products may not reconnect and will continue to flash orange or display the no Wi-Fi symbol. In this situation, the iDevices products must be reset and setup again to connect to the new Wi-Fi network.
To learn how to reset and reconnect your iDevices Dimmer Switch, visit: Resetting Dimmer Switch
When the iDevices Connected app says "iCloud is Synchronizing," this indicates that your iOS device is attempting to sync home data from your iCloud account. While this sync is in process, Apple's HomeKit platform will not allow the product setup to proceed.
Typically, the issue resolves itself after several hours. Please wait for a few hours and then try again.
If the issue persists settings may need to be adjusted, try the steps below:
- Open your iOS Settings app
- Tap your name at the top of the Settings app
- Tap iCloud
- Ensure Keychain and Home are both turned ON
- Check the iDevices Connected app, if "iCloud is Synchronizing" has disappeared, continue with product setup.
If "iCloud is Synchronizing" continues to show:
- Open the Apple Home App which will show “Loading Accessories and Scenes."
- After approximately 30 minutes, the option "Reset Home Configuration..." will appear at the bottom of the Home app.
- Tap "Reset Home Configuration..." to reset the Home data.
- Once the reset is complete, you can return to the iDevices Connected app to set up your product.
Compatibility
Requirements
- Home Wi-Fi® (802.11 B/G/N)
- None, WPA or WPA2 (AES) Network Security
For more details on router compatibility and changing your router security settings,click here
All iDevices products are certified by the Wi-Fi Alliance®. The certification doesn't guarantee iDevices products work with all routers. You can verify compliance on the Wi-Fi Alliance website -www.wi-fi.org- or look for this logo on your networking equipment to ensure compliance:
Note: Due to firmware, router and mobile device updates, compatibility may change at any time.
- Heating: 1 and 2 Stages (W1, W2)
- Cooling: 1 and 2 Stages (Y1, Y2)
- Heat Pump: 1 and 2 stage with Aux or Emergency Heat (O/B, Aux/E)
- Fan Control: G
- Humidification and Dehumidification
- Power: C (required), RH, RC
- Converts to Fahrenheit or Celsius
- Home Wi-Fi® 802.11b/g/n at 2.4 Ghz
- None, WPA or WPA2-PSK (AES) Network Security
- Free iDevices® Connected App
- HomeKit requires an iPhone, iPad or iPod touch with iOS 10 or later.
- Power Input: 24VAC with "C" Common Wire
iOS:
- HomeKit™ Requires an iPhone, iPad, or iPod touch with iOS 10 or later
- iCloud® account using iCloud Keychain®
- Requires an Android™ 4.3+ device with Bluetooth® technology
- Google Account to sync home data and device names across devices
- Free iDevices Connected App
Using the iDevices Connected app, users can securely access and control iDevices products from anywhere through our own encrypted IoT infrastructure. The iDevices Connected app automatically allows you to control your iDevices products when you're away from your home Wi-Fi network.
For HomeKit™ features such as Siri® voice control, an Apple TV® (3rd generation or later) is required for use outside of your home. Ensure Apple TV® is signed in with the same iCloud® account on your iOS device, and that Keychain® is turned on.
For users with an iOS device running iOS 10 or later, that would like to remotely control HomeKit compatible accessories with the Apple Home app, an Apple Home Hub is required. Devices that can be setup as an Apple Home Hub are: Apple TV 4K, Apple TV 4th generation with tvOS 10 or later, HomePod, or iPad with iOS 10 or later. The device you set up as a home hub must remain in your home, connected to your home Wi-Fi network, plugged into power and powered on.
For more information on using an Apple Home Hub: Click Here
To learn more about the iDevices Connected app setup and compatibility, visit the iDevices Connected app support page here
Remote Access Requirements
Use Instinct remotely with the Amazon Alexa app.
All other produts work remotely through the iDevices Connected App.
Instinct
Use the Amazon Alexa app to access and control your Instinct remotely. For more information on controlling Instinct, visit Controlling Instinct in the Amazon Alexa app
Switch, Outdoor Switch, Socket, Thermostat, Wall Outlet, Wall Switch and Dimmer Switch
Using the iDevices Connected app, users can securely access and control iDevices products from anywhere through our own encrypted IoT infrastructure. The iDevices Connected app automatically allows you to control your iDevices products when you're away from your home Wi-Fi network.
For HomeKit™ features such as Siri® voice control, an Apple TV® (3rd generation or later) is required for use outside of your home. Ensure Apple TV® is signed in with the same iCloud® account on your iOS device, and that Keychain® is turned on.
For users with an iOS device running iOS 10 or later, that would like to remotely control HomeKit compatible accessories with the Apple Home app, an Apple Home Hub is required. Devices that can be setup as an Apple Home Hub are: Apple TV 4K, Apple TV 4th generation with tvOS 10 or later, HomePod, or iPad with iOS 10 or later. The device you set up as a home hub must remain in your home, connected to your home Wi-Fi network, plugged into power and powered on.
For more information on using an Apple Home Hub: Click Here
Wi-Fi And Network Compatibility
An adequate Wi-Fi network is required to sufficiently operate connected products.
Consider including additional access points for buildings with concrete walls and ceilings, as those can block signal.
Be sure Airtime fairness or Airtime Quality settings are disabled on your router.
Products should be set up on a 2.4GHz network band.
iDevices products require a home Wi-Fi®network with a 2.4 GHz network band (802.11 B/G/N)
Most routers have two network bands, 2.4 GHz and 5 GHz. The 5 GHz network band has faster data speeds, which is great for tasks like browsing the internet and streaming content such as video or gaming. However, 5 GHz has a shorter signal range from the router.
The 2.4 GHz network, while slightly slower in speed, has a much longer signal range from the router making it ideal and more dependable for smart home products. Most smart home products require the 2.4 GHz network band, as this allows users to control products farther from the router and doesn't require continuous streaming.
- Instinct supports the network security setting WPA2 with AES encryption.
- All other iDevices products support None, WPA, or WPA2 with AES encryption.
Additionally, many routers have a setting called “Airtime Fairness” or "Airtime Quality," which often causes products to be unable to join the Wi-Fi network. Typically, this setting is located in the Wireless section of your router settings under the Advanced or Professional tab and is enabled by default. We recommend disabling this setting.
Most routers allow you to access and adjust settings via a web browser or app. Please consult the router's user manual to learn how to connect to your router and adjust its settings.
_______________________________________
The following routers are known to not currently be compatible with iDevices products:
- Actiontec MI424WR
- ARRIS EA9200
- ARRIS TG1672
- ARRIS TG862
- ARRIS TG1682G
- ASKEY Wave2
- ASUS RT-AC1200
- Bell Home Hub 3000
- Business Class Routers
- Eero 6
- Eero Pro 6
- FiOS G1100
- Google Fiber
- Linksys AC1200
- Luxul Mesh systems
- Netgear Orbi (Firmware prior to 2.1.4.16)
- Spectrum RAC2V1K
- Technicolor TC8717T
- Ubee Routers
- Xfinity XB7 (Models CGM4331COM and TG4482A)
Note: Due to firmware, router and mobile device updates, compatibility may change at any time.
If you have questions about the compatibility of your router with iDevices products, please contact our Customer Experience Team at Support@iDevicesinc.com.
iDevices Switch, Outdoor Switch, Socket, Wall Outlet, Wall Switch, and Dimmer Switch are certified by the Wi-Fi Alliance®. The certification doesn’t guarantee iDevices products work with all routers. You can verify compliance on the Wi-Fi Alliance website - www.wi-fi.org - or look for this logo on your networking equipment to ensure compliance:
iDevices products require adequate Wi-Fi strength in the home that covers the product installation area and can should also be able to support a number of connected products and devices.
A stable and capable Wi-Fi network is important when thinking about building a smart home. All routers have a client limit, meaning how many products or devices are connected to the router. Some client limits are very high and therefore are a good choice for your smart home. Many routers supplied by your Internet Service Providers (ISP), and often older routers are not designed to support multiple smart home products. This may result in a difficult setup experience, or even products dropping network connections randomly.
If you have an existing network:
Confirm that your existing network meets the requirements for supporting a smart home, that you have a 2.4GHz band available, and that the Wi-Fi signal is strong in the areas of your home where you plan to install your connected products.
If a network does not yet exist:
When necessary, the physical product installation can be completed before a Wi-Fi network is in place.
Determine if you require a standard consumer network or a larger, professional network setup as noted below. If you have a larger home, you may need to consider multiple access points (APs) throughout the home to ensure the signal is strong and broad. Also consider including additional access points (APs) for buildings with concrete walls and ceilings, as those will also block the Wi-Fi signal. If you have questions about the compatibility of your current router or are looking for router recommendations, please contact the iDevices Customer Experience Team at Support@iDevicesinc.com
Standard Consumer Network Recommendations
Consumer network hardware works well in typical-sized homes with less than 50 connected products. We recommend a mesh network such as Google Wi-Fi or Eero to ensure proper coverage.
Professional Network Recommendations
For larger or more complex structures with more than 50 or so connected products, a more professional hardware setup may be appropriate. These typically include running Cat 5 or 6 throughout the home along with setting up multiple gateways and access points.
Router Setup Tips:
- Set products up on a 2.4 GHz network band, 802.11 b/g/n by having your phone connected to the 2.4GHz network before app pairing.
- Set router network security to None, WPA or WPA2 with AES encryption.
- Guest networks are not supported.
- Be sure Airtime/Wireline Fairness is disabled on the router, when applicable. This feature should be turned off prior to product setup.
- Access points should be set up no more than 20'-30' apart and share the same network name.
After making certain changes to your Wi-Fi® network, your iDevices Products may be unable to communicate with the app, home assistants, and other connected services.
These changes can include:
- Installing a new router and/or access points
- Upgrading firmware on the router and/or access points
- Changing the network name (SSID)
- Changing the network password
When this occurs, the LED night light on your iDevices products will blink orange, or the Thermostat display will show the no Wi-Fi symbol to indicate that it can no longer find the network it was once paired with.
Before changing network equipment, please review the most current network requirements and router compatibility list here: Wi-Fi And Network Compatibility.
When a new router is installed, it may be possible to make the SSID and password exactly the same as it previously was. In some instances, the products will see this new network as the same one it was connected to previously and products may reconnect without issue. Refer to your router's manual for instructions on adjusting the SSID and password.
After setting the SSID and password to what it was previously, reboot the iDevices product by unplugging it and plugging it back in or by pressing the reboot button on any in-wall products. Verify that the LED returns to its normal night light color and the product can be controlled in the iDevices Connected app.
When the settings on the new router are too different from the previous one, the products may not reconnect and will continue to flash orange or display the no Wi-Fi symbol. In this situation, the iDevices products must be reset and setup again to connect to the new Wi-Fi network.
Click on the product below to learn how to reset and reconnect your iDevices product:
Need Further Assistance? We're Here To Help.
Our Customer Experience Team is available Mon - Fri 9am - 5:30pm EST